Looking for the POP and IMAP settings for Cox email? Cox offers a convenient way to manage your email from within any email program. Setting up Cox Email on Outlook or another email program is easy if you follow the steps correctly . You can access and manage all of your correspondence in one email program.
Setup Your COX Email Fast:
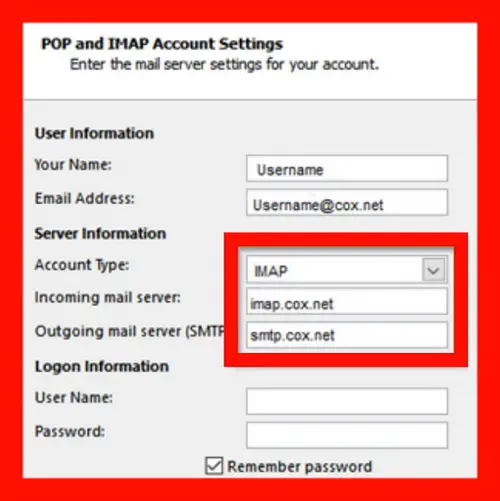
Incoming Mail Server Address = imap.cox.net
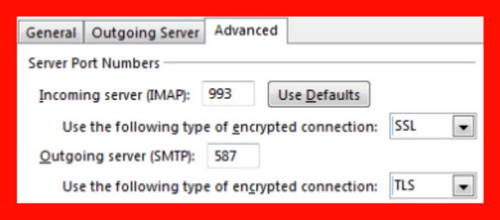
Incoming Mail Server Port = 993
Outgoing Mail Server Address = smtp.cox.net
Outgoing Mail Server Port = SSL or TLS Encryption: 465 or 995 = TLS only or no encryption: 587
Enter in pop.cox.net in the email server area
You can set up cox email on any computer, tablet or phone. It’s easy once you have your account information and follow this easy guide to set it up. Cox.net provides IMAP access to your Cox.net email account. You can connect to your email all desktop email clients. Once you’ve added your Cox account, you’ll be able to check all of your emails from one place.
Follow these steps below to set up Cox Email…
All the POP and IMAP setting are here to use in any email program if you have cox for email.
Common Cox Email Settings – POP, SMTP, & IMAP
Incoming Mail Server Address = imap.cox.net
Incoming Mail Server Port = 993
SSL = Yes
Username = Most of the time, your email address is your username.
Password = Please enter your Cox.net password. This is the same username you use to log into cox.net.
Outgoing Mail Server Address = smtp.cox.net
Outgoing Mail Server Port = SSL or TLS Encryption: 465 or 995 = TLS only or no encryption: 587
 Set Incoming server (IMAP) to 993 with SSL encryption,
then set Outgoing server with TLS encryption
Authentication Required = Yes
Username = Most of the time, your email address is your username.
Password = Your Cox password. This is the same password you use to log into cox.net.
 COX POP and IMAP Account Settings
Simple step by step to add cox email:
(When using Outlook with COX)
1 Open Microsoft Outlook and select the “File” tab.
2 In Account Information, select “Add account.”
3 Click “Manually Configure Server Settings” and select the “Next” button.
4 Click “Next” on the “Internet E-mail” button.”
5 Complete the required fields under the User Information section, including your full email address and use cox.net.
6 Select the “POP” option from the drop-down menu under Account Type in your email account settings.. Enter in “pop.cox.net” in the email server area and “smtp.cox.net” in the outgoing mail server.
7 Type your Cox email address and password into the Login section. Check the Remember Password box if you want Outlook to store your credentials.
8 Select the “More Settings” button.
9 Click on the “Advanced” tab and select SSL in the Server Port Numbers section for Outgoing Server SMTP. Type in “465” for the SSL.
10 In the Incoming Server POP3 section, check The Server Requires an Encrypted Connection Choose “SSL” and type in port 995.
11 Click Next to test the settings and then click Finish.
If you use Cox for your email service, be sure to configure your account correctly and using the exact IMAP and POP settings. Once you set up Cox Email on Microsoft Outlook, you can use it as your primary email client for all of your needs on any computer with internet access.


Leave a Reply