Cut the power, check for a jammed object against the impeller plate, and clear it by hand — that solves a Waste King garbage disposal making loud grinding noise more often than any other fix. Waste King’s reset and jam-clearing setup isn’t identical to InSinkErator’s, though, so it helps to know what you’re working with before you reach for a wrench.

A Waste King garbage disposal making loud grinding noise is usually a hard object caught against the impeller plate, not a failing motor. Cut power first, then use the offset wrench in the bottom hex hole (on models that have one) to rock the flywheel free — most jams clear in under ten minutes, at no cost.
- Not every Waste King model has the offset-wrench hex hole InSinkErator disposals use — check the bottom of the unit before assuming that tool’s an option.
- A grinding sound that comes and goes with load usually means something’s jammed; a steady grind or squeal with nothing running usually means the mount or the bearings.
- If the flywheel won’t turn at all by hand after power’s cut, that’s past a home fix.
- A cracked anti-vibration mount can sound just as bad as a real jam, but it’s a $10-20 part, not a new disposal.
| Cause | Likelihood | Fix Cost | DIY Time |
|---|---|---|---|
| Object jammed against impeller | Most likely | Free | 5-10 min |
| Cracked anti-vibration mount or splash guard | Fairly common | $10-20 | 20-30 min |
| Worn flywheel or shredder ring | Less common | $25-40 | 30-45 min |
| Failing motor bearings | Rare | $90-150 (new unit) | Pro recommended |
The Grinding Sound That Only Happens Under Load
That harsh, metallic scraping you hear right when food goes down — then quiet again once the sink’s empty — usually means something is caught between the impeller plate and the grind ring, not the motor failing. Glass, a bottle cap, a peach pit, or a small bone can slip past the splash guard and turn every load into a clunk-clunk-clunk instead of a smooth hum, often right before the disposal bogs down or trips the reset. It’s the same kind of mechanical jam I chased for 19 years on Air Force aircraft before I ever touched a disposal — the logic barely changes between machines. Don’t reach for a screwdriver to knock it loose through the drain; that’s a fast way to crack the flywheel and turn a free fix into a full replacement instead. Follow this sequence instead:
- Cut power at the wall switch or breaker — never reach into the disposal while it’s plugged in.
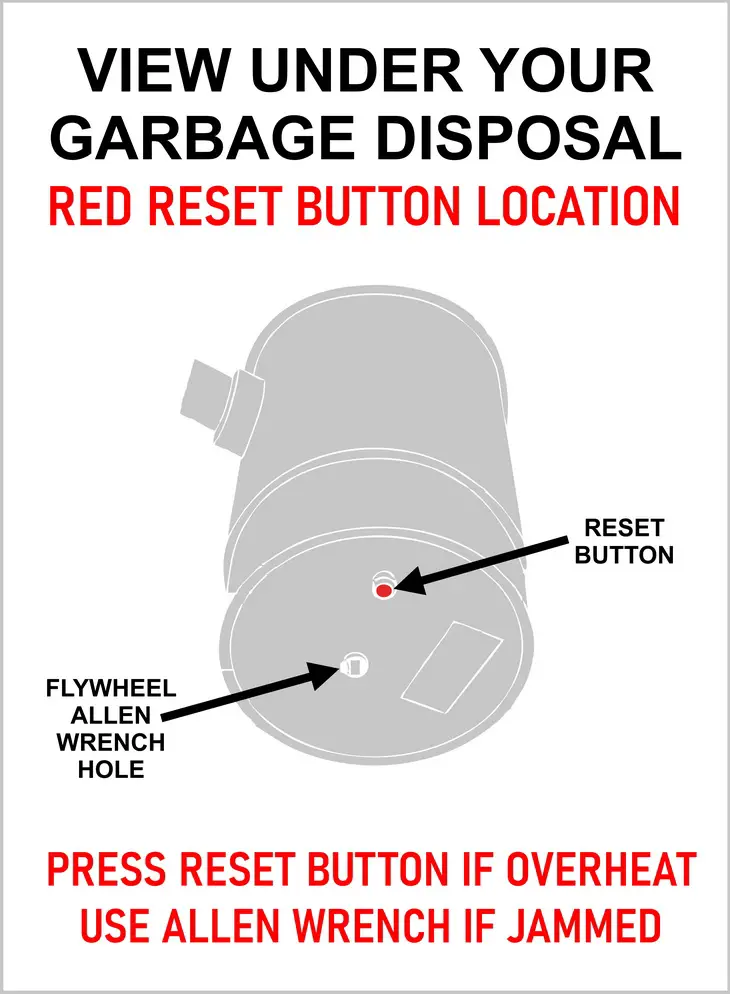
- Use the offset wrench in the bottom hex hole, if your Waste King has one, to rock the flywheel free from underneath.
This is close to the same failure mode covered in Glass In Garbage Disposal – Jammed And Not Working, just with a different object doing the jamming. If yours hums steadily instead of grinding, that’s usually a stuck flywheel with nothing rattling around inside, and I cover that separately in How To Fix A Garbage Disposal Humming? For a wider troubleshooting checklist that also covers leaks, smells, and reset problems, the complete broken garbage disposal checklist is worth a look too.

How to Clear a Jam Without Damaging the Flywheel
Clearing a Waste King garbage disposal making loud grinding noise usually takes less than ten minutes once you find the object and free the flywheel. Work through these steps in order:
- Cut power at the wall switch or the breaker. Never reach into the disposal while it’s plugged in.
- Shine a flashlight down through the drain opening and look past the splash guard for anything catching the light — glass, a bottle cap, a fruit pit.
- If you can see the object, lift it out with tongs or needle-nose pliers. Keep your hand out of the drain the whole time.
- Check the bottom center of the disposal for a hex-shaped hole. If your model has one, insert the offset wrench that came with the unit.
- Rock the wrench firmly back and forth until the flywheel spins freely in both directions.
- Remove the wrench, restore power, and press the red reset button on the housing before running water and testing the disposal.
The RepairClinic Waste King troubleshooting guide walks through this same reset sequence with photos, if you’d like a second reference before you start.
Steady Grinding or Squealing Even When It’s Empty
If the disposal grinds, squeals, or rattles even with the sink empty and nothing running, that points to the rubber anti-vibration mount or splash guard gasket wearing out — not a jam and not the motor. Waste King fits a rubber gasket between the sink flange and the disposal body to kill vibration noise. Once it cracks or stiffens with age, the whole unit rattles against the mounting ring every time it runs. On the quieter Sound Seal models, that rattle actually stands out more, since the insulated housing makes the motor itself so quiet by comparison. You’ll notice it as a buzz or clatter coming from where the disposal meets the sink, not from inside the grind chamber. Honestly, it sounds a lot like loose change tumbling in a dryer.
Tightening the three mounting screws evenly around the ring sometimes quiets it down for a while, but if the rubber’s actually cracked, the noise comes back within a few weeks. Replacing the gasket runs $10-20 for the part and is usually a 20-30 minute job with no wiring involved. Compared to $90-150 for a full disposal, that’s the cheaper problem to have. PartSelect’s noisy-disposal breakdown covers this same mount-versus-motor distinction if you want a second opinion.
Replacing a Cracked Anti-Vibration Mount
Once you’ve confirmed the mount is the culprit and not a jam, the swap is a short job with the disposal disconnected from its drain and trap. Follow this order to avoid dropping the unit on your foot halfway through:
- Support the disposal body with one hand and loosen the three mounting lugs on the ring above it.
- Twist the mounting ring counterclockwise until the disposal drops free from the sink flange.
- Peel the old rubber gasket off the mounting ring and wipe away any built-up grime underneath.
- Press the new gasket into place, seated evenly all the way around the ring.
- Lift the disposal back into position and twist clockwise until it locks against the ring.
- Reconnect the drain lines, restore power, and run water with the disposal on to check for leaks and confirm the noise is gone.
Here’s what that flywheel jam and the offset-wrench fix actually look like in practice — worth watching once before you try it yourself:
This video walks through checking a Waste King disposal for a jammed impeller, using the offset wrench to free a stuck flywheel, and testing the reset button before reassembly. It’s a useful visual reference if you’ve never had the unit unplugged and looked at the underside before.
Does a Grinding Garbage Disposal Mean It’s Ruined?
Not usually, and this is where Waste King’s design works a little differently than most competitors. InSinkErator built its whole “Jam-Buster” reputation around the hex-wrench port on the bottom of nearly every unit it makes — Waste King didn’t standardize that the same way. Older EZ-mount Waste King units and some budget-tier models skip the hex hole entirely, so if you’re down there with a flashlight and can’t find one, you’re not doing anything wrong — it’s genuinely not there on your model. On those units, the reset button near the electrical connection is your main recovery tool, and freeing a jam means removing the disposal from the mount or reaching up through the drain with tongs instead of the wrench trick. The higher-tier Legend series units generally include the offset-wrench port, which is worth knowing before you assume a fix guide written for InSinkErator applies to your exact model.
A worn flywheel or shredder ring is less common, but it happens on units that have ground a lot of fibrous scraps — celery, corn husks, banana peels — over several years. If yours is past that point, a full unit swap often makes more sense than parts and labor; our picks for the best garbage disposals to buy and install yourself covers solid replacements at every price point. And if slow draining shows up alongside the noise instead of a clean stop, that’s usually a separate clog issue — see our guide to a disposal that’s draining slowly for that fix specifically.
Frequently Asked Questions
Why is my Waste King garbage disposal making loud grinding noise?
Most of the time it’s a hard object like glass, a bottle cap, or a fruit pit caught between the impeller plate and the grind ring. Cut power, check with a flashlight, and use the offset wrench if your model has one.
Is it safe to run a grinding disposal until I can fix it?
No. Running it while something’s jammed puts extra strain on the motor and can crack the flywheel or bend the impeller, turning a simple fix into a full replacement.
Can I use ice cubes or Drano to fix a grinding disposal?
Ice cubes can help sharpen the impeller blades over time, but neither ice nor drain cleaner clears a solid object that’s physically jammed. You still need to cut power and remove the object by hand.
How do I know if my Waste King has a hex-wrench reset option?
Look at the bottom center of the unit for a hex-shaped hole. Higher-tier Legend series models usually have it; older EZ-mount and budget models often don’t, and rely on the reset button and manual removal instead.
When should I stop trying to fix it myself and call a plumber?
If the flywheel won’t turn at all by hand once power is cut, or the grinding continues after you’ve cleared every visible object, that’s past a home fix and worth a professional look.

Written by Keith Schneerer
Certified Appliance Tech · Founder, RemoveAndReplace.com
Keith has spent 30+ years repairing machines, starting as a military mechanic and later maintaining food processing equipment before moving into appliance repair. He founded RemoveAndReplace.com to share field-tested repair advice.
More about Keith →