Most people can replace the thermostat on a Whirlpool refrigerator themselves in about 30-45 minutes once a multimeter confirms the cold control has failed — the part runs $35-55. Unplug the fridge, pull the knob and back panel, disconnect the capillary tube and wiring, swap in the new thermostat, then test the compressor cycle before closing it up.
 Replacing the thermostat is a repair most homeowners can handle themselves on a Whirlpool refrigerator that’s not cooling the way it used to.
- Test before you buy — a two-minute multimeter check confirms the thermostat is actually the failure before you spend $35-55 on a part you might not need.
- Mechanical dial models (with a capillary tube) and digital touch-panel models use completely different parts — know which one you have before ordering.
- The OEM thermostat assembly WP2198202 fits a wide range of older Whirlpool and Kenmore-badged dial models, even across model numbers that look nothing alike.
- Budget 30-45 minutes your first time — a 1/4-inch nut driver and needle-nose pliers are the only tools most people need.
- The capillary tube has to go back exactly as it came out — more on that before the numbered steps below.
The Cold Control Thermostat Fails More Than Anything Else Nearby
On most Whirlpool refrigerators with a manual temperature dial, a warm fridge usually comes down to the cold control thermostat. It’s a small switch with a capillary tube attached — a thin copper line filled with gas that runs from the control housing into the fresh food section. When that gas charge weakens, or the switch contacts burn out, the compressor runs nonstop or barely turns on at all. Turning the dial colder won’t fix it, since the contacts wear out long before the compressor motor does. I’ve seen that pattern repeat plenty of times over 11 years of repairing commercial food service equipment. A weak evaporator fan or a bad start relay can cause similar symptoms, but the thermostat is the first part worth testing, and a $15 multimeter confirms it in under two minutes before you spend money guessing.
Work through these before assuming the thermostat is bad:
- Fridge not running at all? Check for power at the outlet first.
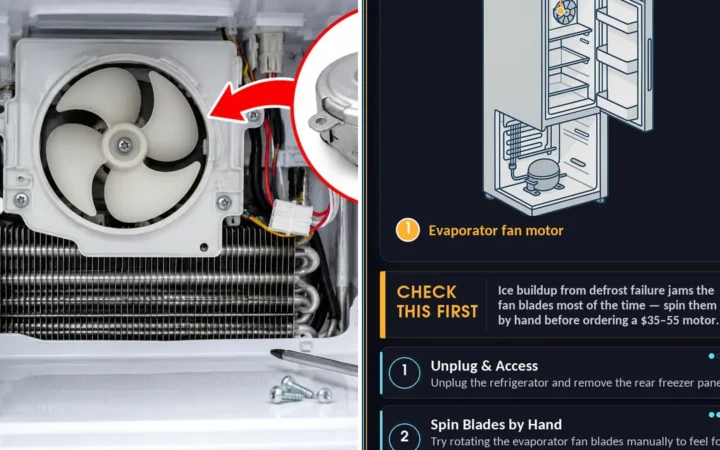
- Compressor running but nothing gets cold? Rule out a full stop in cooling before swapping parts.
- Still warm after that? Test the thermostat with a multimeter — it takes under two minutes.
The part itself is small, about the size of a matchbox. It has a round dial shaft on one end and a coiled capillary tube on the other, usually held to the control housing with a spring clip. Whirlpool and Kenmore-badged units built through the 2000s use a simple Cold/Colder/Coldest or 1-9 dial instead of a digital display. Almost all of them use the same OEM thermostat assembly, WP2198202, across dozens of model numbers. Watch for frost or condensation around the capillary tube’s mounting bracket. That’s often the first sign the contacts are starting to fail, so check for it before you reach for the multimeter.
| Cause | Likelihood | Fix Cost | DIY Time |
|---|---|---|---|
| Cold control thermostat | Most common | $35-55 | 30-45 min |
| Evaporator fan motor | Common | $45-90 | 45-60 min |
| Start relay/capacitor | Less common | $15-35 | 20-30 min |
| Control board (digital models) | Least common | $80-200 | 45-75 min |
One thing worth knowing: a fridge in a hot garage can throw off this test. The cold control might test fine on the bench and still act erratic once it’s back in place, since higher ambient temps change how fast the capillary bulb reacts. A borderline thermostat can pass at room temperature and still cycle wrong once the garage heats up. If the thermostat tests fine but the fridge still runs warm in a garage, don’t rule it out yet — run the test again after the space has had a few hours to warm up.
Mechanical Cold Control vs. Electronic Thermistor — Know Which One You Have
Older analog-dial Whirlpool top-mount and side-by-side models use the mechanical cold control with the capillary tube described above. These are the ones with a physical Cold/Colder/Coldest dial instead of a touchscreen. Not sure how those dial numbers relate to temperature? This breaks down what each setting actually does — worth a read before you assume the dial itself is broken.
Digital touch-control French door and side-by-side models built since the early 2010s use a different setup. Instead of a capillary tube and mechanical switch, they use an electronic thermistor — basically a temperature-sensing resistor. It’s wired to a control board that decides when the compressor runs.
The mechanical cold control covered in this repair is what you’ll still find on most top-freezer models — units like the WRT311FZDZ and WRT518SZFM, along with most Kenmore-badged double-door refrigerators, use that same capillary-tube design even though the model numbers look nothing alike. That’s why the WP2198202 assembly, or its direct predecessor part numbers, fits such a wide range of units. Digital display with error codes instead of a dial? You’re likely dealing with a thermistor and possibly a control board. That’s a different repair, usually cheaper, but not the one covered here. You can browse replacement thermostats by model to confirm which style yours uses.
How Do You Test a Refrigerator Thermostat With a Multimeter?
You can test this yourself in under two minutes with a basic multimeter. Here’s how:
- Unplug the refrigerator. This is a live electrical test right at the control housing, so don’t skip this.
- Remove the temperature control knob. Most pull straight off; a few have a small Phillips screw underneath.
- Set your multimeter to the ohms/continuity setting. Touch one probe to each terminal on the exposed thermostat.
- Rotate the shaft slowly from lowest to highest. Continuity should switch from open to closed at some point in that range.
- No change at all means the thermostat has failed. A change that happens but seems delayed or inconsistent points toward the same conclusion.
This repair looks scarier than it is. You won’t need anything exotic here — a nut driver and a pair of pliers cover almost the whole job.
Here’s a short walkthrough covering the same cold control design and testing method described above, including how the capillary tube routes behind the control housing on most of these models.
How to Replace Thermostat on Whirlpool Refrigerator Models: Step-by-Step
Most people grab needle-nose pliers and yank the capillary tube free. Big mistake. If you don’t note how it was routed and clipped against the fin first, you’ll waste time later — twenty minutes guessing at the bend radius trying to get it back into place. Seat it flush against the fin, or the new thermostat will cycle at the wrong temperature no matter how new it is (trust me on this one — it’s the annoying part). Whirlpool still routes that tube behind a bracket you can barely see without a flashlight and a mirror. It’s been the same clunky design for decades.
- Unplug the refrigerator and pull it away from the wall enough to work comfortably.
- Empty the fresh food shelves near the control housing so you have room to work without knocking anything over.
- Remove the temperature control knob — pull it straight off or remove the small retaining screw underneath.
- Remove the inner control housing panel with a 1/4-inch nut driver. Take a photo of the wiring before you touch anything — I used to skip this step and just trust my memory, and I don’t recommend that anymore.
- Disconnect the wire leads from the old thermostat terminals, noting or photographing which wire went where (I still keep a notepad for this exact reason).
- Carefully unclip the capillary tube from its mounting bracket without kinking or bending it sharply.
- Install the new thermostat and secure the capillary tube back into its bracket with the same clip.
- Reconnect the wire leads, reinstall the housing panel, and snap the knob back on.
- Plug the fridge back in, set the dial to a middle setting, and give the compressor 15-20 minutes to complete a full cycle before you judge whether it’s working.
Always unplug the refrigerator at the wall before removing the control housing — don’t just switch it off. The thermostat terminals are live any time the unit has power, even if the compressor isn’t currently running.

How Long Should It Take Before You Know the Fix Worked?
Don’t judge the repair in the first five minutes. Give the compressor a full cycle — usually 15-20 minutes — before checking the temperature. A healthy fridge should settle into the 37-40°F range in the fresh food section within a few hours, not immediately. If you set the dial to a middle number and the compressor still runs nonstop past that first cycle, or never kicks on at all, something else is going on — recheck your wiring connections before assuming the new part is bad.
The mechanical cold control assembly runs $35-55 through RepairClinic or similar parts suppliers. A service call for this same repair typically runs $150-250. If you’re comfortable with a nut driver and a multimeter, you can save real money. This job never requires touching the sealed refrigerant system.
- Call a pro instead if: your model uses the digital thermistor/control-board setup and you’re not confident diagnosing control-board fault codes.
- Call a pro instead if: the refrigerator is still under manufacturer warranty.
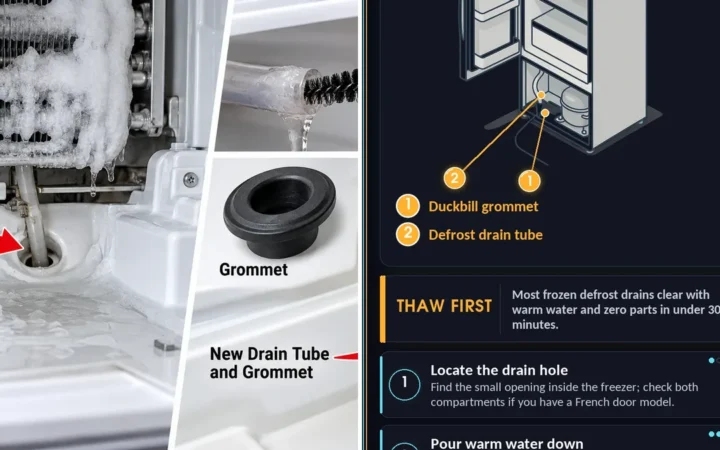
- Call a pro instead if: you’re also seeing heavy frost or ice buildup, or water dripping into the fresh food section, which usually points to a drain or sealed-system issue rather than a bad switch.
Keeping the New Thermostat From Failing Early
Don’t stack food right against the control housing wall. It traps heat around the thermostat. That makes the switch cycle more often than it should, and it shortens the part’s life. Once a year, check the dial’s accuracy with a cheap fridge thermometer instead of trusting the number on the knob. If the actual temperature runs a few degrees off from the setting, note it now. That way you’re not troubleshooting blind later. Fridge in a garage? That same ambient-heat effect on the capillary bulb mentioned earlier doesn’t go away with age — a thermostat that seemed fine in cooler months can start acting up again once summer heat returns.
How do I know if my Whirlpool refrigerator thermostat is actually bad?
The fastest check is a fridge thermometer and the dial itself. Turn the dial from lowest to highest and listen for the compressor to click on and off within a minute or two. If nothing changes no matter where you set the dial, I’d put my money on the thermostat before anything else.
Can I test a refrigerator thermostat without removing it?
Yes — pull the knob off, expose the terminals, and check continuity with a multimeter while rotating the shaft. You don’t need to pull the whole housing apart just to test it.
What’s the difference between a cold control and a thermistor?
A cold control is a mechanical switch with a capillary tube that opens and closes based on temperature. A thermistor is an electronic sensor that reports a resistance value to a control board, which then decides when to run the compressor. Older manual-dial Whirlpools use the cold control. Digital touch-panel models use the thermistor instead.
How much does it cost to replace thermostat on Whirlpool Refrigerator units?
The part itself runs $35-55 for the mechanical cold control assembly. A service call for the same repair typically runs $150-250, so doing it yourself saves real money if you’re comfortable with a nut driver.
Is replacing a refrigerator thermostat dangerous?
Not really — unplug it first and there’s no gas or refrigerant involved in this particular repair. I’ve never had this one go wrong as long as the fridge was actually unplugged, not just switched off at a smart outlet.
If you’ve been putting off learning how to replace thermostat on Whirlpool Refrigerator models because it sounds intimidating, it really isn’t. This is one of the few refrigerator repairs I’d tell almost anyone to try before calling for service. It’s cheap, the tools are basic, and the biggest risk is losing track of how that capillary tube was routed — the multimeter check up top only takes two minutes, so there’s no reason to skip it.

Written by Keith Schneerer
Certified Appliance Tech · Founder, RemoveAndReplace.com
Keith has spent 30+ years repairing machines, starting as a military mechanic and later maintaining food processing equipment before moving into appliance repair. He founded RemoveAndReplace.com to share field-tested repair advice.
More about Keith →