Pull the lower kickplate, swap the water inlet valve, and most LG dishwashers that won’t fill start working again. It’s a $25-$45 part, and the job takes 30-45 minutes with a screwdriver, a small wrench, and the water shut off. Before you buy anything, check the inlet screen filter and the water supply line first. A clogged screen mimics a dead valve, and it costs nothing to fix.
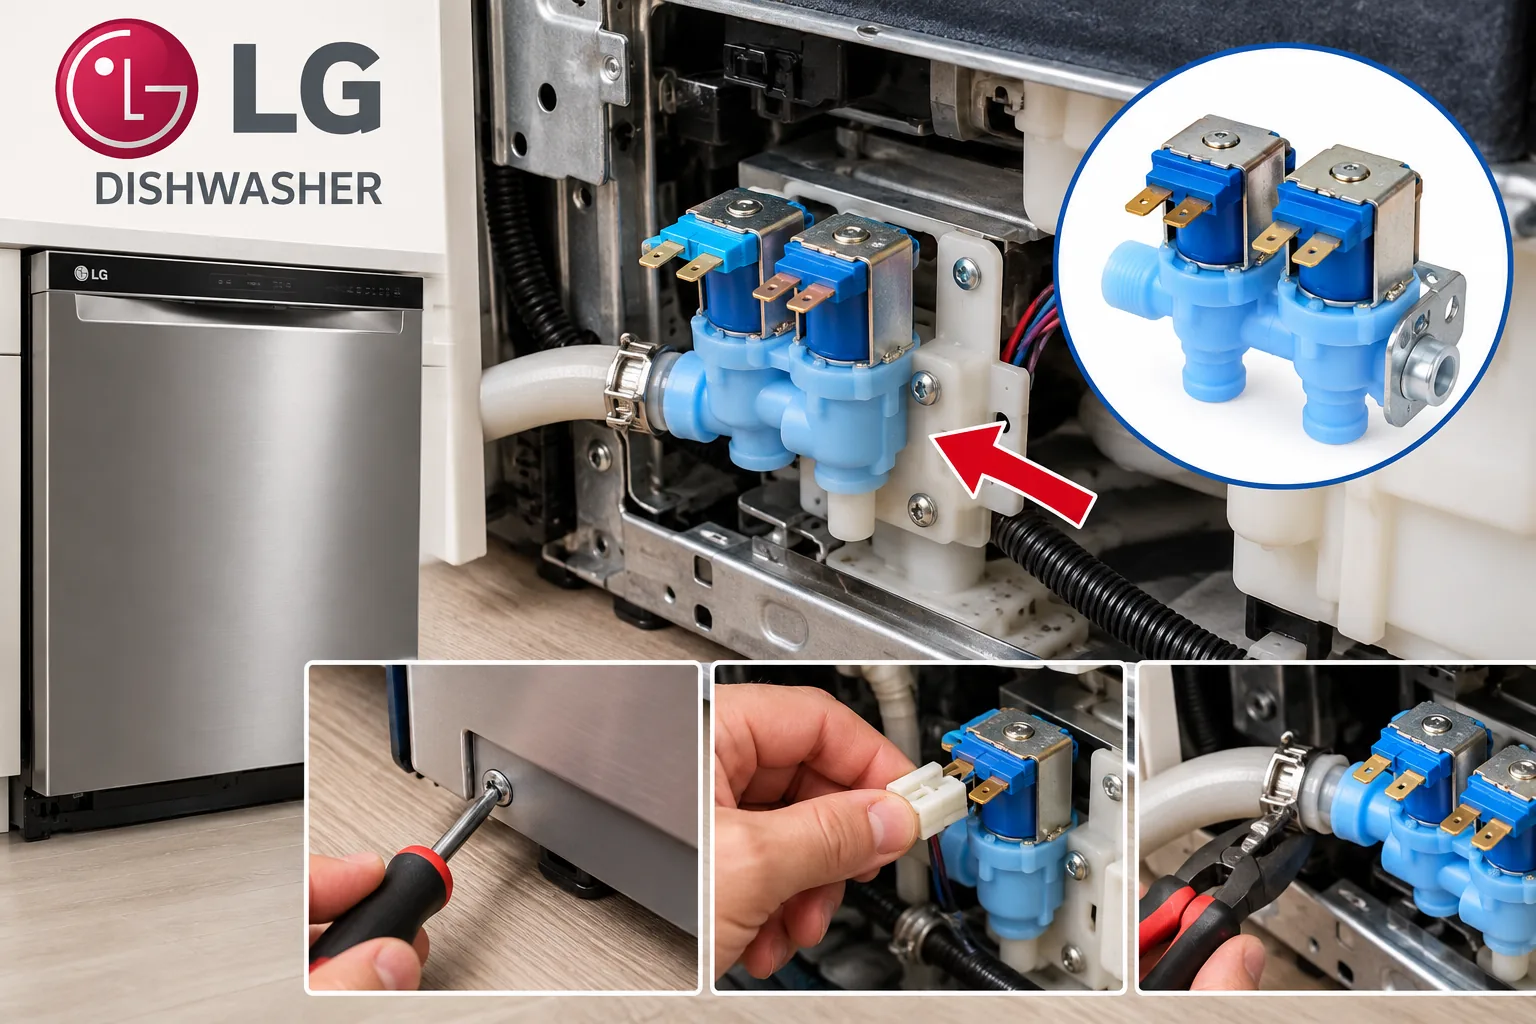
- Most fill problems trace back to the solenoid coil inside the valve going dead, not a mechanical jam
- A slow fill with the valve technically “working” points to a torn diaphragm seal, not the solenoid
- Check the screen filter on the water line first — it’s free and it’s a common culprit on older installs
- Some LG models use a dual inlet valve/guide assembly, so confirm which body style you have before ordering a part
- If the dishwasher still won’t fill after a new valve, don’t assume you got a bad part — see the float switch section below before ordering another one
| Cause | Likelihood | Fix Cost | DIY Time |
|---|---|---|---|
| Dead solenoid coil (valve won’t open) | Most Likely | $25-45 | 30-45 min |
| Torn diaphragm seal (slow/weak fill) | Common | $25-45 | 30-45 min |
| Clogged inlet screen filter | Common, often overlooked | Free | 10 min |
| Float switch or control board issue | Rare | $15-120+ | 30-90 min |
The Solenoid Coil Is Usually the Real Problem
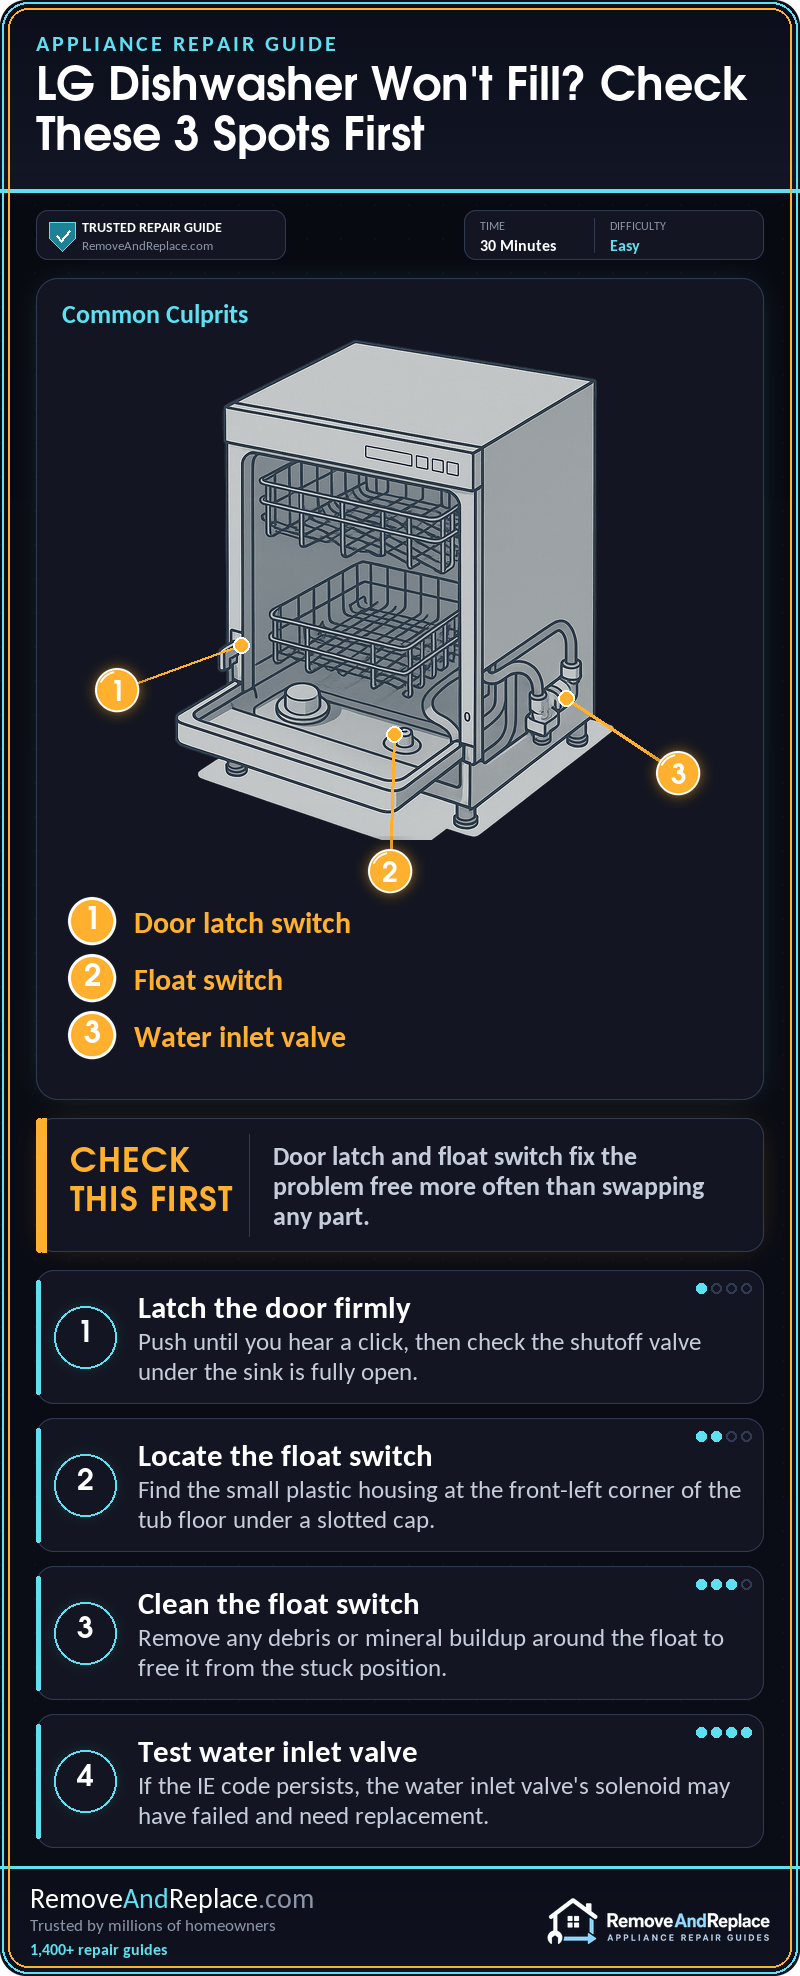
When an LG dishwasher won’t fill at all, the water inlet valve’s solenoid coil has usually burned out and stopped opening the valve. Water sits ready in the supply line, but nothing tells the valve to let it through. You can test this without tearing anything apart. Pull the lower kickplate, find the valve — the small block where the water line connects, usually front-left behind the door — and listen during the fill part of a cycle. A good coil hums or clicks faintly when it’s energized. Dead silence at the valve while the machine tries to fill is close to a confirmed diagnosis, even without a multimeter. If you’re going to replace inlet valve LG Dishwasher parts yourself, this is the failure you’ll hit most, and it’s the cheapest one to fix.
I trust what a part sounds like before I trust a diagnostic light — a habit left over from years working aircraft maintenance in the Air Force — and it still saves me from swapping parts that were never bad.
Is It the Valve, or Is Something Else Blocking the Fill?
The wrong assumption almost everyone makes is hearing “no water” and jumping straight to the pump or the control board, because that sounds more serious. A dishwasher needs water in the tub before the pump has anything to move, so if the machine sits silent and dry through the whole fill, the pump was never the real suspect. The valve, or whatever feeds it, is the problem.
Before you order a valve, don’t make the other common mistake — replacing the whole assembly when the actual blockage is the small mesh screen filter where the water line threads into the valve body. Sediment and mineral buildup clog that screen over the years, especially on well water or older supply lines, and it looks exactly like a dead valve: no water, no flow, no fill. Pull the line, pop the screen out with a small pick, rinse it under the tap, and reinstall. It’s a five-minute check that costs nothing and fixes the problem more often than people expect (it’s the first thing I check now, before I even look at the valve). If the dishwasher is also throwing a bE error code, that’s the control panel flagging a fill problem — it doesn’t mean the board itself is bad.
If your dishwasher does the opposite — filling too much or overflowing onto the floor — that’s usually a valve stuck partway open, and it’s covered in why dishwashers overflow onto the floor. For general no-fill troubleshooting beyond LG specifically, RepairClinic’s dishwasher-won’t-fill guide covers the broader symptom list.
Watch the Full Valve Swap
This video walks through pulling the kickplate, disconnecting the water line and wiring, and swapping the old valve for a new one. It’s a good visual check against the written steps below if you’ve never had the kickplate off before.
Replacing the Inlet Valve Step by Step
Shut off the water supply at the valve under the sink or at the main line feeding the dishwasher, and unplug the dishwasher or kill the breaker. Don’t skip this — I know it seems obvious, but skipping the water shutoff on “just a dishwasher” is how kitchen floors get mopped at 9pm. Here’s how to replace inlet valve LG Dishwasher parts start to finish:
- Remove the lower access panel. Usually two or three screws along the bottom edge, sometimes a couple more inside the door frame.
- Locate the inlet valve — the small solenoid block where the copper or braided water line connects, typically front-left of the tub.
- Disconnect the water line from the brass fitting on the valve. Have a towel ready; there’s always a little residual water in the line.
- Unplug the wire connector from the valve’s solenoid terminals — it’s a simple push-clip, no tools needed.
- Remove the mounting screws or bracket clip holding the valve to the frame, and pull the old valve free.
- Install the new valve in the same orientation, reconnect the wire connector, and thread the water line back onto the fitting by hand before snugging with a wrench. Don’t crank it down hard — just enough to seal without cross-threading the brass.
- Turn the water back on and check for drips at the fitting for a minute or two before reinstalling the kickplate.
- Restore power and run a short cycle to confirm it fills properly.
Budget 45 minutes the first time and closer to 15-20 once you’ve done it before. Some LG models use a dual inlet valve and guide assembly with two coils sharing one housing, so if only one function is affected — fill, or the rinse-aid feed — you may only need half the assembly. Check your model’s parts diagram before ordering; guessing wrong is how people order twice.
A Leaking Diaphragm Causes Slow Fills, Not No Fill
If the dishwasher fills but painfully slowly, or fills a little when the cycle isn’t even calling for water, the solenoid coil is doing its job but the rubber diaphragm inside the valve body has torn or hardened with age. That diaphragm opens and seals the water passage; the coil just triggers it. A worn diaphragm lets water seep past when the valve should be shut. Same part, different diagnosis path. Here’s how to check it before you order anything:
- Run a normal cycle and time how long the fill portion actually takes compared to the manual.
- Listen for the coil — if it hums or clicks normally but the tub still fills slowly, the coil isn’t the problem.
- Feel the valve body after the cycle ends. Warm to the touch usually means water is trickling past a worn diaphragm.
- Check between cycles for a faint trickle into the tub when nothing should be running.
- Replace the valve if two or more of these show up — the diaphragm isn’t sold separately, so the fix is the same part either way.
Rare Case: The Float Switch or Control Board Is Faking a Valve Failure
Every so often, someone replaces the valve, the machine still won’t fill, and they assume they got a bad part. Check the float switch first — the small cup-shaped sensor at the bottom-front of the tub that rises with water level. If it’s stuck down, often from a stray piece of glass or dish debris wedged under it, the control board reads it as “already full” and never energizes the valve, no matter how healthy that valve is. This shows up more often in households with kids or a lot of hand-washed glassware going through the machine. Lift the float by hand and see if it moves freely — it’s a five-second check that’s saved more than one unnecessary part order.
Always shut off the water supply and disconnect power before opening the lower panel. Water and a live electrical connection in the same footwell is not a corner worth cutting.
The valve itself runs $25-45 through a parts supplier like PartSelect — RepairClinic’s own valve replacement guide covers the same part number range if you want a second reference. A service call for this exact repair typically runs $150-250 once labor is added. This is one of the more forgiving jobs to replace inlet valve LG Dishwasher parts yourself — no refrigerant, no gas line, low electrical complexity. If your dishwasher is older and already showing other wear, run the numbers with the 50% rule for repair vs. replace before you spend money on any single part.
- Call a pro if you smell gas anywhere near the install (unrelated but worth checking any time you’re behind an appliance)
- Call a pro if the water line fitting is corroded or seized and won’t budge without excessive force
- Call a pro if you’ve replaced the valve and it still won’t fill — see the float switch check above before assuming the part is bad
Keep the Screen Filter Clean and This Won’t Happen Again
Once the new valve is in, rinse that inlet screen filter every 12-18 months, especially on hard water — the same one covered above, and the single habit that prevents most repeat “no fill” and “slow fill” complaints within a year or two of a valve swap. On well water, cut that interval to every 6-9 months — the valve fails from sediment choking it far more often than it fails from age.
I used to skip mentioning the screen filter and just tell people to replace the valve — it fixed the symptom, so why not. Then I kept seeing the same complaint come back within a year, and realized I was treating the symptom instead of the cause. I don’t skip that step anymore. And if your LG refrigerator’s ice maker has slowed down too, the cause is often the same idea — a restricted water supply rather than a dead part, covered in LG refrigerator ice maker problems.
Whoever decided to bury that screen filter behind a compression fitting instead of a quarter-turn cap deserves some blame for how often people skip cleaning it. It’s a two-minute job made annoying by design.
Frequently Asked Questions
How do I know if it’s the inlet valve and not the water supply itself?
Check that the supply valve under the sink is fully open and the line isn’t kinked first. More than one “bad valve” turns out to be a half-closed shutoff someone forgot about after a sink repair.
Can I test the valve with a multimeter before replacing it?
Yes. With the valve unplugged from power, test across the solenoid terminals for continuity. No continuity means the coil is dead, and you’ve confirmed the diagnosis before spending anything.
Does it matter which brand of replacement valve I use?
Stick with the OEM part number for your specific LG model. Universal aftermarket valves sometimes work fine, but a few leak at the fitting within months. For a $30 part, it’s not worth the gamble.
What if the new valve doesn’t fix the no-fill problem?
See the float switch section above before assuming you got a defective part — it trips up more people than a bad replacement valve ever does.
How long does the whole repair actually take?
Plan on 45 minutes the first time, mostly spent finding screws and getting the kickplate off. Once you’ve done it, the actual valve swap is closer to 15-20 minutes.

Written by Keith Schneerer
Certified Appliance Tech · Founder, RemoveAndReplace.com
Keith has spent 30+ years repairing machines, starting as a military mechanic and later maintaining food processing equipment before moving into appliance repair. He founded RemoveAndReplace.com to share field-tested repair advice.
More about Keith →