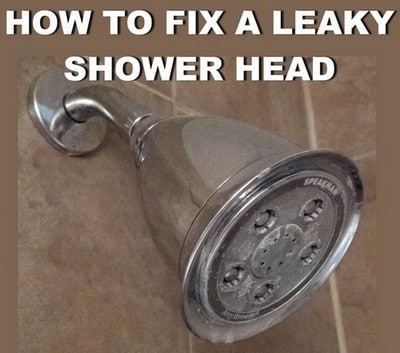
A shower head can leak in about four distinct ways, and each one points at a different part. Water spraying out of the threads where the head meets the arm. A slow weep from the swivel ball. Nozzles dribbling or shooting sideways. Or the maddening one — a steady drip long after you shut the valve off. Figure out which of those you’ve got and the repair basically picks itself.

A leaking shower head is usually hard water scale, not a broken part. To fix leaking shower head issues, shut off the water, unscrew the head counterclockwise, and soak it in white vinegar for at least two hours. While it soaks, wrap fresh teflon tape on the shower arm threads. Reinstall, tighten firmly, and test. Total cost is about a dollar.
The short version
- Vinegar is the safe soak. CLR and Lime-Away work faster but can strip the finish off a plated metal head — an all-plastic head is fine with either.
- Teflon tape goes on clockwise, three or four wraps. Wrapped the other direction it unravels as you thread the head back on.
- A cracked O-ring or rubber washer inside the head is the second thing to check, and it’s a $1–$3 part.
- If it still drips with the valve fully shut, the head isn’t your problem — the shower valve cartridge is.
| Cause | Likelihood | Fix Cost | DIY Time |
|---|---|---|---|
| Hard water scale clogging the nozzles | Most common | About $1 (vinegar) | 20 min + 2 hr soak |
| Old or missing teflon tape on the arm threads | Common | About $2 | 10 min |
| Cracked O-ring or rubber washer | Less common | $1–$3 | 10 min |
| Worn shower valve cartridge (drips with water off) | Least common | $15–$40 | 1 hour |
Water Sprays Out Where The Head Screws Onto The Arm
Most of the time, water shooting out of that threaded joint means the head itself is plugged with mineral scale. I always look at the nozzle face before blaming the connection, because a plugged head fakes a bad joint all day long — something 30+ years of hands-on repair work has drilled into me. Water has to go somewhere, and when the nozzle holes are choked with calcium and lime, the path of least resistance becomes the seam where the head screws onto the arm. Fixing a leaking shower head here takes a wrench, a bowl of white vinegar, and a roll of teflon tape. Shut the water off, unscrew the head counterclockwise, and soak it in vinegar for at least two hours. While it soaks, strip the old tape off the shower arm threads and wrap on fresh. Thread the head back on, snug it tight, and test it.
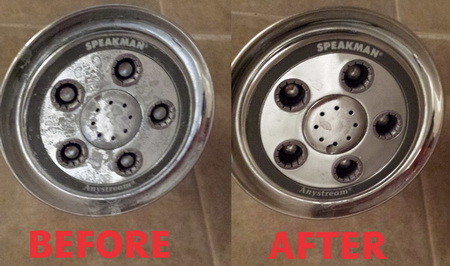
Flip the head over once it’s off and you’ll see exactly what the scale looks like: a crusty white or pale green ring built up around the rubber nozzle tips, and the tips themselves won’t wipe clean with your thumb anymore — they feel gritty and stiff instead of soft and springy. Behind the swivel ball there’s usually a small screen washer, and in hard water country that screen packs solid with sand-fine grit. Out here in the Phoenix area our water is brutally hard, and I’ve seen heads plug up in eighteen months that would’ve gone five years somewhere with soft water. If you’re in a hard water region, I’d assume scale first and you’ll be right far more often than not.
Don’t hang your weight on the shower arm. That arm threads into a drop-ear elbow inside the wall. Crank on it hard enough and you’ll snap the fitting behind the tile, and a $2 repair turns into cutting open drywall. Brace the arm with one hand while you turn the head with the other. And wrap a rag around the head before you put pliers on it — chrome gouges instantly.
Step 1 — Get The Head Off
With the water off, put a wrench or a set of pliers on the collar and turn counterclockwise. Some heads back off by hand once you break them loose; some are welded on with fifteen years of scale and you gotta lean into it. I keep my free hand braced on the arm the whole time — I’ve seen what a snapped elbow behind the tile costs, and it isn’t two dollars.
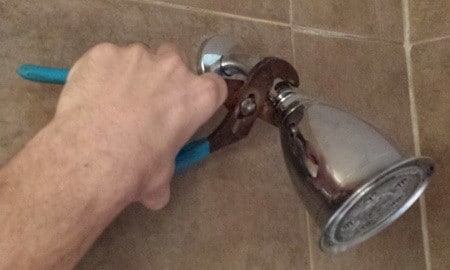
And while I’m on it — I don’t know why manufacturers still ship a chrome-plated plastic collar on a fitting you’re supposed to grab with a wrench. You either mangle the finish or you can’t get enough bite to break it loose. It annoys me every single time.
Step 2 — Soak It
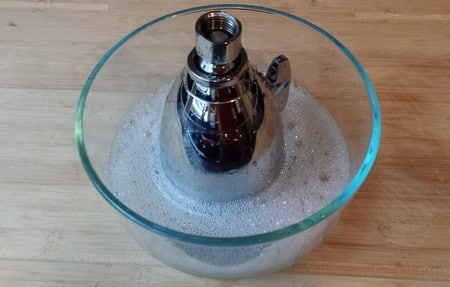
Get a glass bowl and fill it with white vinegar. Lime-Away and CLR work too, and they work faster, but vinegar is the safest thing to use here. CLR and Lime-Away can strip the metal finish right off a plated shower head, so use caution with those. If your head is all plastic, any hard water remover is fine with no worry.
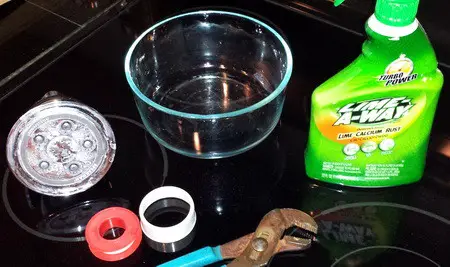
Let it soak at least two hours. Pour some of the vinegar or Lime-Away into the shower head too, not just around it — the buildup on the inside face is what’s actually blocking flow. On a badly scaled head I’ll leave it overnight, and I’ve never once regretted the extra time. If the soak doesn’t fully clear the deposits, work a toothpick into the nozzle holes and pop the gunk out. I used to try explaining pressure and cross-sectional area to people at this point and — you know what, never mind. Just clear the holes.
Step 3 — Fresh Teflon Tape On The Arm
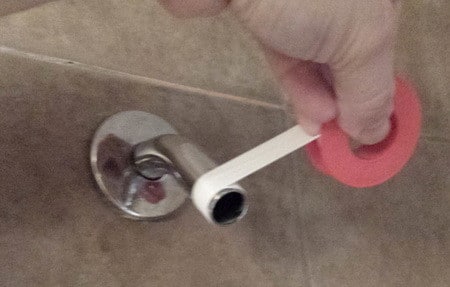
While the head is soaking, add fresh plumbers tape (white teflon tape) to the shower arm threads. This is the seal that keeps water from spraying out at that joint, and old tape is basically worthless. I strip every scrap of it off first, because I’ve never had fresh tape seal properly on top of old.
This is where most people screw up: they wrap the tape counterclockwise. Do that and the tape balls up and unwinds the second you start threading the head on. Look straight at the end of the arm and wrap clockwise, three or four turns, pulling it snug into the threads.
Step 4 — Reinstall And Test
Thread the clean head back on and tighten it down firmly. Run the shower and watch that joint for thirty seconds. If it’s still weeping, I give it another quarter turn and test again — a lot of joints just need that little bit more.
The Head Weeps From The Swivel Ball Instead
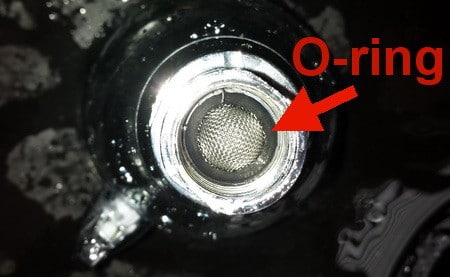
OK, so the threads are dry but you’ve still got water seeping out of the ball joint or the back of the head. That narrows it down to the O-ring or rubber washer inside. Pull the head off again and look inside the inlet — there’s a rubber ring seated in there. If it looks cracked, ripped, flattened, or distorted, it’s done. Pick up a replacement at any plumbing or home improvement store, seat the new one in the shower head, and put it back on. The part costs a couple bucks and the swap takes ten minutes.
I bring the old ring with me to the store instead of guessing at the size, and I usually buy two while I’m there since they’re pennies apiece. If you’d rather cross-check the part against your specific brand first, Delta’s own leaky shower head walkthrough shows what their seals look like, and Lowe’s has a parts-side version if you want to see what’s on the shelf before you drive over.
The Spray Is Uneven Or Shooting Sideways
That’s partially blocked nozzles, nothing more. Rub your thumb hard across the rubber tips while the water runs — half the time that alone clears it. If the pressure never really came back after a full cleaning, that’s a separate rabbit hole worth reading up on, because the restrictor or the supply side may be the actual culprit.
Why Does My Shower Head Drip Hours After I Turn The Water Off?
Still dripping with the valve shut all the way? Then the head isn’t your problem at all. Water is getting past the shower valve cartridge inside the wall and trickling down through the arm. No amount of vinegar, tape, or O-rings will touch that. You need to pull the handle, pull the cartridge, and either rebuild it or replace it — which is a different job and one I’d approach with the main water supply shut off. Our guide to fixing a leaky shower faucet handle covers that side of the wall in detail.
Now for the version almost nobody mentions, and I’ve chased it more than once. If the drip only shows up twenty or thirty minutes after somebody ran hot water, and the shower is dead quiet the rest of the day, you’re probably looking at thermal expansion. In a closed system — one with a pressure reducing valve or a check valve at the meter — heated water has nowhere to expand back to, so line pressure spikes hard for a while after the water heater cycles. A cartridge that seals fine at 55 PSI will let go at 120, drip for a few minutes, then stop on its own. Replacing the cartridge fixes the symptom. An expansion tank on the water heater fixes the cause, and if you’ve got dripping faucets in more than one room, that’s your tell.
A shower valve cartridge costs $15 to $40 and a plumber charges $150 to $250 to swap the same part — that’s a $135 difference for about an hour of your time. The head-side repairs above are cheaper still: a dollar of vinegar, two dollars of tape, three dollars for an O-ring.
Call a pro if:
- There’s no shutoff for the shower and you’d have to kill water to the whole house to work on it.
- The valve body moves or spins inside the wall when you pull on the handle.
- The shower arm won’t budge and the elbow behind the tile is turning with it.
Keeping It From Coming Back
Once a month, run your thumb across the rubber nozzle tips while the shower is running. Takes five seconds and it knocks the scale off before it hardens into a plug. Then do a full vinegar soak every six months — I do mine every three, because the water here in the valley is about as hard as it gets. You can skip pulling the head for the maintenance soaks: fill a sandwich bag with vinegar, rubber-band it over the head overnight, pull it off in the morning and run hot water for a minute.
That’s honestly the whole trick. Most of the leaking shower head calls I ever ran turned out to be a head nobody had cleaned since the day it went up.
Shower Head Leak Questions I Get Asked A Lot
Can I clean it without taking the shower head off?
Yes — the sandwich-bag-of-vinegar trick above works fine for maintenance. But if you’re chasing an active leak at the threads, I’d still pull the head, because you need to get fresh teflon tape on that shower arm and you can’t do that with the head in place.
Will new teflon tape by itself stop the leak?
Sometimes. But if the head is plugged, I find the tape just pushes the leak somewhere else.
How many wraps of teflon tape do I need?
Three or four, wrapped clockwise as you look at the end of the arm, pulled tight enough that you can see the thread ridges through the tape. More than that and you’re fighting the threads instead of sealing them.
Is CLR safe on a chrome shower head?
I wouldn’t. CLR and Lime-Away both work faster than vinegar, but they can strip a plated finish, and you don’t get that back. On an all-plastic head I don’t hesitate — use whatever hard water remover you’ve got. On anything chrome, brushed nickel, or oil-rubbed bronze, I stick with vinegar and just wait longer.
Should I just buy a new shower head instead?
Not on the first go. I’ve cleaned heads that looked completely shot and had them spraying like new two hours later, and it’s kinda satisfying when a dollar of vinegar saves a $60 fixture. If the plastic body is cracked or the swivel is sloppy and won’t hold position, sure, replace it. Otherwise I clean it first — worst case you’re out an afternoon.
If this repair went smoothly and you’re now eyeing other drips around the house, our plumbing basics guide covers the same kind of quick wins on faucets and drains, and I use that same find-the-source-first habit on a clothes dryer leaking water when a puddle shows up in the laundry room. Keep the roll of teflon tape somewhere you’ll find it again — you’re gonna want it.

Written by Keith Schneerer
Certified Appliance Tech · Founder, RemoveAndReplace.com
Keith has spent 30+ years repairing machines, starting as a military mechanic and later maintaining food processing equipment before moving into appliance repair. He founded RemoveAndReplace.com to share field-tested repair advice.
More about Keith →