A dripping tub or shower handle is almost always the cartridge behind the faucet — not the showerhead itself. Pull the handle, remove the cartridge, and match a replacement at the hardware store. The full cartridge runs about $20, the job takes under an hour, and nine times out of ten it stops the drip cold.
- The drip comes from the cartridge behind the handle — not from the showerhead, even though that’s where the water shows up.
- A worn spring and rubber washer inside the valve seat cause most of the leaking. Those cost a couple bucks.
- A complete replacement cartridge is around $20. Bring the old one to the store to match it — usually Moen, Delta, or Pfister.
- Shut off the water before you touch anything. Budget about an hour your first time.
- Load the new spring and washer onto a screwdriver to slide them into place — trying to set them by hand fights you the whole way.
Why Your Shower Faucet Is Dripping (And Where the Leak Actually Comes From)
Here’s the thing most people get wrong: the water drips out of the showerhead, so they assume the showerhead is bad. It almost never is. About 90% of the time, a dripping tub or shower is the stem cartridge leaking behind the handle, and inside that cartridge it’s usually a worn spring and rubber washer that let water sneak past the valve seat. I dealt with exactly this in the old basement bathroom, and once I had the handle off, there was really only one thing that could be leaking — the cartridge. So that’s what we replaced. I’ve been turning wrenches for 39 years, a good chunk of that fixing high-pressure commercial equipment where a nagging drip meant real downtime, and I can tell you the fix here is far simpler than the panic it causes. Pull the handle, pull the cartridge, match it, swap it, done. The complete cartridge is around 20 dollars. That’s the whole repair.
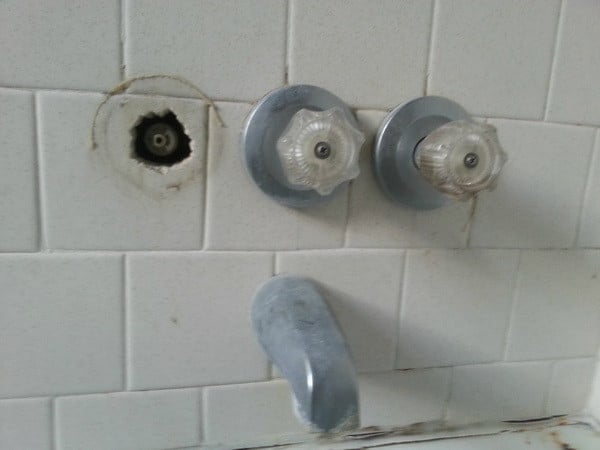
With the shower faucet handle removed, the exposed valve reveals exactly where the leaky shower faucet is dripping from behind the wall.
Everyone assumes a dripping shower means calling a plumber and dropping $150 on a service call. It doesn’t. This is an $18–20 cartridge and an hour of your Saturday, and if you’re comfortable holding a screwdriver you can absolutely do it yourself. I used to think anything behind a wall was pro-only territory — I told people that for years back when I was newer to home stuff. Then I actually took a shower valve apart and realized it’s just a cartridge sitting in a housing, no different in principle than the hundreds of valves I’d serviced on aircraft hydraulic systems in the Air Force. Same idea, way less pressure.
Step 1 — Shut Off the Water and Pull the Handle
Shut the water off before you do anything. If your bathroom has a shutoff valve, use it. If not, shut off the main to the house. Don’t just close the faucet handle and hope — the second you pull the cartridge, whatever’s in that line is coming out fast if the water’s still on. I’ve seen people soak a whole bathroom skipping this step.
Remove the shower faucet handle by loosening the screw. On most handles it’s a single set screw, sometimes hidden under a little decorative cap you pop off with a fingernail or a flathead. Once that screw’s out, the handle pulls straight off the stem. Set it somewhere you won’t knock it into the drain (gotta learn that one once).
Step 2 — Get a Good Look at What You’re Dealing With
With the handle off, you’ll see the trim plate and the cartridge stem sticking out. Take a close look here — this is where the leak’s been hiding the whole time. In our basement bathroom you could see exactly where water had been weeping behind the handle. It’s kinda satisfying, honestly, finally seeing the actual culprit after listening to that drip for weeks.
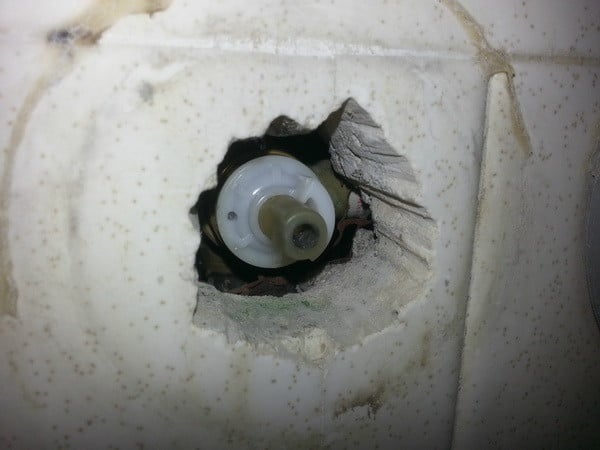
A close-up of the cartridge stem shows the exact leak point behind the shower faucet handle where worn seals let water pass.
Step 3 — Remove the Cartridge
Pull the cartridge completely out of the housing. Depending on your brand there may be a retaining clip or a packing nut holding it in — back that off first. Then the cartridge slides free. We removed the whole thing that was leaking and set it aside to take with us to the store.
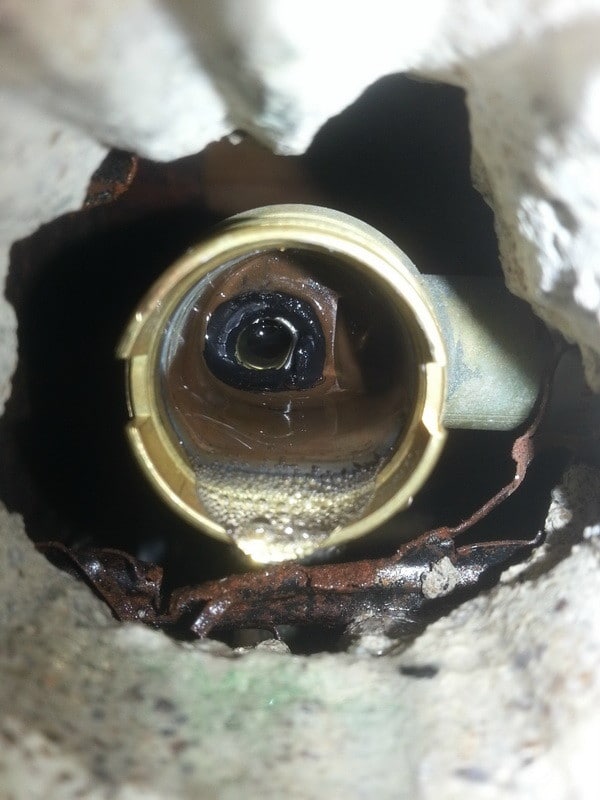
The leaking shower cartridge pulled fully out of the valve body — the small worn spring and rubber washer inside are the real source of most shower faucet drips.
If the cartridge fights you and won’t budge, mineral buildup is usually the reason. Wiggle it side to side while pulling — don’t just yank straight out with everything you’ve got. For stubborn ones there’s a cheap plastic puller tool sold for a few bucks that grabs the cartridge and pulls it dead straight. Worth having if yours is really seized.
Step 4 — Match the Replacement at the Store
This is the shortcut that saves you a second trip: bring the old cartridge with you. Don’t try to eyeball it or read a model number — just carry the physical part in and match it up right there on the shelf. We took ours to the local home superstore and found the exact replacement in a few minutes. In most cases it’ll be a Moen, Delta, or Pfister — those three cover the vast majority of what’s in American bathrooms. The complete cartridge is around 20 dollars, which is the same repair a plumber would charge you $120–180 to do. You’re keeping that money.
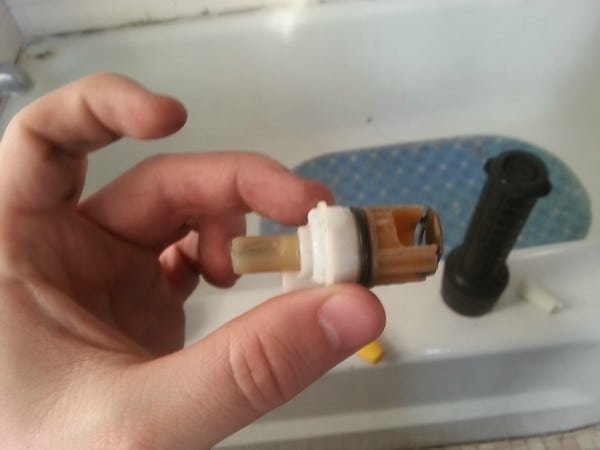
Bring the old shower cartridge to the hardware store to match a replacement — matching the physical part is the fastest way to buy the right Moen, Delta, or Pfister cartridge.
If you’d rather ID the part before you leave, Delta keeps a solid tub/shower leak repair parts finder that helps you spot the right cartridge and washer kit for your model. But honestly, carrying the old part in beats any parts diagram nine times out of ten.
Step 5 — Replace the Spring and Washer (This Is the Actual Fix)
Here’s the part most articles skip, and it’s the whole ballgame. The black rubber washer is removable, and behind it there’s a small spring that comes out too. Nothing really holds them in — you can pick at them with a screwdriver and they’ll come right out. It was that spring and washer that were causing the leaking for the most part. The cartridge itself is often still fine; it’s those two little pieces getting worn and flat that let water past.
The easiest way to get the new spring and washer in is to put them both on a screwdriver and slide them into the hole together. Set the screwdriver in place, then walk them off the tip and into the seat. Trying to set that little spring by hand will fight you the whole time and it’ll ping across the bathroom the second you lose your grip (don’t ask me how I know). Once the new spring and washer are seated, drop the cartridge back in and tighten up the packing nut.
How Do You Know If It’s the Cartridge or Something Else?
This is the People Also Ask question I get most, so let’s settle it. If the drip only happens when the faucet’s turned off, it’s the cartridge seals — the spring and washer we just covered. If water’s weeping around the handle base while it’s running, that’s usually an O-ring on the cartridge stem. If the handle has gotten noticeably easier to turn than it used to be, that’s a worn cartridge telling you it’s on the way out — you can feel it going before it fully fails. And if you’re getting a genuine drip from the showerhead itself even with the valve shut off tight, that’s still the valve, not the head — the head is just where gravity delivers the leak.
One more sensory tell: a faint hissing or trickling sound inside the wall when everything’s off usually means water’s slipping past a bad seat washer. That’s your cue this repair is exactly what you need.
While you’ve got the wall open and the water off, it’s a smart time to look at the rest of your setup — if you’re updating an older basement bath, here’s how to refresh a bathroom with low-cost tub and shower fixtures without a full remodel.
When to Skip the DIY and Call a Pro
The cartridge runs about $20 at any home store, and the spring-and-washer kit is a couple dollars. A plumber’s service call for this exact repair runs $120–180. If you’re comfortable with a screwdriver, you’re saving well over a hundred bucks on an hour of work.
That said — if your valve body is soldered copper and cracked, or the cartridge is so corroded it won’t release even with a puller and you’re worried about damaging the housing inside a finished wall, that’s when I’d hand it off. A cracked valve body means opening the wall and sweating new pipe, and that’s a different job than swapping a cartridge.
Keep It From Dripping Again
Cartridges don’t fail on a schedule, but hard water speeds them up by chewing through the rubber washer and seat. If your water’s hard, plan on this being a once-every-5-to-7-years thing rather than once a decade. When you do a swap, buy the little spring-and-seat kit at the same time and keep the spare — they’re a couple dollars and it turns your next repair into a ten-minute job with no store run. And don’t crank the handle shut like you’re closing a fire hydrant. Snugging it hard every time is what flattens the seat washer prematurely. Firm is plenty.
If your bathroom’s got other faucet gremlins, the same cartridge-and-washer logic applies to sink fixtures too — here’s how to repair a leaking double-handle faucet if you’ve got a dripping sink to tackle next.
FAQ
How much does it cost to fix a leaky shower faucet myself?
About $20 for the complete cartridge, plus a couple dollars if you grab a spring-and-washer kit. That’s it. Compare that to $120–180 for a plumber to do the same swap. I’ve never understood paying someone for this one when the part’s cheaper than lunch.
Do I need to shut off the water to replace a shower cartridge?
Yes, absolutely — and I mean the actual shutoff, not just closing the handle. The moment the cartridge comes out, anything in that line is coming with it. Shut off the bathroom valve or the house main first.
How do I know which brand cartridge to buy?
Take the old one to the store and match it on the shelf. Don’t guess. In most cases it’ll be Moen, Delta, or Pfister — those three cover almost everything out there. Danco also makes a helpful single-handle tub/shower repair guide if you want to confirm your type before you leave.
Is it really the spring and washer, or the whole cartridge?
Often it’s just the spring and rubber washer that are worn — those tiny pieces do most of the leaking. In our basement bathroom, that’s exactly what it was. Replace those along with the cartridge and you’ve covered your bases.
What if the cartridge won’t come out?
Mineral buildup is usually the culprit. Wiggle it side to side while you pull instead of yanking straight out. If it’s really seized, grab the cheap plastic cartridge puller tool — it costs a few bucks and pulls the thing out dead straight without you fighting it. Family Handyman has a good walkthrough on the stubborn ones too.

Written by Keith Schneerer
Certified Appliance Tech · Founder, RemoveAndReplace.com
Keith has spent 30+ years repairing machines, starting as a military mechanic and later maintaining food processing equipment before moving into appliance repair. He founded RemoveAndReplace.com to share field-tested repair advice.
More about Keith →