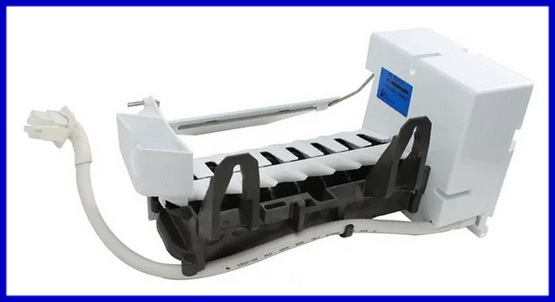
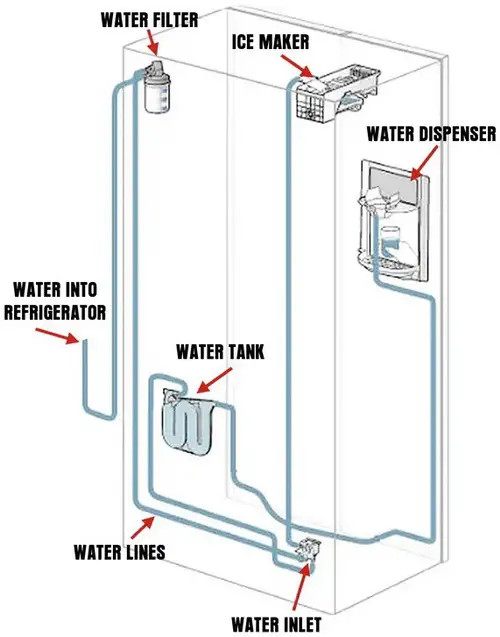
Your GE ice maker can encounter issues, leaving you with an “ice-less” refrigerator. One of the issues is the GE ice maker not working. This guide will provide how to fix this issue with causes and solutions.

Why Your GE Ice Maker is Not Working
Before looking into the possible solutions for a non-functioning GE ice maker, it’s important to understand the common reasons behind this issue.
- Frozen Water Line: The water line to the ice maker could be frozen, obstructing the flow of water.
- Faulty Water Inlet Valve: This is the water valve that controls the amount of water that goes to the ice maker. If this part is defective, it can prevent the ice maker from working.
- Broken Thermostat: A faulty thermostat can disrupt the ice-making cycle, hence no ice production.
- Damaged Ice Maker Assembly: If the ice maker assembly itself is damaged, it may not be able to produce ice.
- Improper Temperature: If the temperature in the freezer is too high, it can prevent the ice maker from producing ice.
- Kinked Water Line: If a water line is bent or kinked, the water cannot get to the ice maker.
- Fault In Dispenser: If your GE refrigerator has an ice dispenser, it may have an issue with a faulty microswitch.
Fix GE ice maker that does not work?
7 Steps To Fix GE Ice Maker
Here’s a step-by-step guide on how to fix a General Electric (GE) ice maker in a GE refrigerator.
Step 1: Identify the Problem
Before you begin your repair, it’s important to understand the issue your ice maker is facing. Is it not making ice at all? Is the ice it’s producing too small or large? Or is it leaking water? Understanding the problem helps you tackle it more effectively.
Step 2: Switch Off the Appliance
Safety first. Before you start your DIY repair, make sure to turn off your refrigerator to prevent any electrical mishaps. Unplug the appliance from its power source.
Step 3: Inspect the Ice Maker
Once you’ve safely switched off the appliance, it’s time to inspect the ice maker. Open the freezer and locate the ice maker. Check for any visible signs of damage or malfunction, such as broken parts or water leaks.
Step 4: Check the Water Supply
The problem with your ice maker could be due to a lack of water. Check the water supply line at the back of the refrigerator. If it’s kinked or blocked, straighten it out or clear the blockage.
Step 5: Inspect the Fill Tube
Water enters the ice maker from the fill tube. If this tube is frozen or blocked, it can prevent the ice maker from functioning properly. Thaw the tube using a hairdryer or unclog it carefully with a thin instrument.
Step 6: Check the Control Arm
The control arm is a metal rod that turns the ice maker on and off. If it’s stuck or broken, it could be preventing the ice maker from working. Gently move the control arm to see if it’s functioning correctly.
Step 7: Examine the Thermostat
The thermostat controls the temperature in the ice maker. If it’s faulty, it could be causing the ice maker to freeze up or not make ice. Use a multimeter to test the thermostat for continuity. If it’s defective, it will need to be replaced.
Replace Faulty Parts: If any parts of the ice maker are broken or faulty, they’ll need to be replaced. You can order replacement parts online or from a local appliance store. Make sure to refer to your refrigerator’s manual for part numbers and installation instructions.

Troubleshoot Frozen Water Line
A frozen water line can be spotted by checking the fill tube. If you find a frozen fill tube, you can use a hairdryer to thaw it. Make sure to keep the hairdryer on a low setting to prevent any damage. Once the ice blockage is cleared, the ice maker should start working normally.
Repair Faulty Water Inlet Valve
A faulty water inlet valve can be diagnosed by checking for any irregularities or leaks. If the water inlet valve is defective, it needs to be replaced. This process involves disconnecting the power source, shutting off the water supply, disconnecting the water line, removing the old valve, and installing the new one.
Fix Broken Thermostat
If the thermostat is to blame, it should be replaced by a professional. The thermostat controls the ice maker’s temperature, and if it’s not functioning correctly, the ice maker won’t produce ice.
Damaged Ice Maker Assembly
A damaged ice maker assembly can be tricky to diagnose and repair. If the ice maker assembly is damaged, it’s best to replace the entire unit. It’s advisable to hire a professional to handle this to avoid any further damage.
Regulating Freezer Temperature
If the temperature inside the freezer is too high, adjusting it to an appropriate level can resolve the issue. The optimal temperature for the freezer should be set at 0 degrees Fahrenheit.
GE Appliance Models Applicable: This guide applies to the following GE ice maker refrigerator models:
GE Profile PFE28KYNFS
GE Profile PFE28PYNFS
GE GNE27JYMFS
GE GWE19JSLSS
GE GNE25JSKSS
GE GNE27JSMSS
GE GNE25JMKES
GE GNE27EYMFS
Warranty and Support: A GE refrigerator usually has a one-year limited warranty that covers any defect in material or workmanship. This warranty starts from the purchase date. If, within this period, the product is found to be defective, GE will either repair or replace it. The ice maker, typically considered a component of the refrigerator, is usually covered under this warranty. Go to GE support for more info if you need help or think your ice maker is still under warranty.
A broken GE ice maker means you have to do some troubleshooting, but knowing the causes and solutions can help you repair it. Whether it’s a frozen water line, a faulty water inlet valve, a broken thermostat, a damaged ice maker assembly, or an improper freezer temperature, this guide will help you fix it yourself.


Leave a Reply