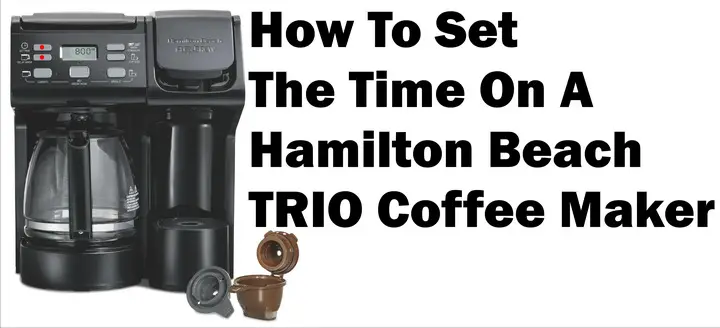
Setting the time on your Hamilton Beach FlexBrew Trio is key for using the programmable features, like automatic brewing. Follow these simple steps:

How To Set Time On Hamilton Beach TRIO
Step 1: Plug in the Coffee Maker
Make sure your coffee maker is plugged in. You won’t be able to set the time if it’s not connected to a power source.
Set the time on your Hamilton Beach Trio Coffee Maker
Step 2: Reset the Clock (If Needed)
If the display shows “12:00” blinking, you’ll need to reset the clock. This might happen after unplugging the coffee maker or a power outage. If the time is already set, you can skip this step.
Step 3: Press the SET TIME Button
Find the “SET TIME” button on the control panel, possibly marked with a clock icon. This button lets you change the time settings.
Step 4: Set the Hour
- Tap or Hold the SET TIME Button: Tap the button repeatedly to set the hour. Hold it down to scroll faster.
- Watch the AM/PM Indicator: Make sure you set the correct AM/PM time, especially if you plan to use the programmable brewing feature.
- Wait for the Minute Mode: After setting the hour, wait a few seconds, and the coffee maker will switch to minute-setting mode.
Step 5: Set the Minutes
- Tap or Hold to Set Minutes: Adjust the minutes the same way you did for the hours, either by tapping or holding the button.
- Fine-Tune: If you go past your desired time, keep tapping the button until you get it right.
Step 6: Confirm the Time
Once the hour and minutes are set, the coffee maker will save the time automatically. You should see the correct time displayed.
Step 7: Double-Check the Time
Compare the time on your coffee maker with another clock to ensure it’s accurate.
Additional Tips
- Daylight Saving Time: Remember to adjust the clock for daylight saving time changes.
- Power Outages: If the power goes out, you may need to reset the clock. Always check the display after replugging it.
- Using Programmable Features: After setting the time, you can use the programmable features, like scheduling a fresh pot of coffee. Make sure the clock is accurate before doing so.
With the time set, your FlexBrew Trio will be ready to brew whenever you need it. Enjoy waking up to freshly brewed coffee.
How to Program The Hamilton Beach Flex Brew TRIO
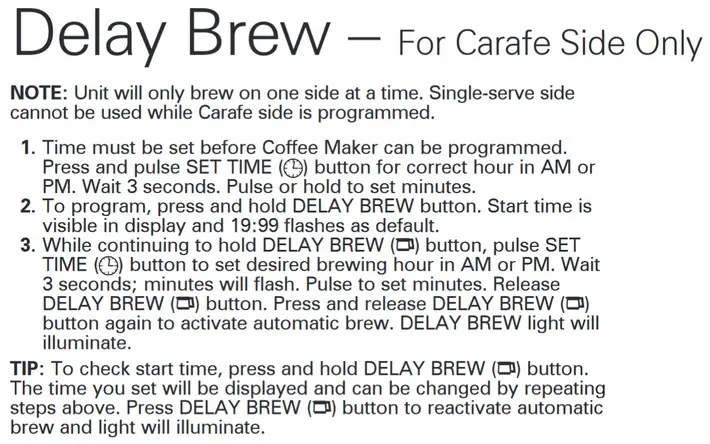
Please note: You can only brew on one side at a time. The single-serve side cannot be used while the carafe side is programmed.
- Set the Time First: Before you can program the coffee maker, you need to set the time. Press the “SET TIME” button to adjust the hour, making sure to select AM or PM. After setting the hour, wait 3 seconds, then use the button again to set the minutes.
- Program the Brew Time: Press and hold the “DELAY BREW” button. You will see the default start time (19:99) flash on the display.
- Set the Desired Brew Time: While still holding the “DELAY BREW” button, use the “SET TIME” button to choose the hour for brewing, ensuring you select AM or PM. After waiting 3 seconds, the minutes will flash, allowing you to set them as well. Once you’ve set the time, release the “DELAY BREW” button. Press it again to activate the automatic brew feature—the “DELAY BREW” light will turn on.
Tip: To check or change the start time, press and hold the “DELAY BREW” button. The time you previously set will appear, and you can adjust it by following the steps above. Don’t forget to press the “DELAY BREW” button again to reactivate the automatic brew, and the light will come on.


Hamilton Beach User Manual
For more detailed instructions and to explore additional features of your Hamilton Beach FlexBrew Trio, you can access the official user manual here. The manual provides in-depth guidance on everything from advanced programming settings to maintenance and troubleshooting tips. Whether you’re looking for information on how to clean your coffee maker or need help with more complex issues, the user manual is a valuable resource that ensures you get the most out of your coffee maker.
Troubleshooting The Single-Serve Side (Pod Side)
Problem: Coffee Maker won’t brew or coffee isn’t dispensing.
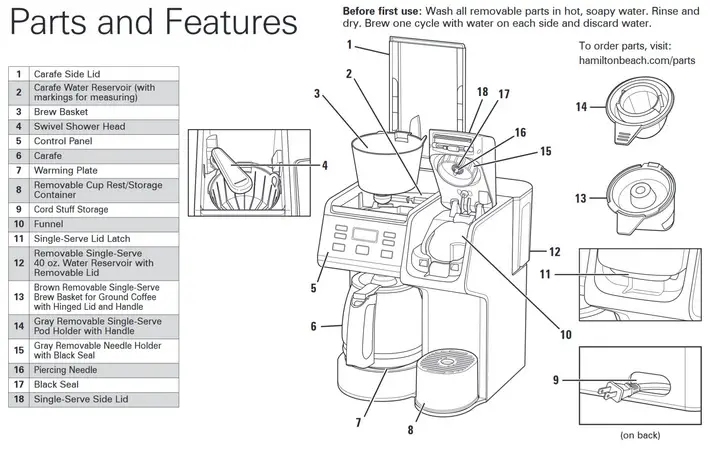
- Clogged Piercing Needle: The needle might be clogged. Remove the Gray Removable Needle Holder and clean the Piercing Needle in the lid.
- Mineral Deposits: Mineral buildup can affect performance. Clean the coffee maker as outlined in the Care and Cleaning section.
- Not Enough Water: Ensure you have at least 15 oz. (444 ml) of water in the reservoir.
Problem: Coffee tastes bad.
- Incorrect Water/Coffee Ratio: Adjust the ratio of water to coffee grounds or use less water if you’re using coffee pods.
- Poor Coffee Quality: Ensure you’re using fresh, high-quality coffee.
- Water Quality: Use filtered or bottled water for better taste.
Problem: Coffee sediment in the cup.
- Coarser Grind Needed: Try using a coarser grind or add a #1 paper cone coffee filter to the Brown Removable Brew Basket. Ensure the lid on the basket is closed properly.
Problem: Water on the counter under the unit.
- Overfilled Water Reservoir: Don’t add more than 40 oz. (1.2 liters) of water. Some mugs or cups may also dribble water, so pour carefully.
Control Panel Notifications:
- CLEAn: The coffee maker needs cleaning.
- CLOSE LId: The lid isn’t closed properly. Press it down to lock in place.
- OVEr LOAd: The needle is clogged, or the grounds basket is overloaded. Don’t fill above the MAX line.
- FIL H2O: Not enough water. Add more, then press the BREW NOW button to restart the brew cycle.
- OVEr: Let the coffee maker cool for 15 minutes. Ensure there’s water in the reservoir, then empty the mug and press the BREW NOW button to restart brewing.
Problem: Coffee overflows from the Brew Basket.
- Use the Right Basket: Always use the Removable Brew Basket with a lid for ground coffee.
- Too Much Coffee: Use no more than 3 tablespoons (44 ml) of grounds.
- Grind Size: For whole beans, use a standard automatic drip coffee grind. Avoid very fine grinds, which can cause overflow.
- Missing Seal: Ensure the black seal around the needle in the Removable Needle Holder is in place.
Problem: Coffee overflows from travel mug or regular mug.
- Empty Mug: Make sure the mug is empty before starting a new brew cycle by pressing the BREW NOW button.
Problem: Coffee pod bursts.
- Pod Quality: Some pods may be weaker at the seams. If this happens, try a different brand.
Note: Delay Brew feature doesn’t work with the Single-Serve side.
- Feature Limitation: The Delay Brew feature is designed for the carafe side only.
Troubleshooting The Carafe Side
Problem: Longer than normal brew time.
- Bold Brewing Cycle: If you’re using the bold setting, brewing will take longer to create a richer, fuller cup of coffee.
- Mineral Buildup: Mineral deposits can slow down the brew process. Regular cleaning is recommended, especially if you have hard water. Check the “Care and Cleaning” section for instructions. Note: Do not take apart the coffee maker.
Problem: Brew Basket overflows or coffee brews slowly.
- Too Much Coffee: Using too much ground coffee can cause overflow.
- Finely Ground Coffee: Decaf or finely ground coffee can also lead to overflow. Try using slightly less coffee or switch to a medium grind.
- Cleaning Needed: A slow brew could indicate that the coffee maker needs cleaning. Refer to the Care and Cleaning section.
- If Using a Paper Filter:
- Coffee Grounds in the Wrong Place: Make sure there are no grounds between the paper filter and the Brew Basket.
- Filter Placement: Ensure the paper filter is fully open and properly positioned in the Brew Basket.
- Rinse the Basket First: Rinsing the Brew Basket before inserting the filter can help the edges stay in place.
- Filter Quality: Using a poor-quality filter can also cause issues.
Problem: Coffee leaks onto the base.
- Carafe Removal: Don’t remove the carafe from the warming plate for more than 20 seconds during brewing.
Problem: Coffee tastes bad.
- Cleaning Needed: A dirty coffee maker can affect the taste. Clean the unit as described in the Care and Cleaning section.
- Incorrect Grind: If the coffee is ground too coarsely or too finely, it can affect the flavor. Use medium ground coffee for the best results.
- Coffee-to-Water Ratio: Adjust the ratio to suit your taste.
- Coffee Quality: Make sure you’re using fresh, high-quality coffee.
- Water Quality: Consider using filtered or bottled water for better taste.
Problem: Coffee sediment in the cup.
- Use Quality Filters: A high-quality basket-style paper filter can help reduce sediment.
Problem: Coffee not brewing or the unit won’t turn on.
- Carafe Position: Ensure the carafe is correctly placed on the warming plate.
- Check the Water Reservoir: Make sure there’s water in the reservoir.
- Power Issues:
- Unit Unplugged: Check that the unit is plugged in.
- Power Outage: If the power goes out, the coffee maker won’t function until power is restored.
- Power Surge: Unplug the unit, then plug it back in.
- Clock Reset: After a power outage, you may need to reset the clock.
- Brew Button: Make sure to press the BREW NOW button to start brewing.
Having issues with the coffee dispensing on the Keurig side? Does the coffee maker show an overload error? Check here for more help and how to remedy the issue.
If you happen to need more help, please feel free to add your question in the comments below and we can help.


Leave a Reply