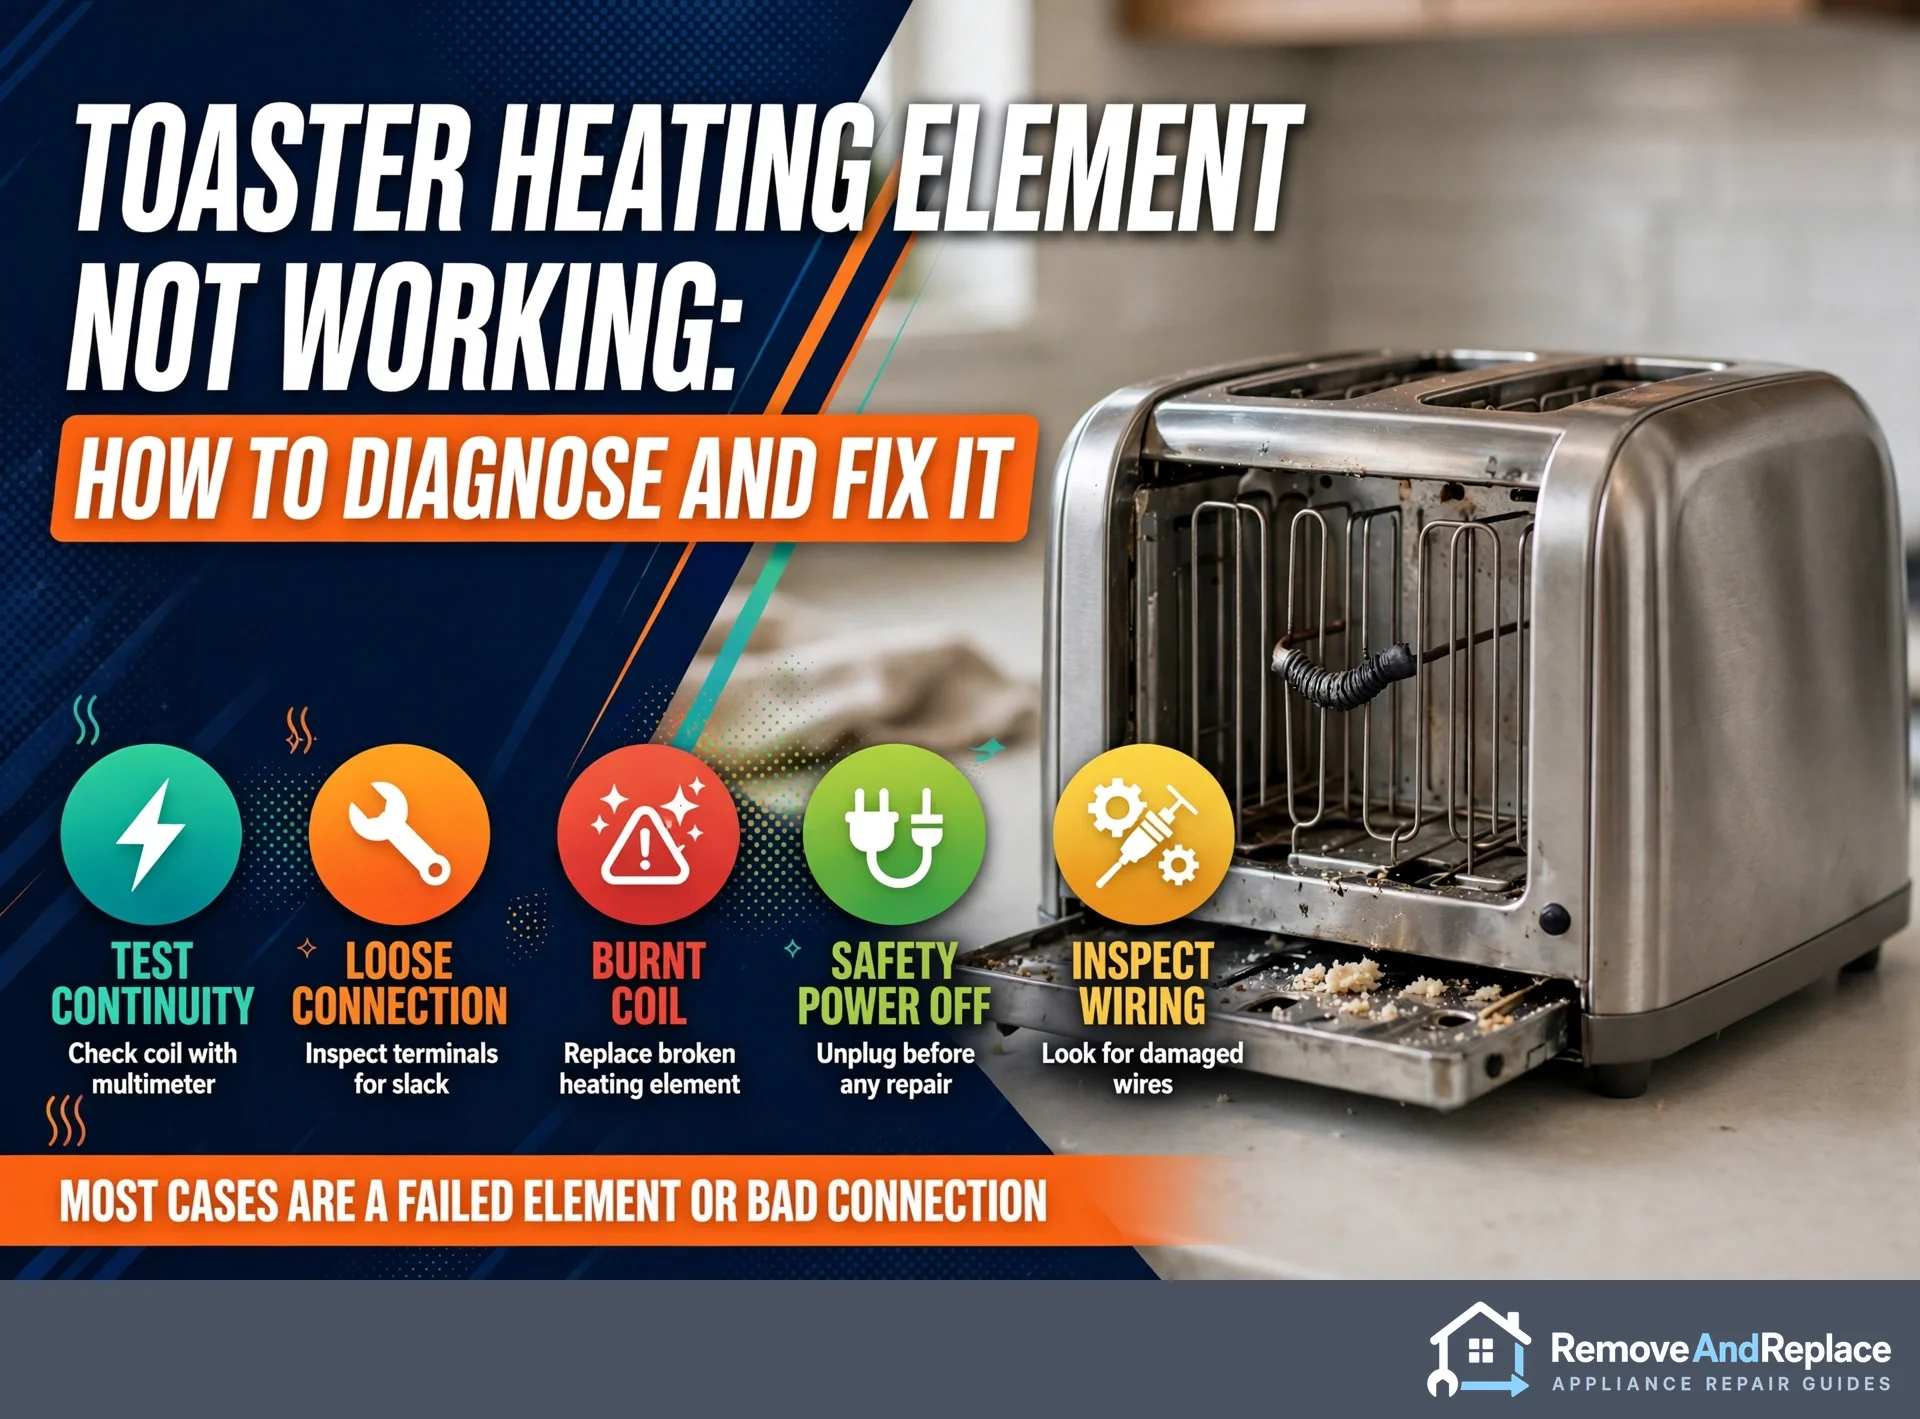
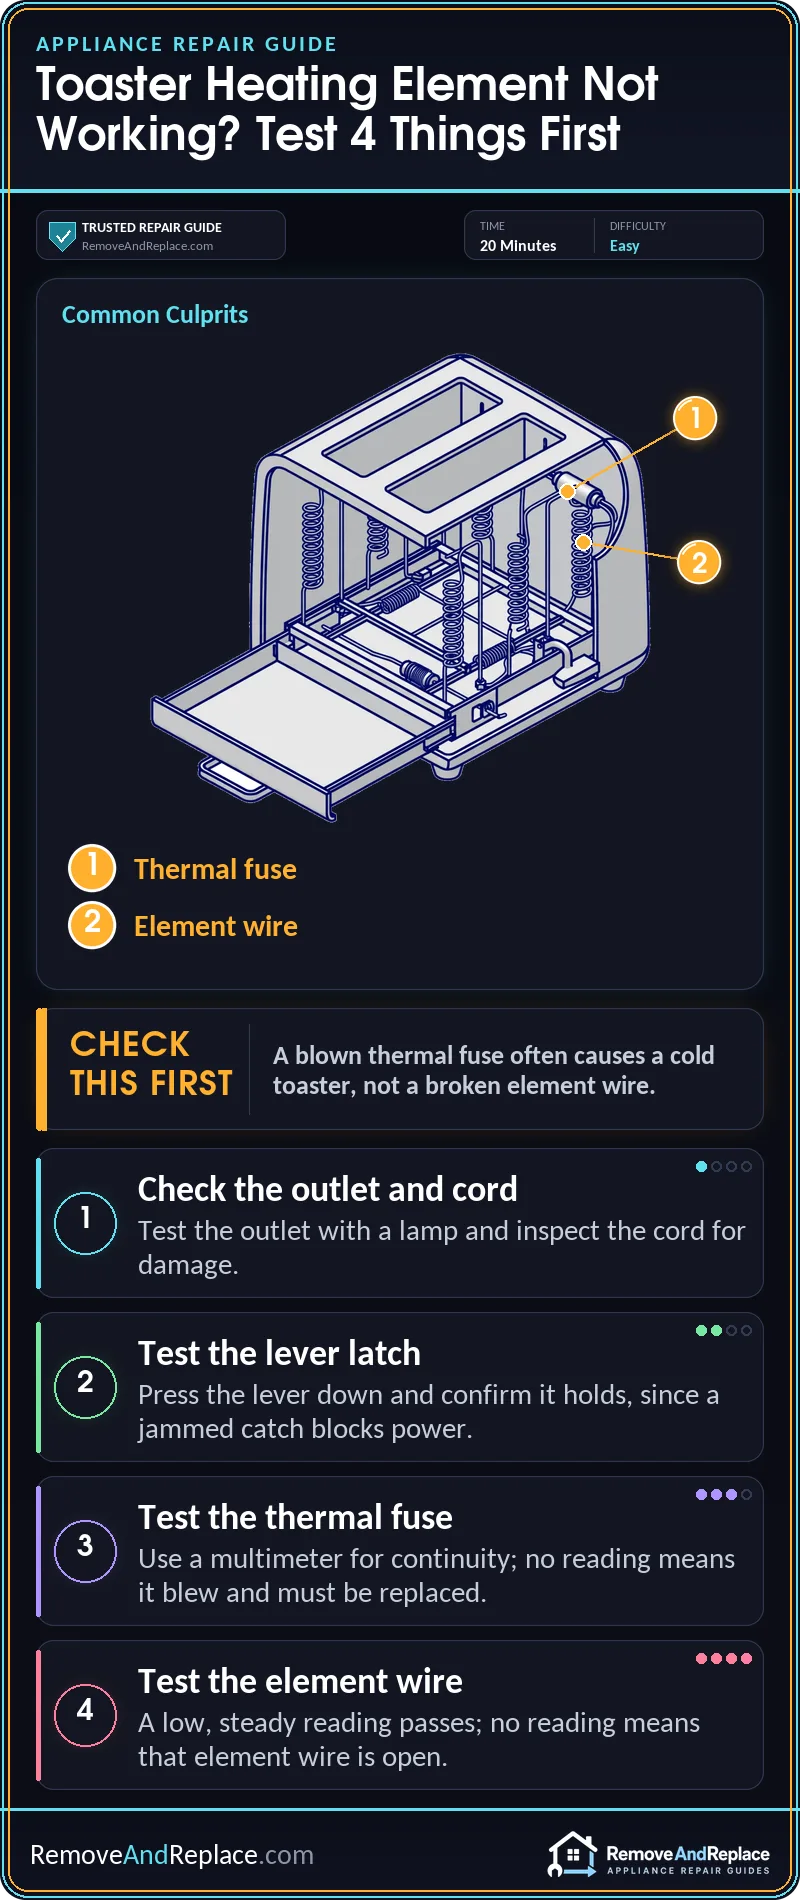
A toaster heating element not working often traces back to a blown thermal fuse or a broken element wire, not a dead toaster. Unplug it and test the suspect part for continuity with a multimeter. A low, steady reading passes; no reading at all means that part is open and needs replacing.
The Short Version
- Prove the outlet, the cord and the lever latch before you blame the element.
- Toaster oven modes like Bagel and Broil can switch the lower element off on purpose.
- On a 120-volt toaster, dividing 14,400 by the rating-plate wattage gives a ballpark for the ohms you should see.
- Never bridge a blown thermal fuse. Find out why it blew first.
- Order parts by the model number on the toaster, not by how the old part looks.
A Cold Element Doesn’t Always Mean a Bad Element
This is the part most people get backwards. A toaster heating element not working looks like a dead element, but the wire itself is only one of several things standing between the wall and a glowing coil. The lever latch, the thermal fuse, the cord, and on newer models a small control board all have to do their job first.
A blown thermal fuse or a lever that won’t latch fools people just as often as a broken wire does.
The order of checks is the same one I used during 11 years of commercial food service equipment repair, and it works fine on a countertop toaster: confirm power gets to the part, then test the part. Work through it in this order:
- Rule out the free stuff first: the outlet, the cord, the lever and the mode setting.
- Test the thermal fuse.
- Test the element itself.
- Only then suspect the board.
If one side glows and the other stays dark, that usually points to a broken nichrome element wire, but it can also come from dirty carriage contacts, a too-low browning setting, or a fault on the control side, so rule those out first.
Read this before you open anything. Unplug the appliance or switch off its breaker before you touch anything. Pull the plug from the wall, because lifting the lever does not isolate a toaster. Let it cool, and never poke at the elements or the slots with a fork or knife while it’s plugged in. Don’t bridge a blown thermal fuse with a wire or foil. That fuse is the part that keeps an overheated toaster from becoming a fire.
Free Checks First: Outlet, Cord, Lever and Mode
- Test the outlet with something else. Plug a lamp or phone charger into it. A tripped GFCI or a dead circuit is a surprisingly common reason for a toaster not toasting.
- Look over the cord and plug with the toaster unplugged. Check for a loose prong, a kinked cord near the toaster body, and scorch marks on the plug.
- Check the lever. Plug the toaster into the known-good outlet and press the lever down. In many pop-up toasters it should stay down. If it springs right back up and nothing glows, the circuit that holds it isn’t getting power or the catch is jammed. Unplug it again before the next step.
- Look at the mode, if it’s a toaster oven. Some models deliberately leave the lower element off in Bagel or Broil. The upper element also tends to look brighter than the lower one. Neither is a failure, so run it on plain Bake or Toast and compare.
If all of that comes up clean, I’d rank what’s left this way, from most to least likely: the thermal fuse, a broken element wire, then the lever mechanism or control board. A small appliance that suddenly stops heating deserves the same power-path-first thinking as a microwave, which I laid out in why a microwave suddenly stops working. Protective parts first, heating part last.
The Thermal Fuse: Small, Hidden, Easy to Blame Last
Many toasters have a one-time thermal fuse wired in series with the heating circuit. If it opens, nothing heats, so every element stays cold. That’s different from a broken element, where you’d usually see one side glow and the other not.
Fuses blow for a reason: a pile of crumbs, a jammed item, a lever stuck down. Fix the cause or the new fuse goes too. eReplacementParts has a toaster no-heat guide that covers this part of the diagnosis. Some toasters have no separate fuse at all, because it’s built into another part. If you can’t find one, move on to the element and the board.
A cold element tells you the circuit is open somewhere, not which part opened it, so test the path before you buy the part.
When it’s not this: if the fuse tests fine and one side still won’t heat, the problem is downstream at the element or its connection.
A Broken Element Wire
The heating wire in most pop-up toasters is thin nickel-chromium (nichrome) wire wound around a mica sheet. That’s fragile stuff. It can snap from age, from a crumb or a jammed bread slice that overheats one spot, or from rough handling.
A toaster heating element not working because of a break usually shows up as one side glowing and the other dark, a visible gap or dark burn spot in the wire, or a loose terminal on the cold side.
Competitors skip this trick: you can predict what a healthy element should read. Dividing 14,400 by the wattage on the rating plate gives the element resistance in ohms for a 120-volt toaster. A 1,000-watt toaster at 120 volts works out to 14.4 ohms.
Treat that as a ballpark. If you test a single element rather than the whole toaster, it can read differently from the whole-toaster figure. What you’re really hunting for is a reading versus no reading.
When it’s not this: a good reading across the element means the wire is fine, so look at the fuse, the lever contacts or the board.
The Lever Mechanism or Control Board (Less Common)
This is the one that sends people into buying parts they don’t need. On electronic toasters, a control board or relay can fail while the lights and display still work. You get power, a lever that may latch, and no heat.
On simpler toasters the lever contacts can burn or the catch can wear so the lever never closes the heating circuit. The telltale sign is that the fuse and elements both test good. Boards cost noticeably more than a fuse or element, and that’s often what tips a repair toward buying a new toaster.
Watch the Teardown Before You Pick Up a Screwdriver
This video is a walkthrough of diagnosing and fixing a toaster that won’t heat. Watch it to see how a toaster comes apart and where the fuse, elements and wiring sit, since layouts vary by model. It makes the steps below easier to follow.
How Do You Test the Fuse and Element With a Multimeter?
- Confirm it’s unplugged and cool. Empty the crumb tray while you’re at it.
- Photograph the wiring before you remove anything. You’ll want that picture when it’s time to reconnect.
- Take off the outer shell. The screw type varies by model (Phillips, Torx or a security bit), so check yours before you start.
- Look before you measure. Check for a visible break in the wire, burnt terminals, melted insulation and loose connections.
- Test the thermal fuse. Set the meter to continuity and touch a probe to each end. A beep or low reading passes. Nothing means it’s blown.
- Test each element across its terminals. Compare the reading to the ballpark above. An open reading means a broken element.
If both pass and the toaster still won’t heat, the lever contacts or the board are next. A fuse and element that test good point you there.
Before You Order a Part
The check is the continuity test above. A pass looks like a low, steady reading, which means that part isn’t your problem and you should look upstream. A fail is an open reading with no beep, which means that part is bad and worth replacing.
Find the model number on the sticker or stamping on the bottom or back of the toaster, and match the part to that. The rating plate also lists the wattage. If the fuse has a rating printed on it, the replacement should match it. Don’t guess from the look of the old part.
Replacing the Element
A write-up of an element replacement on a Breville Die-Cast Smart Toaster shows what the job looks like on a premium model with motorized one-touch lowering and extra settings, which makes it more involved than a basic two-slice toaster. Yours will differ in the details, but the sequence is the same.
- Note how the old element sits. Take another photo showing how it’s oriented and where each wire goes.
- Free it. Undo the terminals, screws or tabs holding it. Mica-wrapped elements crack if you bend them, so ease it out.
- Fit the new one in the same orientation. It shouldn’t touch the metal frame or its neighbors.
- Reconnect the wires and close the case. Make sure nothing is pinched.
- Plug in only after the case is fully back together. Run it once empty while you stand next to it. The elements should glow evenly. Then try toast.
A fuse swap follows the same steps, with the same rating in the same position. I’d rather replace an element than twist-patch a broken nichrome wire. In my experience a patched joint tends to burn out again at the joint.
Is It Worth Repairing the Toaster?
It depends on the toaster. A fuse or element on a quality model is worth the fix. A cheap toaster that’s riveted shut is built to be thrown away, and I don’t love that design. When the part, your time and any board replacement get close to the price of a decent new toaster, buy new.
For prevention, empty the crumb tray every couple of weeks and don’t jam oversized items into the slots.
FAQ
Why does only one side of my toaster heat?
Usually a broken element or a loose connection on the cold side. A blown fuse takes out the whole circuit.
Can I patch a broken heating wire?
You can twist or crimp it back together and it may work for a while, but I wouldn’t count on it. The joint is a weak spot, so I’d replace the element.
How many ohms should a toaster element read?
Divide 14,400 by the wattage on the rating plate for a 120-volt toaster. A single element can read differently from the whole-toaster number, so what matters is a reading versus no reading.
Why is the top element of my toaster oven brighter than the bottom?
That’s often normal, and some modes (Broil, Bagel) intentionally leave the lower element off. Switch to plain Bake and compare before you assume a failure.
Is it worth fixing when a toaster heating element isn’t working?
Only if the part is cheap and the toaster is worth keeping. In my experience a fuse or element on a decent toaster pays off. A board on a cheap one usually doesn’t.
My lever won’t stay down. Is the element bad?
Probably not. In many pop-up toasters the lever has to latch before the heating circuit closes, so a lever that pops back up means the circuit isn’t getting power or the catch is jammed. I’d check the outlet and cord, then the fuse, before touching the element.
Stop and call a qualified appliance tech, or retire the toaster, if you find melted insulation or scorch marks around the cord, plug or internal wiring. I wouldn’t power it back on.

Written by Keith Schneerer
Certified Appliance Tech · Founder, RemoveAndReplace.com
Keith has spent 30+ years repairing machines, starting as a military mechanic and later maintaining food processing equipment before moving into appliance repair. He founded RemoveAndReplace.com to share field-tested repair advice.
More about Keith →