Nineteen years fixing aircraft systems in the Air Force taught me to work problems in order, and I still use that same approach on a fridge — an ice maker not making ice usually comes down to something simple: the on/off switch, a full ice bin, a freezer that isn’t cold enough, or a water supply problem like a clogged filter or a valve that’s still turned off. I always work through the free checks first, since most ice makers get fixed without buying a single part.
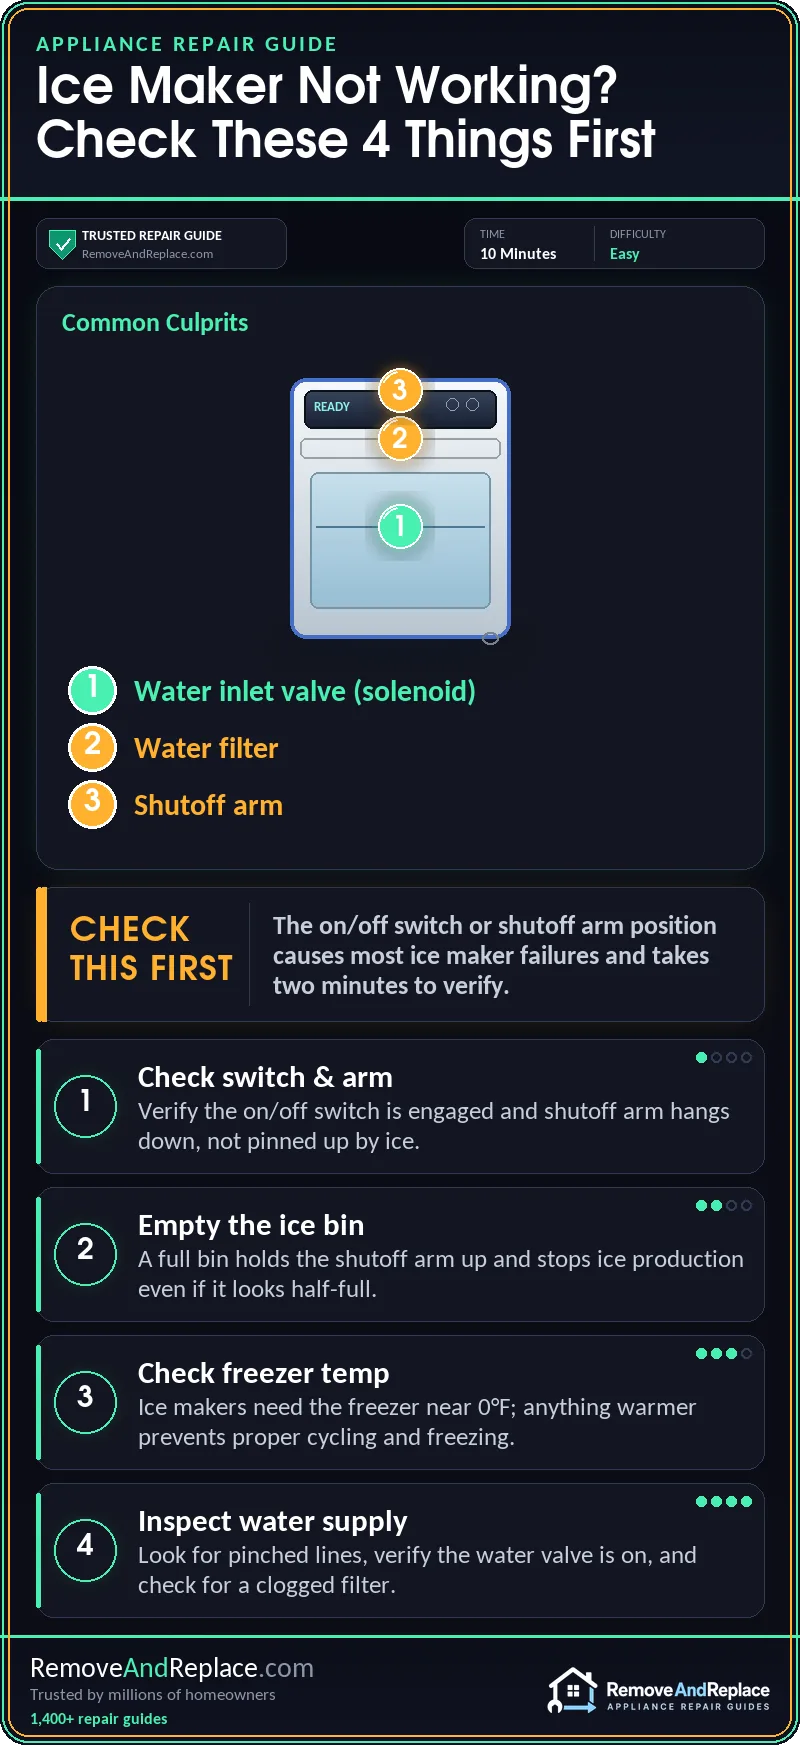
- Check the on/off switch and the shutoff arm position first — both are free, two-minute checks.
- The freezer needs to sit close to 0°F. Anything much warmer and the ice maker can’t keep up, even if nothing’s actually broken.
- A clogged filter, a pinched line, or a water valve left off after a filter change causes more “dead” ice makers than the ice maker itself ever does.
- The water inlet valve (solenoid) is the one part that genuinely wears out and needs replacing — but it’s usually the last thing to check, not the first.
- If the ice maker cycles but nothing comes out, look at the water supply before you assume the module is bad.
| Cause | Likelihood | Fix Cost | DIY Time |
|---|---|---|---|
| On/off switch or shutoff arm position | Most common | Free | 2 min |
| Ice bin overfull, arm stuck up | Common | Free | 2 min |
| Freezer not cold enough | Common | Free | 5 min |
| Water valve turned off | Common | Free | 5 min |
| Clogged water filter | Somewhat common | $20-50 | 10 min |
| Pinched or frozen water line | Somewhat common | Free-$15 | 20 min |
| Ejector paddle blocked | Less common | Free | 10 min |
| Water inlet valve (solenoid) failed | Less common | $20-50 | 30-45 min |
Why Is My Refrigerator Ice Maker Not Making Ice?
Most of the time, an ice maker not making ice comes down to one of a handful of things, and none of them require a new ice maker module. I always check the on/off switch first, then make sure the wire shutoff arm is sitting down instead of pinned up by a full ice bin. If both check out, I look at freezer temperature next — an ice maker won’t cycle right if the freezer’s running warmer than around 0-5°F. After that, it’s usually a water supply issue: a clogged filter, a pinched line behind the fridge, or a valve that’s still shut off from a filter change. The part that actually fails and needs replacing, the water inlet valve, is further down this list on purpose — it’s the least likely culprit, not the first one. I’ve fixed plenty of these over the years without ever touching a screwdriver.
Quick gut check: switch already on and the bin isn’t full? Skip down to Is Your Freezer Actually Cold Enough to Make Ice? Freezer feels cold but nothing’s filling the mold? Jump to The Water Supply Is the Real Problem More Often Than the Ice Maker Is. Hear the fill valve buzz but no water ever shows up? Go straight to Ice Maker Parts That Actually Fail.
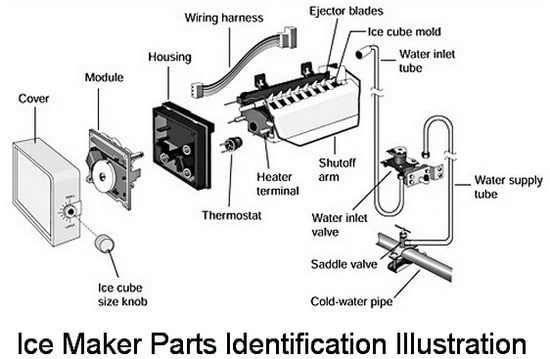
Everyone assumes the ice maker itself has died and needs to be replaced outright, but in my experience I almost always find something upstream of it instead. Work through these before you ever touch a wrench:
- Check the on/off switch. Some ice makers have a dedicated switch or lever right on the unit — I’ve bumped it myself without noticing.
- Check the shutoff arm. Make sure the wire or plastic arm is down, not pinned up against the housing.
- Check the ice bin. A completely full bin holds the shutoff arm up and shuts the whole thing off, even if the bin looks half-empty from certain angles.
- Check the water valve behind the fridge. If someone changed the filter recently, the valve may have been turned off and never turned back on.
- Look for a pinched line. Pull the fridge out about 12 inches and check the water line for kinks — this happens more than people expect after a move or a deep clean.
Is Your Freezer Actually Cold Enough to Make Ice?
If the freezer temperature is sitting above 5°F, the ice maker can technically still run, but it won’t keep up, and eventually it’ll act like it’s stopped working entirely. I always use an actual appliance thermometer to check the real temperature — a fridge’s digital display isn’t always accurate — and aim for -2°F to 0°F. If the freezer’s running warm, I check for frost buildup on the back wall, a door seal that isn’t sealing all the way, or a freezer packed so full nothing’s getting airflow.

Garage-installed refrigerators take an especially hard hit here. Ice makers in garage units, especially in hot climates, often struggle every summer, not because anything’s broken, but because the compressor can’t keep pace with triple-digit ambient air. I always rule this out first if the fridge lives in a garage or somewhere hot, before I start suspecting the parts themselves.
The first move a lot of people make is cranking the freezer thermostat down to its coldest setting, figuring colder is always better. That doesn’t fix a blocked vent or a bad door seal — it’s not gonna do anything but run the compressor nonstop for no reason and frost the evaporator coil up even worse. I’d fix the actual airflow or seal problem first; the thermostat setting is rarely the real issue. For a manufacturer’s own troubleshooting checklist, KitchenAid’s ice maker troubleshooting guide walks through similar temperature checks.
The Water Supply Is the Real Problem More Often Than the Ice Maker Is
When the switch, shutoff arm, and freezer temp all check out fine but you’re still dealing with an ice maker not making ice, the water supply is almost always where the trouble actually lives. That means a clogged filter, a pinched or partially frozen line, a valve left off after a filter swap, or water pressure too low to fill the mold. All four are simple to check and none require pulling the ice maker apart. I check the filter and the valve position before I ever suspect the ice maker itself.
A clogged filter is one of the more common culprits I run into. If you’re not sure when it was last changed, that’s probably your answer, and you’ve gotta rule it out before buying parts — see this walkthrough on ice makers acting up right after a water filter replacement for what usually goes wrong during that swap. Low water pressure often traces back to the same clogged filter, so I always test that before replacing anything else. And if your Samsung fridge is throwing an error code instead of just quietly failing, run through this guide to clearing Samsung refrigerator error codes before you assume the ice maker itself is the problem.
Ice Maker Parts That Actually Fail: Shutoff Arm, Paddle, and the Inlet Valve
The ejector paddle inside the ice maker spins to push cubes out of the mold. If it’s jammed by a stuck cube or ice buildup, the ice maker can fill and freeze the mold just fine and then never actually release anything. I clear any obstruction by hand once the unit’s unplugged, and that alone fixes more of these than people expect.
The water inlet valve sits near the bottom rear of the fridge, and I always unplug the unit before testing it, since you’re working close to both power and water at the same time. It’s the one part I’d genuinely call a wear item. Testing it means checking for around 120 volts at the valve when the ice maker calls for water, then testing the valve itself with a multimeter for continuity. Get power at the valve but no water flow, and the valve’s bad. PartSelect’s symptom guide for this exact failure is a decent reference if you want to cross-check the part before you order it.
Unplug the refrigerator before pulling any connector or reaching near the inlet valve. You’re working close to a live water line and an electrical connection at the same time — testing for voltage is the one step you do with it plugged in, and I always treat that as the only exception.
Brand-specific quirk: Samsung and LG French door models are especially prone to the fill tube icing over before anything else even has a chance to fail. If that’s what you’re dealing with, this Samsung ice maker guide covers that specific quirk in more depth. GE and older Whirlpool side-by-side units are simpler mechanically, and on those, the inlet valve is usually the first real part to wear out after eight or ten years — see this GE ice maker troubleshooting guide if that’s your setup. Frigidaire units have their own quirks too, and this complete Frigidaire ice maker repair guide covers that brand if it’s what’s sitting in your kitchen.
When to Call a Pro (And What It Actually Costs)
A new water inlet valve runs about $20-50 on parts sites like PartSelect or RepairClinic. A service call for the same repair usually lands somewhere between $150 and $250 once you add the trip charge and labor. If you’re comfortable pulling the fridge out and working carefully with a multimeter, replacing the valve yourself is typically a 30-45 minute job. I’d call someone instead if you’re not confident working near both water and electrical connections at once, or if testing the valve shows the problem’s actually further upstream in the wiring or control board — that’s a different repair entirely.
How to Keep This From Happening Again
I recommend changing the water filter roughly every six months, sooner if your water’s hard or you notice slower flow at the dispenser. Don’t let the ice bin pack solid — cubes fuse together over time and jam the paddle. Keep the freezer loaded enough for good thermal mass but not so packed that vents get blocked. For a general repair reference on the whole system, Fix.com’s ice maker repair guide covers similar maintenance basics worth bookmarking.
In my experience, nine times out of ten this is a two-dollar problem wearing a two-hundred-dollar costume. I’d work through the free checks first, don’t let anyone talk you into a full ice maker replacement before you’ve ruled out the water supply, and you’ll probably have this fixed before your ice bin even finishes melting.
Common Questions About Ice Makers Not Making Ice
How do I know if my ice maker’s water inlet valve is bad?
Test it with a multimeter for continuity and check for around 120 volts at the valve when the ice maker calls for water. If you get power but no water flows, the valve’s bad. It’s the ice maker part that actually wears out over time.
Why does my ice maker make ice but won’t dispense it?
That’s almost always the dispenser auger, the chute door solenoid, or a frozen clump jammed in the chute — not the ice maker itself.
How long does it take a new refrigerator to start making ice?
Give it 24 hours minimum. Expect up to 48 hours before you start worrying, since the freezer has to hit temperature first before the mold can catch up on cycles.
Can I use vinegar to clean a clogged ice maker line?
Yes — run a diluted vinegar-and-water mix through the line to break up mineral buildup, then flush thoroughly with plain water before reconnecting anything to the ice maker.
Is it normal for an ice maker to skip a cycle here and there?
Yes. A skipped cycle now and then usually just means the bin sensor saw enough ice already sitting there. It’s only a real problem if it stops cycling completely.
Related Guides

Written by Keith Schneerer
Certified Appliance Tech · Founder, RemoveAndReplace.com
Keith has spent 30+ years repairing machines, starting as a military mechanic and later maintaining food processing equipment before moving into appliance repair. He founded RemoveAndReplace.com to share field-tested repair advice.
More about Keith →

TWP,
It looks like possibly a support part or housing may need to be removed. Is the wire part of a wire harness that can be disconnected? Are you unable to see where the end of the wire goes? Here is a diagram of the ice maker to help you to better understand disassembly. ICE MAKER diagram for model # B26FT70SNS Bosch-Parts Refrigerator Parts.
-RR
I have a Bosch side-by-side, freezer on the bottom fridge (Bosch b26ft70sns). The ice maker works, but needs to be cleaned because the ice has sediment on it (we have hard water). I cannot seem to figure out how to remove it completely. I removed the screws in the front and side that hold the ice maker on the bracket top. I also removed the two screws in that hold the auger motor in place. I can pull the ice maker out about 2-3 inches and it is free except for the wires. The wires appear to go into the auger motor but I cannot find a way to unplug them to get it all the way out. Can anyone help?
Thank you for everything.
James Coker,
The ice maker should have a small control board built into it. If the control board is bad, it could be replaced separately or just replace the complete ice maker. Replacing the complete ice maker assembly should solve the issue and prevent you from having to troubleshoot all the smaller parts within the ice maker. You should be able to find the ice maker online for around $90 US dollars. Cheapest Samsung ice maker DA97-11092B we can find is here.
NOTE: Due to Samsung using different ice makers depending on the build date of certain model refrigerators, you must look at the blue tag on the bottom of your ice maker and read the part number starting with DA97-XXXXXX of that tag to ensure you are ordering the correct ice maker.
-RR
Is the tray moving to “dump” the ice out? No, the tray has arms that sweep the ice out.
Is the ice maker getting an excessive amount of water? No
Have you made sure the wire harnesses are not pinched or damaged? I removed the entire ice maker and did not notice any damage to the wire.
Is there just one control board for the entire frig? Or is there a separate control board for the ice maker? Is the heat element going out due to the control board a common problem? If not, should I just replace the whole ice maker? (part DA97-11092B). Could it just be the motor is struggling to push the ice out?
James Coker,
It may be the heat element is bad in the ice maker. You can test it with a meter. The control board that applies power to the heat element may not be working properly. You can try testing each component and troubleshoot which is causing your issue. A new ice maker may fix the issue but if the ice maker is not receiving the proper power, you will have the same issue. Further troubleshooting is needed to find why the ice stays frozen in the tray.
Is the tray moving to “dump” the ice out?
Is the ice maker getting an excessive amount of water?
Have you made sure the wire harnesses are not pinched or damaged?
-RR
I have a Samsung RS265TDRS side by side refrigerator I’ve had for 4 years. Recently my ice maker will make ice, but not dump it into the bin. I tried to reset to no avail. So I removed the ice maker, defrosted the ice, cleaned it up, and plugged it back in. I then hit reset and the trays filled with water. Came back a few hours later and there was ice and it sounded like the motor was struggling to push the ice out. The ice was frozen solid to the trays. So after doing more research I read of other people that bought a new ice maker and continued to have the same issue. How can I check if it’s a bad control board not turning on the heat element under the tray? Is there a separate board that controls the ice making function? Or is the most common solution to buy a new ice maker?