A pair of headphones with audio cutting out on one side can be a common problem. Often, the issue is a broken or damaged wire near the plug or inside the ear cup. This guide provides an easy, do-it-yourself approach to repairing those wires and restoring your headphones’ full sound.

Step 1: Confirm the Source of the Issue
• Test your headphones on more than one device (phone, computer, etc.).
• If the same side is silent no matter the device, the headphones themselves need repair.
• If the problem shifts from left to right depending on the device or jack, the issue may be related to the audio source rather than the headphones.
Step 2: Gather Your Tools
• Soldering iron (small, low-wattage)
• Solder (rosin-core is usually recommended for electronics)
• Wire strippers or a sharp knife
• Heat-shrink tubing or electrical tape
• Small screwdriver set (if you need to open the ear cup)
• Replacement headphone plug (if the current plug is damaged)
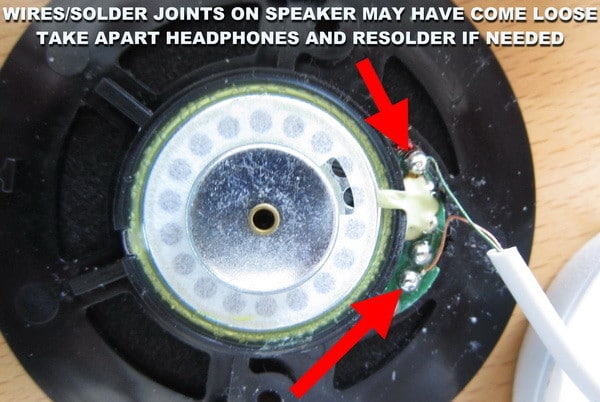
Step 3: Inspect the Headphone Cable
Check for visible signs of wear or damage along the cable:
• Frayed wiring
• Bends or kinks near the plug
• Bare copper showing through the insulation
These trouble spots often indicate where the sound may be cutting out. Gently move and flex the wire while playing audio to see if there’s an intermittent connection.
Step 4: Repair or Replace the Plug (Most Common Fix)
- Cut and Strip the Cable
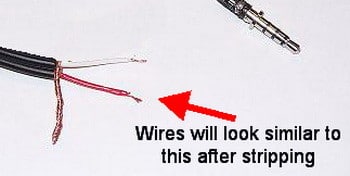
Remove the faulty or damaged plug by slicing the cable a couple of inches above the plug. Use wire strippers to remove about half an inch of insulation from the cable’s end, revealing two or three internal wires. - Identify Internal Wires
Headphone cables typically have left (L), right (R), and ground (common) wires. They may be color-coded (red for right, green or blue for left, and bare/copper for ground), or they might have enamel coatings in place of traditional insulation. - Prep the Wires
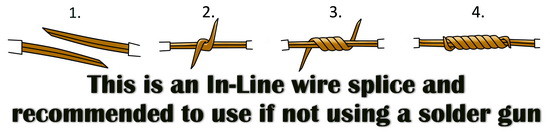
If your wires have an enamel coating, carefully burn off or strip away the coating with the soldering iron or fine sandpaper. Twist the same-color strands together, making sure they’re neat. - Solder New Plug
Disassemble the replacement headphone plug so you can see the terminals inside. Typically:
• Tip: Left (L)
• Ring: Right (R)
• Sleeve: Ground (common)
Heat each terminal briefly with the soldering iron, then apply a small amount of solder. Insert the correct wire (L, R, Ground) into each terminal and heat it again so the solder flows around the wire. - Insulate and Reassemble
Slide heat-shrink tubing over each solder joint or use electrical tape to prevent short circuits. Reassemble the plug housing, making sure no wires touch each other improperly.
Step 5: Inspect Wiring Inside the Ear Cup (If Needed)
If replacing or repairing the plug doesn’t fix the problem, the wiring inside one ear cup could be damaged.
- Use the appropriate screwdriver to remove any screws.
- Gently open the cup, watching for thin wires.
- Look for loose or broken connections where wires attach to the speaker driver.
- Solder any disconnected wires back into place. If the solder pads on the driver are labeled (+/- or L/R), match the wire colors accordingly.
Step 6: Test Your Work
• Plug the headphones into an audio source at a low volume to check that both sides work.
• Lightly wiggle the cable near the solder points and plug to ensure there is no crackling or cutout.
Links to the most popular headphone manufacturers: Beats, Bose, Klipsch, Master & Dynamic, Monster, Philips, Sennheiser, Skullcandy, and Sony.
Safety Reminders
Turn off and unplug your soldering iron after use.
Allow the iron to cool on a heat-resistant stand before storing it.
Work in a well-ventilated area to avoid breathing in solder fumes.
Repairing headphones that only have sound on one side typically involves finding and fixing a faulty connection. In many cases, re-soldering or replacing the plug solves the problem. If the trouble remains, it could be inside the ear cup wiring, which can also be repaired with a careful approach. With a few simple tools, a bit of patience, and the right guidance, you can restore stereo sound to your favorite headphones without having to buy a new pair.
Do you have an easier way to fix audio issues on a pair of headphones? Please leave a comment below.

Written by Keith Schneerer
Certified Appliance Tech · Founder, RemoveAndReplace.com
Keith has spent 30+ years repairing machines, starting as a military mechanic and later maintaining food processing equipment before moving into appliance repair. He founded RemoveAndReplace.com to share field-tested repair advice.
More about Keith →

Adam,
Most likely if both ears are not producing sound, it is the metal 3.5 mm jack that inserts into piece of equipment you want sound from. Your best bet is to purchase the complete wire with jack. You will then have to attach the wire to the ear pieces either by soldering or small screws. You can find replacements on Amazon for 3.5 mm jack with flat no tangle wire.
-RR
I have some special edition (I think) Ryback headphones and it’s the type of headphones with the flat no-tangle wire. How should I fix this, I also can’t find the spot where the wire is broken. I noticed that I chew the wire at one place and I checked and I can’t seem to find any crackling or hear both ears. Maybe it could be a problem in the headwear part of the headphone? Please help!!!!!
David,
You can buy a headphones audio replacement wire kit. Sometimes the wires in the universal kits are shielded and you can use a wire stripper and strip it back and cut it to the length you need. Amazon has headphone repair kits that are relatively inexpensive.
-RR
I have a set of Sony Studio Monitor Headphones… that the wire went back to the one speaker… and i can fix it, but i need new wire… where can i buy this very tiny wire?
Beats are harder to fix like many others are. It may help if they would have said that you need a 4 pole jack not a 3 and “No” they do not have 5 connection points they have 4 which is why they are called 4 pole jacks for 4 connection points. To solder 4 pole jacks you will need to be a bit of a pro. They are not as easy to solder as you may think. The smaller they are the harder they are to fit.
As with the wire colors you would need to test these to ensure that you get the right combination, 2 of them will need to be twisted together in some cases headphones or earphones have 5 cores but only use 4 but it was a choice of wiring by the manufacturer. Believe me when I say all makes and even models differ from color to color and they will not try and make it easy for you. The best way is to test them with proper equipment to find out the correct combination or you could just send them to us.
Melanie,
Buy a $4.00 1/8″ jack replacement from Radio Shack, which has small screw connectors that don’t need soldering. There will be one that will be for 5 wire. Ask the store person if you are unsure. Once you have this you can simply attach the exposed wires to the jack.
-RR
I have a pair of dr dre’s that does not have the jack end of it, it just has the headphone with a cord that is cut off there are 5 colors green, black, white, yellow, and brown can you please help me with telling me what each color does? Can any of these colors be doubled up like if they were for each side plus ground? Thank you in advance.