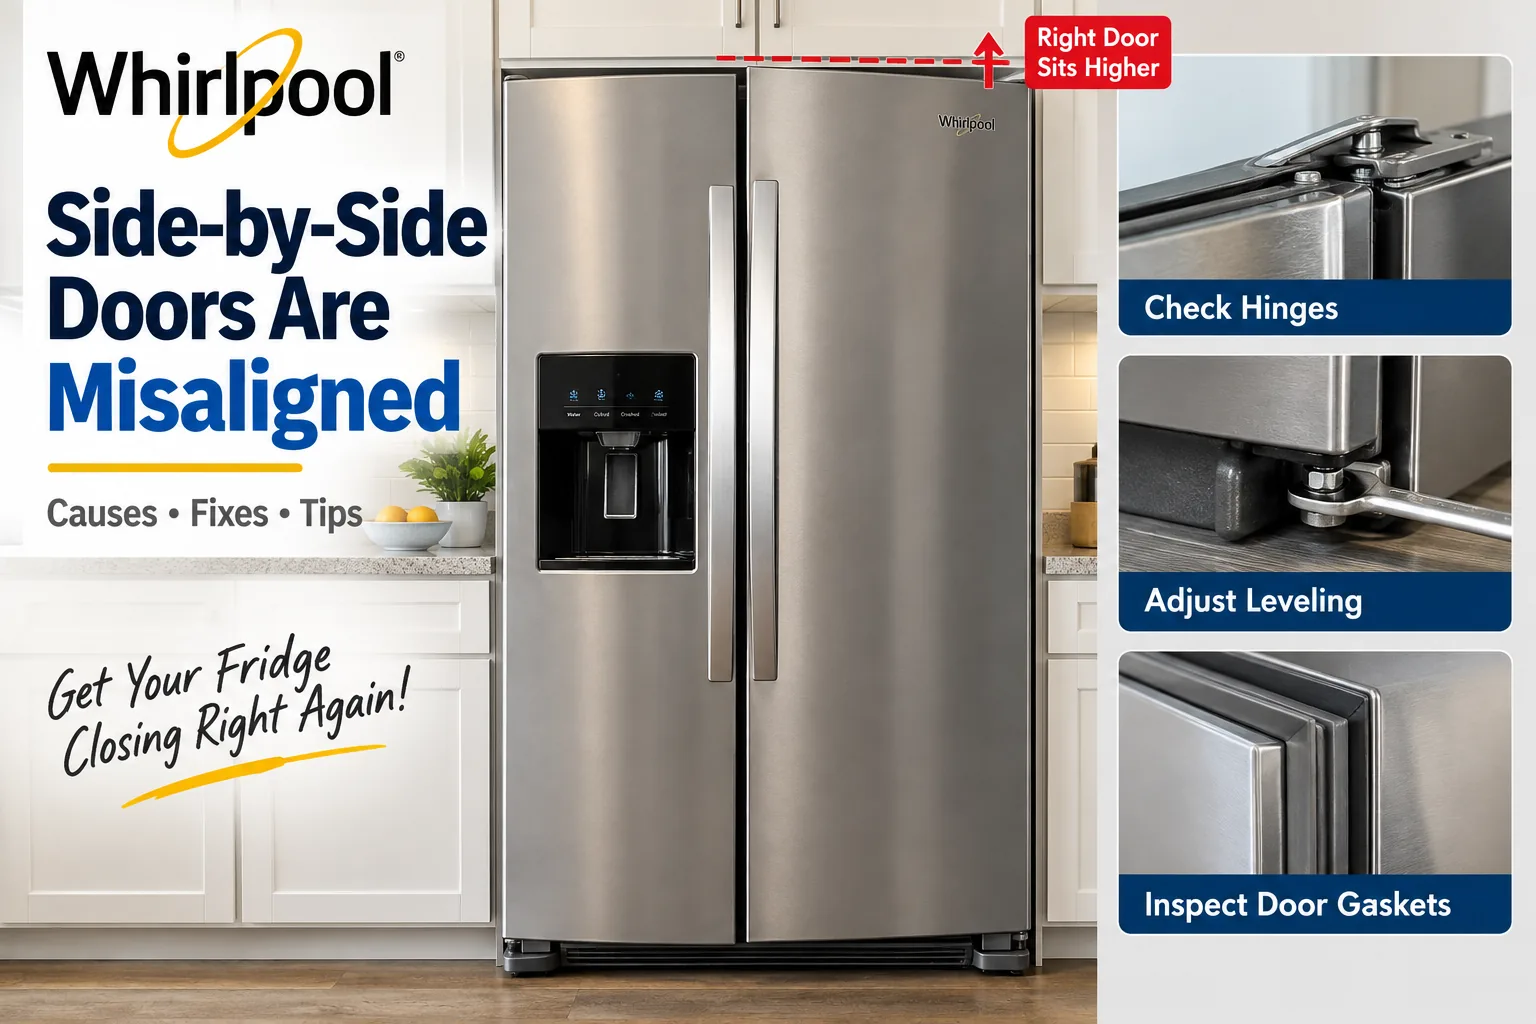
Most of the time, Whirlpool Refrigerator doors misaligned like this trace back to the unit not sitting level — not a broken hinge. Set a level on top of the cabinet and adjust the front leveling legs; that fixes it in about 10 minutes in many of these cases, no parts needed.
- A level from the junk drawer tells you in 30 seconds whether this is even a leveling problem.
- The top hinge and bottom hinge don’t do the same job — each wears differently over time.
- A loose hinge shows itself as real play when you wiggle the door — a loose leveling leg does not.
- If both hinges are already maxed out and the doors still won’t sit flush, you’re probably looking at a bent bracket, not a bad adjustment.
| Cause | Likelihood | Fix Cost | DIY Time |
|---|---|---|---|
| Unit not level | Most common | Free | 10 min |
| Loose/worn hinge screws | Common | $0-10 | 15 min |
| Bent hinge bracket | Occasional | $25-45 | 45 min |
| Warped door panel | Rare | $150-300+ | Pro likely |
Why Are My Whirlpool Refrigerator Doors Misaligned?
Side-by-side Whirlpool refrigerators run 250 to 300 pounds empty, and if even one corner sits a fraction of an inch low on the floor, the cabinet racks slightly and throws both doors out of alignment with each other and the frame — that’s the root cause behind most misaligned-door calls, not a broken hinge. You’ll typically see one door sitting a little higher than the other at the top, or a gap that’s wider at the bottom than the top. Checking the level before touching a single hinge screw catches this on almost every call like this, a habit that held up well across 11 years repairing commercial food service equipment. The fix itself is simple: pull the fridge out, set a level on top of the cabinet, and turn the front leveling legs until the bubble centers and both doors sit flush. It usually takes two or three small adjustments before they settle into place.
- Pull the fridge away from the wall far enough to see the front legs and set a level on top of the cabinet.
- Note which corner reads low, then turn that side’s leveling leg to raise it.
- Recheck the level after each adjustment — small turns, not big ones.
- Close both doors and check the gap at top and bottom, repeating until they sit flush.
On Whirlpool side-by-sides built since around 2012 — the WRS973, ED5FHGXKQ, and similar series — the front leveling legs turn with a wrench or a pair of pliers on a hex collar, not a screwdriver slot like the older models. Whoever decided these needed a hex collar instead of a slot never had to do this repair kneeling on a kitchen floor (a level from the junk drawer works fine for this, by the way — you don’t need anything fancy). If you’re cranking on a slot that isn’t there, you’re probably looking at the newer-style leg and need pliers instead.
Check the Hinge Screws Next
Once level is ruled out, the hinges themselves are the next thing to check — one of the more common causes once that first step is out of the way. Whirlpool side-by-side doors hang on a top hinge, a bottom hinge, and on most models a center hinge between the two doors. Over years of opening and closing, the screws holding these hinges to the cabinet work loose, or the hinge pin wears an oval-shaped hole where it used to be round. You’ll notice this one differently than a leveling problem — the door has actual play in it when you grab the outer edge and wiggle it, not just a static gap, and sometimes it creaks or clicks when you swing it too.
Work through the hinges in this order so you don’t create a new problem while fixing the real one:
- Confirm the fridge is already level.
- Do the wiggle test. Grab the outer edge of the door and shake it gently — real movement points to a worn hinge, not a loose screw you can just snug down.
- Tighten the top hinge screws with a Torx T25 bit, the sizing Whirlpool has used across most of these models for over a decade.
- Check the center hinge between the two doors if your model has one, since it can loosen independently of the top and bottom hinges.
- Pack stripped screw holes with toothpicks or a wood-fill product before reinstalling the screw if it spins without grabbing — an old trick that works better than it sounds.
My first instinct used to be tightening every hinge screw I could find, figuring more torque never hurts. I learned otherwise after stripping enough screw holes doing it that way:
- Wrong order: hinges before leveling — you just add play to a hinge that was never the problem.
- Right order: level first, hinges second.
If you’re not sure which model hinge design you’re dealing with, checking how to decode your Whirlpool model number tells you the production year range, which narrows down whether you’ve got the screwdriver-slot legs or the newer hex-collar style — Samsung owners troubleshooting a similar door issue can find the equivalent info in our Samsung refrigerator model number lookup guide.
When the Hinge Bracket Itself Is Bent
When both hinges check out fine but the door still won’t sit flush, a bent bottom hinge bracket is a common next suspect — not a bad adjustment. It happens more than people think on fridges installed in a tight kitchen corner, where the door gets swung wide open into a cabinet or wall over and over for years and the bracket slowly bends under the use. You’ll know it’s this and not a leveling problem because the door sits crooked even when you lift straight up on the handle — a level hinge shouldn’t do that. Whirlpool sells the hinge bracket separately from the hinge pin, and swapping just the bent bracket runs $25-45 depending on which side, versus $150+ if someone tells you to replace the whole door assembly, which is rarely necessary for this specific failure.
Can a Warped Door Be the Real Problem?
It’s rare, but yes — a warped door can be the real problem. A door installed somewhere it gets direct afternoon sun, or one that’s been overloaded with heavy jugs on the door shelves for years, can warp just enough that no hinge adjustment fixes it. If you’ve maxed out both hinge adjustments and the door still bows away from the seal along one edge, this is likely it, and it’s a job for a new door panel, not more hinge tweaks. That’s the one scenario in this whole list where I’d tell you to order the part and call it, instead of spending another weekend chasing an adjustment that was never going to fix it.
If you want to see the leveling and hinge-adjustment process done in real time before you try it yourself, this video covers the same steps above pretty well:
This video is a solid visual reference for seeing exactly where the leveling legs and hinge screws sit before you start pulling your own fridge away from the wall. It walks through:
- Checking the refrigerator’s level first
- Adjusting the top and bottom hinges to bring both doors back into alignment

Step-by-Step: Leveling and Adjusting the Doors
This is the order worth working through on a service call, free fixes first:
- Clear a path and check the water line. Pull the refrigerator away from the wall about 12 inches — enough to see the legs and set a level on top — and watch the ice maker water line so you don’t kink or pull it loose.
- Set a level on top of the cabinet, side to side and front to back. Note which corner reads low.
- Find the front leveling legs at the base of each door. Models built after roughly 2012 turn with a wrench or pliers on a hex collar; older models take a flat-blade screwdriver in a slot.
- Turn the low-side leg clockwise to raise that corner, a quarter turn at a time, rechecking the level after each turn.
- Close both doors and check the gap at the top and bottom edges. If they’re flush, push the fridge back into place and you’re done.
- If a gap remains, move to the hinges. Remove the top hinge cover, tighten the exposed screws with the same Torx bit from the hinge section above, and recheck the gap.
- Still uneven? Do the wiggle test. Grab the outer edge of the door and shake it gently. Real play means a worn hinge pin or bent bracket — not a leveling problem — so head back up to the hinge bracket section.
For the official adjustment specs on your exact model, Whirlpool’s own door alignment guide is worth a look before you start — it covers a couple of model-specific hinge variations I didn’t get into here, and Whirlpool’s separate side-by-side door alignment page is a good backup if your model isn’t covered on the first one.
These fridges run 250-300 pounds. Don’t crank a leveling leg so high the unit rocks or leans forward — that’s a real tip-over risk, especially with both doors open and loaded with food. Keep an eye on the water line and power cord any time you pull the unit away from the wall; a kinked line turns a free fix into a much bigger repair.
Door alignment problems often show up around the same time as other common Whirlpool side-by-side quirks. If your dispenser is only dispensing crushed ice, or you’re dealing with ice cubes stuck in the dispenser chute, those are separate repairs worth checking on their own. And if closing the doors also triggers a loud thud or rattle once they’re aligned, our guide to Whirlpool refrigerator noise causes and fixes covers that separately.
The leveling and hinge-screw fixes for Whirlpool Refrigerator doors misaligned like this are DIY-friendly — no special tools beyond a level and a Torx bit, and not much that can go wrong if you take it slow. A hinge bracket kit runs $25-45 on RepairClinic, and a service call for the same hinge work typically runs $150-200, so doing it yourself saves real money.
Call a pro if:
- The door is visibly warped or bowed along the seal, not just sitting crooked
- Both hinges are already maxed out and there’s still play at the pin itself
- The cabinet frame the hinge bolts into looks cracked or pulled away from the wall — that’s a structural issue beyond hinge adjustment
Frequently Asked Questions
How do I know if my Whirlpool refrigerator doors are unlevel or if it’s a hinge problem?
The level from the top of the cabinet settles it in seconds. If it reads level and the door still has real play when you grab and wiggle the outer edge, that’s a hinge, not a leveling issue.
Can I adjust Whirlpool refrigerator door hinges without removing the door?
Yes. On most side-by-side models, the top and bottom hinge screws are accessible after popping off a small cover, so you can tighten them or shim a stripped hole without ever taking the door off its hinges.
What size Torx bit do I need for Whirlpool refrigerator door hinges?
A Torx T25, same as covered in the hinge section above — it fits nearly all these models built over the last decade or so.
Why does one Whirlpool refrigerator door sit lower than the other after leveling?
If leveling didn’t fully fix it, check the hinge screws next — a loose or worn hinge on just one side will let that door hang a little lower even on a perfectly level fridge.
How much does it cost to fix misaligned Whirlpool refrigerator doors?
Leveling is free, hinge screws cost little to nothing, and a replacement hinge bracket runs about $25-45 in parts. A full door panel replacement for a warped door is the most expensive outcome, typically $150-300 or more.

Written by Keith Schneerer
Certified Appliance Tech · Founder, RemoveAndReplace.com
Keith has spent 30+ years repairing machines, starting as a military mechanic and later maintaining food processing equipment before moving into appliance repair. He founded RemoveAndReplace.com to share field-tested repair advice.
More about Keith →