Wondering which way to install the batteries in your battery operated device? Which side is negative and which side is positive? What side of the battery goes on the spring? On some battery operated electronics it may be difficult to know which way the batteries need to be installed.
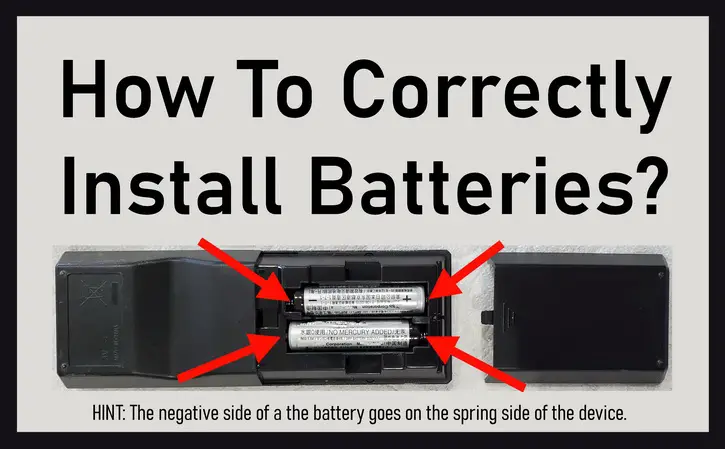 How To Correctly Install Batteries
How to install batteries correctly
On some game controllers, flashlights, toys, clocks, or remote controls, there is no illustration or guide for the Positive + or Negative – signs on the device you are installing the batteries to know which way to install the batteries correctly. We will show you the most common and easy ways to identify where to install the batteries with or without an illustration or an imprint on your Xbox game controller, thermostat, flashlight, toy, clock, or remote control. Remote control not working after battery replacement? Check here for how to fix a remote control
TIP: The negative (-) side of a the battery goes on the spring side of the device and the positive (+) side of the battery goes on the flat side of the device. If the device has no spring, look for the + and – imprints on the device and the battery to correctly replace the battery or batteries.
All batteries have a + or – sign on each end. Batteries have two terminals: positive (+) and negative (-). This tells you which end of the battery is either positive or negative. Look at the ends of an AA battery, it will show a positive (+) on one end and a negative (-) on the other. The flat end is the negative – side and the part with the nub is the positive + side. See images below…
 AA battery with + and – clearly marked
Positive side has NUB – Negative side is flat
Your Game controller or remote control should have an illustration to show you where the batteries go
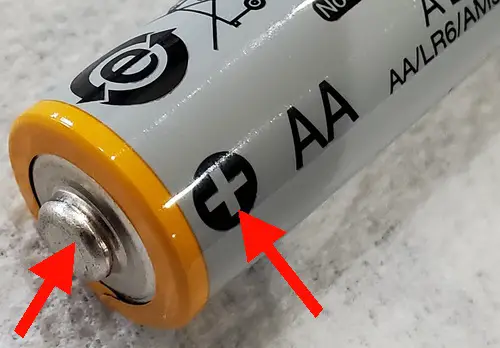 Positive + side of battery
Insert this NUB side of battery to the FLAT area in device
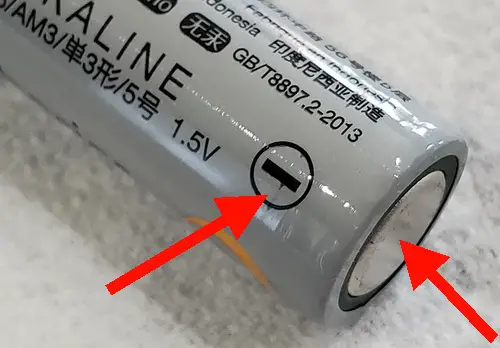 Negative – side of battery
Insert this FLAT side of battery to the SPRING area in device
On most battery operated devices, there should be an imprint in the plastic or under the battery cover that tells you how to install the batteries. Some devices are missing this info so here is the most common way to install a battery or batteries. See image below…
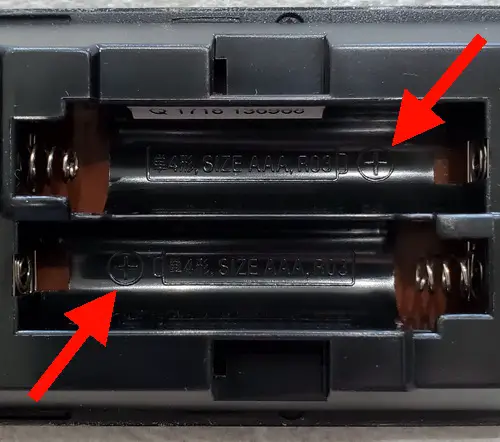 Battery illustration on remote control
This remote has the positive side marked with a + | Negative side of the battery goes to the spring
On most battery operated devices that use round cylindrical type batteries such as double AA, triple AAA, C, and D batteries, the negative end (flat end) of the battery goes on the spring and the positive end (side with a nub) goes to the positive end. The spring is there on the negative side to apply pressure on the battery to keep it in place so that it stays secure.
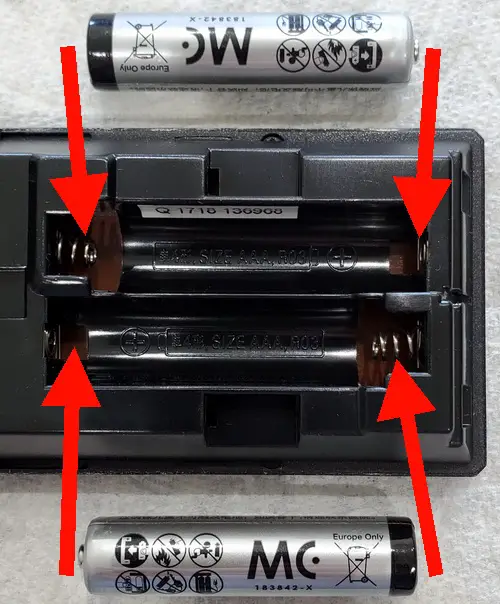 Install batteries in a remote control
Look for the + and – symbols on the device | Match up the batteries with the illustration
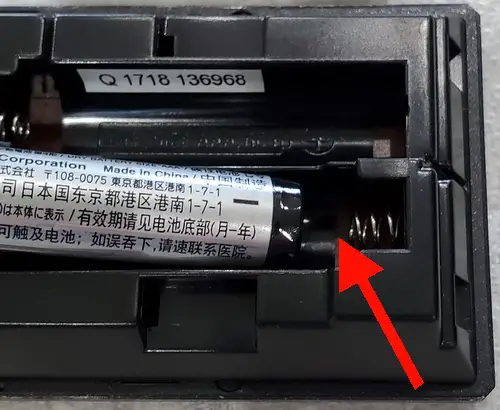 Installing a battery to + and –
Match up the Negative FLAT end of battery to spring
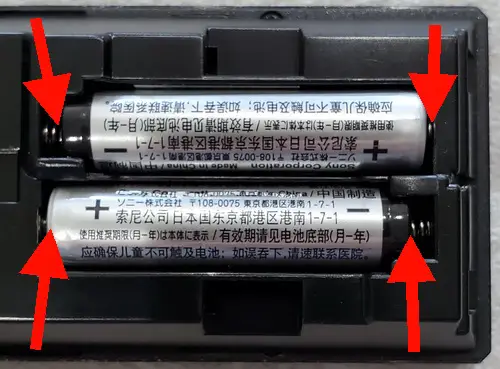 Batteries installed correctly in a remote control
Positive battery side NUB to positive on remote | Negative battery FLAT SIDE to negative on remote spring
Are all batteries installed the same?
Note that some toys or other battery operated devices may have the batteries installed in a different manner then described. So always check to see if the toy or device has an illustration on the back cover of the battery compartment. If there is no illustration, look for a plus sign where the batteries go in the device and most will show a positive (+) or negative (-) as to which way the batteries need to be installed.
Does the negative side of a battery always go on the spring?
On most battery operated devices, yes. The spring is the negative end for the AA or AAA battery to connect to. The spring keeps the battery in place.
How to change batteries in your device
- Remove the old batteries from the device – Xbox game controllers, flashlights, thermostat, toys, clocks, remote controls…
- Dispose of the old batteries in accordance with recycling.
- Check the battery compartment for corrosion or batteries leaking.
- Clean away any corrosion in the battery compartment.
- Use new batteries that are meant for your battery operated device.
- Remove the batteries from their packaging and discard any plastic wrapping.
- Install the new batteries into your device.
- Match up the positive (+) and negative (-) markings on the batteries in the device to make sure they are installed correctly.
- Test the device to be sure it is working properly.
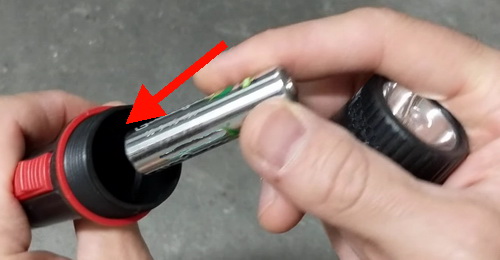 Replace Batteries in Flashlight
Check battery for + or – then put the Neg side or flat side of battery to spring in flashlight
How to Change Batteries in a Flashlight
The Negative side of battery goes to the spring
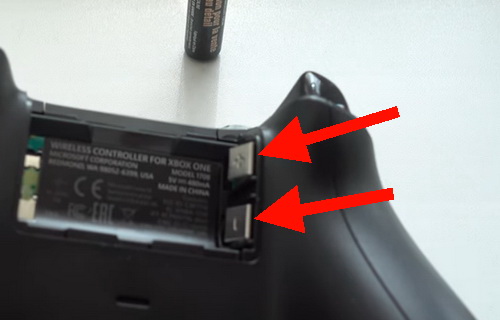 How to change batteries in Xbox controller
Notice the + and – symbols on the controller | Simply insert batteries to match the + and –
How to CHANGE the Batteries on your Xbox Controller
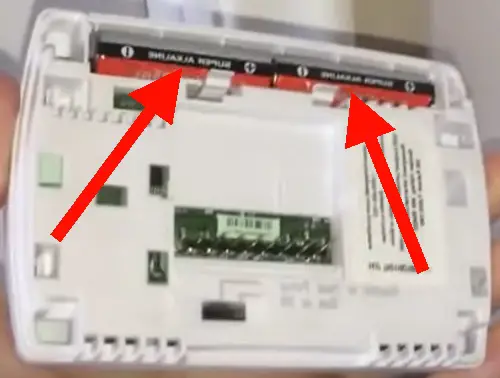 How to change battery in thermostat
Not all batteries are located in same area on all thermostats | Some thermostats batteries are located on the side | Check your manual before changing batteries on your thermostat | Some thermostats do not have a spring in the battery holder so check where it shows the + and – and insert the batteries correctly
How to Change a Thermostat Battery
Need some help with installing batteries into Xbox game controllers, thermostat, flashlights, toys, clocks, or remote controls? Is the battery installation illustration missing and you have no idea how to install the batteries? Please leave a comment below with what your device is and what type of batteries you are attempting to install correctly and we can help.


Leave a Reply