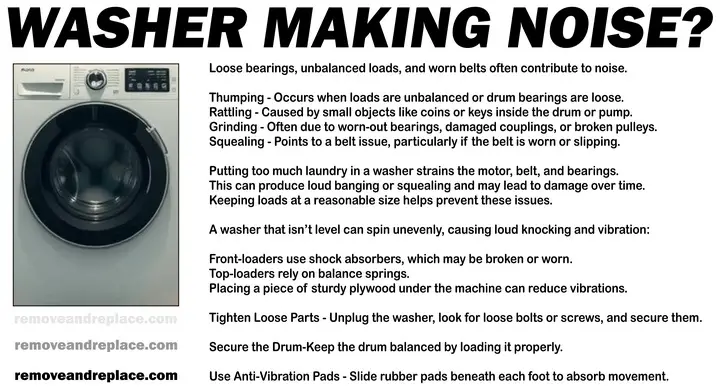
If your washer spins but does not agitate, it could be due to a number of potential issues. This guide will walk you through the different parts that could be causing this problem and how to troubleshoot them.

What To Check – Washing Machine Spins But Doesn’t Agitate
The first thing to look at is whether a belt has broken or slipped. This is especially true if you find that the arms of the machine are spinning but not agitating. The belt may have come loose or worn down, leading it to slip and not provide the necessary friction for the agitator to work properly. It’s a relatively easy fix to replace the belt if that’s what the problem is.
4 Common Reasons Top Loader Spins But Wont Agitate
- Worn Out Drive Belt: The drive belt connects the motor to the agitator, enabling it to move. Over time, it can wear out or break, leading to a washer that spins but doesn’t agitate.
- Faulty Agitator Dogs: These small components are responsible for the agitating motion of the washing machine. If they’re worn out or damaged, they may not be able to grip the agitator, causing it to fail to agitate while still allowing it to spin.
- Defective Lid Switch: The lid switch ensures the washer stops spinning when the lid is open, and if it’s defective, it might not allow the machine to agitate.
- Broken Motor Coupling: This connects the motor to the transmission. If it’s broken, it may cause the washer to spin without agitating.
1. Inspect The Drive Belt
Over time, the drive belt can wear out and cause the washer not to agitate. Prevent this by replacing the belt every few years, depending on the washer’s usage.
Step 1: Unplug the Washing Machine For your safety, always disconnect the washing machine from its power source before starting any repair or inspection.
Step 2: Locate the Drive Belt The drive belt is usually found at the bottom of the washing machine, connecting the motor to the drum. To access it, you’ll likely need to remove the back panel or tilt the machine carefully to one side.
Step 3: Inspect the Drive Belt Inspect the belt for any signs of wear and tear. This could include fraying, cracks, or thinning. A worn-out belt might slip off the motor or the drum, causing the washer not to agitate properly.
Step 4: Check the Belt Tension Press down on the middle of the belt. If it deflects more than about 1/2 inch, it may be too loose and need adjustment or replacement. If the belt is too tight, it can cause excessive wear on the motor bearings and the drum’s support structure.
Step 5: Replace the Drive Belt if Necessary If the belt shows signs of wear or has a loose tension, it’s time to replace it. Always buy a replacement belt that’s specifically designed for your washing machine model. Remove the old belt and place the new one around the motor and drum following the manufacturer’s instructions.
Step 6: Reassemble the Washing Machine Once the new belt is in place, reassemble the washing machine and ensure all panels and screws are securely fastened.
Step 7: Run a Test Cycle After you’ve replaced the belt and reassembled the machine, plug it back in and run a test cycle. If the machine agitates as it should, you’ve successfully replaced the drive belt. If it still doesn’t agitate, there may be another underlying issue
2. Check The Agitator Dogs
These plastic parts are located at the top of the agitator and are designed to turn the agitator one way during the wash cycle. If they’re worn or broken, the agitator may not agitate correctly. To replace them, you’ll need to disassemble the agitator. Let’s break down the process of checking and replacing the Agitator Directional Cogs, also known as Agitator Dogs.
Step 1: Unplug the Washer Safety first! Always unplug your washing machine before starting any repair work.
Step 2: Remove the Fabric Softener Dispenser The fabric softener dispenser is often located at the top of the agitator. This can usually be removed by simply pulling it up and out. Some models may require a gentle twist to release it.
Step 3: Remove the Agitator Cap Underneath the fabric softener dispenser, there should be a cap that covers the agitator’s bolt. Carefully pry this cap off with a small flat-head screwdriver. Be careful not to damage the cap or agitator.
Step 4: Remove the Agitator With the cap removed, you should see a bolt that holds the agitator in place. Using a socket wrench with an extender, remove this bolt. Once the bolt is removed, you should be able to lift the agitator out of the washer.
Step 5: Inspect the Agitator Dogs Now that you’ve removed the agitator, you can inspect the agitator dogs. These small plastic pieces are designed to catch and turn the agitator during the wash cycle. If they’re worn or broken, they won’t be able to do their job.
Step 6: Replace the Agitator Dogs If the agitator dogs are worn or broken, they’ll need to be replaced. You can usually purchase replacement parts from a home improvement store or online. Make sure to buy the right parts for your particular washer model.
Step 7: Reassemble the Agitator Once the new agitator dogs are in place, you can reassemble the agitator. Simply reverse the disassembly process: place the agitator back in the washer, secure it with the bolt, replace the cap, and finally, replace the fabric softener dispenser.
Step 8: Plug in the Washer After everything is securely in place, plug the washer back in and run a test cycle to make sure it’s agitating properly.
3. Check Door Or Lid Latch Assembly
Should the lid switch assembly fail, it can affect the function of the agitator. To identify if this is the problem, test any electrical switches with an Ohm meter for continuity.
Step 1: Unplug the Washing Machine Before beginning any repair or inspection, make sure to unplug the washing machine for safety reasons.
Step 2: Locate the Lid Latch Assembly The lid latch assembly is usually located under the top panel of the washing machine. You might need to remove a few screws or clips to access it. Refer to your washing machine’s manual on how to properly disassemble this part.
Step 3: Identify the Lid Switch Assembly Once you’ve accessed the lid latch assembly, you’ll be able to see the lid switch assembly. It’s typically a small component connected to the lid latch that prevents the washer from operating when the lid is open.
Step 4: Test the Lid Switch Assembly To test the lid switch assembly, you’ll need an Ohm meter. This device measures electrical continuity. Disconnect the lid switch from the washer and place the probes of the Ohm meter onto the terminals of the switch. If the meter reads continuity, that means the switch is functioning correctly. If it reads no continuity, the switch is faulty and needs to be replaced.
Step 5: Inspect the Lid Latch Assembly While you’re there, take a moment to visually inspect the lid latch assembly. Look for any signs of wear, cracking, or damage. If the assembly is visibly damaged, or if the Ohm meter test indicates a problem, you’ll need to replace the lid latch assembly.
Step 6: Replace the Lid Latch Assembly if Necessary If the lid latch assembly is faulty, replace it with a new one. Make sure that the new assembly is compatible with your specific washer model.
Step 7: Reassemble the Washing Machine After replacing the faulty parts, reassemble the washing machine. Make sure everything is securely fastened before plugging the washer back in.
Step 8: Run a Test Cycle Finally, run a test cycle to ensure that the washer is agitating properly. If the issue persists, you may need to call a professional.
4. Motor Coupling Is Broken?
This connects the motor to the transmission. If it’s broken, it may cause the washer to spin without agitating.
Materials Needed:
- Screwdriver
- Wrench
- Replacement motor coupling
Step 1: Unplug the Washer Always start any appliance repair by disconnecting the power source to ensure safety.
Step 2: Access the Motor Coupling The motor coupling is typically located behind the machine’s control panel. You’ll likely need to remove the washing machine’s shell or cabinet to reach it. This usually involves removing screws and possibly the control panel.
Step 3: Remove the Motor Once the washing machine is open, you’ll need to remove the motor. This is usually secured with clamps that can be removed with a screwdriver and possibly a wrench. Be sure to disconnect any wiring attached to the motor.
Step 4: Remove the Broken Motor Coupling With the motor removed, you can now access the broken motor coupling. It should pull right off the motor and transmission shafts, but you may need to use a screwdriver to pry it off.
Step 5: Install the New Motor Coupling Push the new motor coupling onto the motor and transmission shafts. Ensure it’s pushed on as far as it will go.
Step 6: Reinstall the Motor Place the motor back in its original position and secure it with the clamps. Reconnect any wiring that was disconnected.
Step 7: Reassemble the Washer Reassemble the washer by replacing the shell or cabinet and fastening any screws that were removed.
Step 8: Plug the Washer Back In Finally, reconnect the washing machine to the power source.
Have more questions? Ask us anything using the comment form below.