Updated July 3, 2026
To fix a door your dog scratched up, fill the deep gouges with wood putty, let it dry per the can’s instructions, then sand it smooth and flush. Prime and paint over the repair to match. If the molding around the door is heavily chewed or gouged, replace that trim piece instead of patching it.
I’ve been fixing things with my hands for 39 years — 19 of those keeping Air Force aircraft airworthy, where a sloppy patch job isn’t an option — and I’ll tell you a scratched-up door is one of the easier repairs a homeowner can knock out in an afternoon. If you’ve got a panicked dog and a clawed-up door, you’re in the right place. I’ve done this fix on my own doors more than once.
Why Your Dog Did This (And Why It’s Not the Door’s Fault)
Here’s what’s actually happening: most dogs panic when you shut them in a room they don’t know. They’re not being bad — they’re scared, and scratching at the door is how they try to get out or get your attention. About 80% of the door damage I’ve seen from dogs is right at the bottom third of the door and along the molding, exactly where a standing or jumping dog can reach and dig in. The other 20% is up higher on the door face from a bigger dog throwing its weight against it. Nearly all of it is surface gouging in the paint and wood, not structural — which is good news, because that’s the kind of damage wood putty and sandpaper were made for. The fix is straightforward: fill the deep gouges, sand them flush, and repaint. You’re looking at an afternoon of work and maybe fifteen bucks in supplies, not a new door.
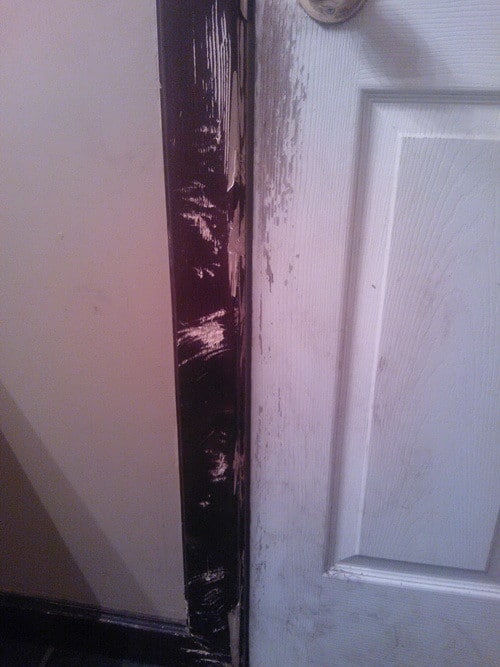
- Wood putty fills the deep gouges — let it dry fully before you touch it with sandpaper.
- Sand it flush and level with the surrounding wood, then prime and paint to blend the repair in.
- If the molding (the trim around the door) is heavily damaged, replace the piece instead of patching it.
- Every supply you need is at your local home improvement store for under $20.
- Fix the dog’s anxiety too, or you’ll be sanding this same door again in a few months.
What You’ll Need Before You Start
Don’t overthink the shopping trip. Everything here is at the local home improvement store, and you probably already own half of it. Here’s my short list:
- A small tub or tube of wood putty (paintable — check the label)
- A putty knife or even an old plastic card to spread it
- Sandpaper — I like 120 grit to knock down the putty and 220 grit to finish smooth
- Primer
- Paint that matches your door
- A tack cloth or damp rag to wipe dust
That’s it. My first instinct years ago was always to reach for the fanciest two-part epoxy filler on the shelf because I figured tougher was better. I did that for a while. Then I learned that for shallow dog scratches on an interior door, plain paintable wood putty sands easier, takes paint better, and costs a fraction as much. Save the epoxy for structural stuff.
How Do You Repair a Door Scratched by a Dog?
This is the meat of it. Take your time on the drying and sanding — rushing those two steps is where most people screw up and end up with a lumpy patch that shows through the paint.
- Clean the damaged area. Wipe out any loose splinters and dust from the gouges. Loose wood fibers under fresh putty will telegraph right through your paint. (I skipped this once and had to redo the whole thing — don’t ask me how I know.)
- Apply a small amount of wood putty to the deep gouges. Press it in firmly with the putty knife so it fills the bottom of the scratch, not just the surface. Overfill slightly — putty shrinks a hair as it dries.
- Let it dry per the instructions on the can or tube. This is not the step to guess on. Some putties are ready in 30 minutes, some want a couple hours. Budget more time than the can claims your first time.
- Sand it down until it’s smooth and level. Start with the 120 grit to bring the putty flush with the door, then finish with 220 so your hand can’t feel the edge of the repair anymore. Run your fingertips across it — if you can feel a ridge, your paint will show it.
- Wipe the dust off with a tack cloth or damp rag. Any dust left behind will grit up under the paint.
- Prime, then paint over the wood putty. Bare putty soaks up paint differently than the surrounding wood, so a coat of primer first keeps the repaired spot from showing as a dull patch later. Then paint to match the door.
When the Molding Is Too Far Gone
Sometimes the door face cleans up fine but the molding — the trim strip that frames the doorway — is chewed and gouged past saving. If the damage to the molding around the door is heavy, I don’t waste time patching it. Just replace it. Molding is cheap, it comes in standard profiles at any home improvement store, and swapping a beat-up piece for a fresh one looks a hundred times better than a putty-caked patch job. Pry the old piece off carefully, take it to the store to match the profile, cut the new piece to length, nail it in, then caulk and paint.
Watch your fingers on the pry bar. When you’re prying off old molding, the wood can split and snap toward you. Pull slow and steady, and keep your free hand clear of where the piece will spring loose.
Watch the Full Repair
If you’d rather see the putty-and-sand process in motion before you dig into your own door, this video walks through the same steps I laid out above. Seeing someone press the filler in and sand it flush makes the “how thick, how smooth” question a lot easier to judge your first time.
Stop It From Happening Again
Here’s the part most repair articles skip — they patch the door and walk away. But if you don’t deal with why your dog panicked, you’ll be sanding this same door again in a few months. A few things that have worked for folks I know: leave the dog in a room it already knows and feels safe in, give it a favorite toy or a piece of your worn clothing so it’s not totally alone, and don’t shut it in cold. Crate training done right can help too. The door repair takes an afternoon. Fixing the anxiety takes longer but saves you the whole job next time.
If you’re patching up other pet damage around the house while you’ve got the tools out, our guide on how to remove scratches from hardwood floors covers the same fill-and-finish idea for floors, and if the frame took a beating you might also want to look at how to fix a hole in a hollow core door. For bigger surface gouges, the technique in repairing scratches in wood furniture transfers over almost exactly.
Frequently Asked Questions
Can I just paint over the scratches without filling them?
No. Paint won’t hide a deep gouge — it’ll actually make it more obvious because the light catches the edges. You’ve gotta fill the depth with putty, sand it flush, then paint. I’ve tried the lazy way and it never once looked right.
What kind of wood putty should I use?
A basic paintable wood putty from the home improvement store is all you need for interior door scratches. Make sure the label says paintable. I’ve moved away from the heavy two-part epoxy fillers for this kind of job — they’re overkill, harder to sand, and cost more for no real benefit on shallow dog damage.
How long do I let the wood putty dry before sanding?
Follow the drying time on the can or tube — it varies by product. Don’t rush it. If you sand putty that’s still soft underneath, you’ll gum up your sandpaper and drag the whole repair out of shape. I always budget more time than the can claims.
Should I repair or replace the molding around the door?
If the molding is only lightly scratched, fill and paint it like the door. But if it’s heavily chewed or gouged, replace it — molding is cheap and swapping in a fresh piece looks far better than a big patch. I don’t even try to save badly damaged trim anymore.
Will this repair hold up if my dog does it again?
The repair itself is solid, but a determined dog will scratch a repaired door just like a fresh one. That’s why I push the prevention side hard — deal with the anxiety, or you’re just doing this again down the road.

Written by Keith Schneerer
Certified Appliance Tech · Founder, RemoveAndReplace.com
Keith has spent 30+ years repairing machines, starting as a military mechanic and later maintaining food processing equipment before moving into appliance repair. He founded RemoveAndReplace.com to share field-tested repair advice.
More about Keith →
The first thing I would try is to sand off the finish. Once the bare wood is exposed, get the scratched area good and wet. The water will help to swell the grain of the wood. Some heat from a hair dryer will help too. With a little time you should be able to get the scratched areas at least close to even with the rest. From there you can sand out any remaining marks and refinish it. Best of luck.
Hi Eleanor,
We have an easy way to Remove and Replace Tiles and Grout on our website.
https://removeandreplace.com/2013/02/27/how-to-remove-and-replace-grout-easy-step-by-step-diy/
Have a look and let us know if you need any other help or tips completing your tile and table project.
-RR
I have a dining room table top that has tile squares and grout. Would like to replace with different tiles and grout. How can I do this? I need easy step by step instructions.