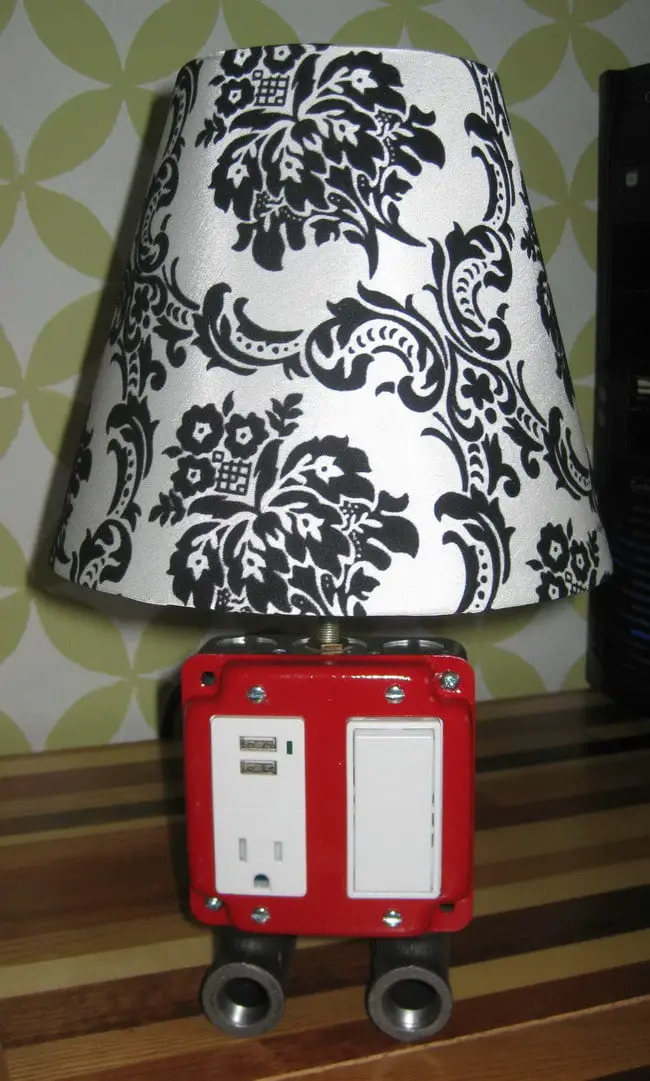
Here is a fun diy project that only takes a few hours and will run you around $50 dollars. The combo Lamp, electrical outlet and USB charger.
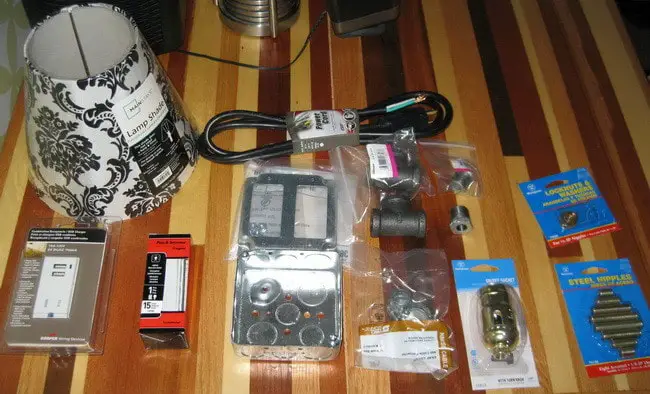
Here is everything that you will need with prices included:
Junction box – $1.02
Cover – $1.25
Outlet and 2.1 AMP USB – $15
Snaplock Connector – $1
1/8 nipples – $5
Wirenuts – $1
Rust-Oleum Spray Paint – $3.87
Electrical Tape – $1.50
Nuts and washers – $1.50
1/2 T – $4
Grounded cord (3 wire) – $5
Light switch – $2.97
Lamp Socket – $5
Galvanized bushing – $4.50
Lamp shade – $5
Total cost – $59.85
Hi-Res Printable Illustrated Parts List
THE LIST – Outlet with usb, light switch, junction box. (there will be a variety of styles deep, square, plastic, metal).
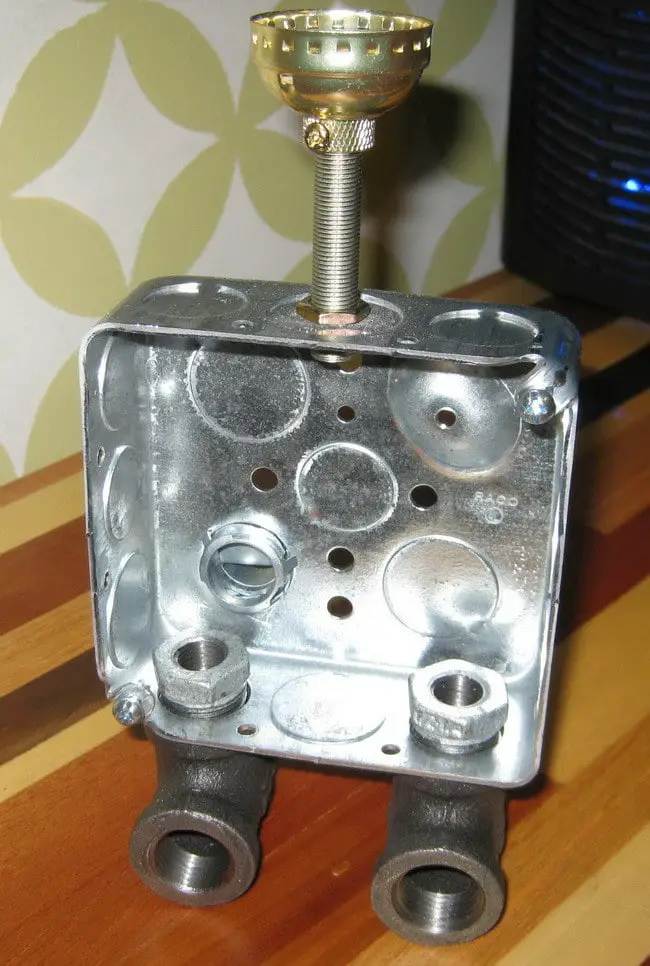
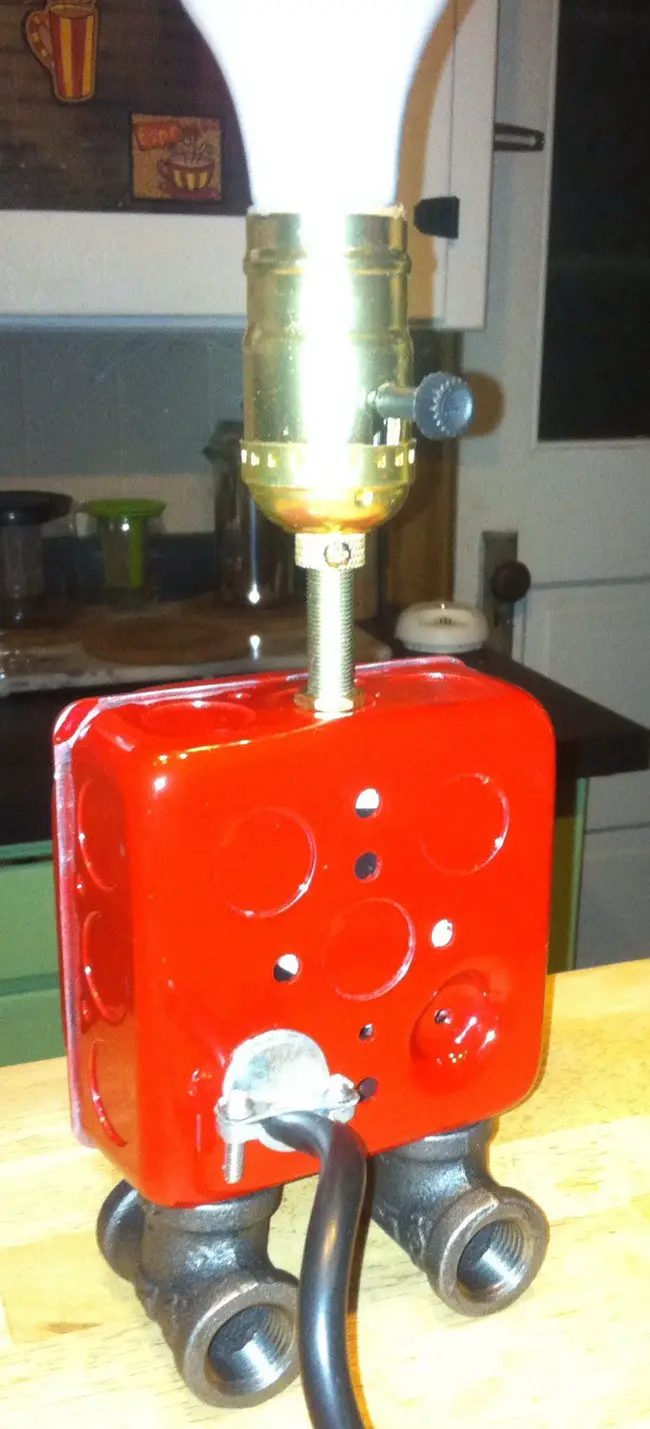
The feet are galvanized and painted fittings from the plumbing section. Two “tees”, and some threaded reducer bushings to connect through the knockouts of the junction box.
In the lighting section they’ll have diy lamp kits, and will have threaded rods, harps to hang the shade on if needed.
You could always just print out the pics, or put them on your phone if possible, show them to the person at the home improvement store and they will help you find everything.
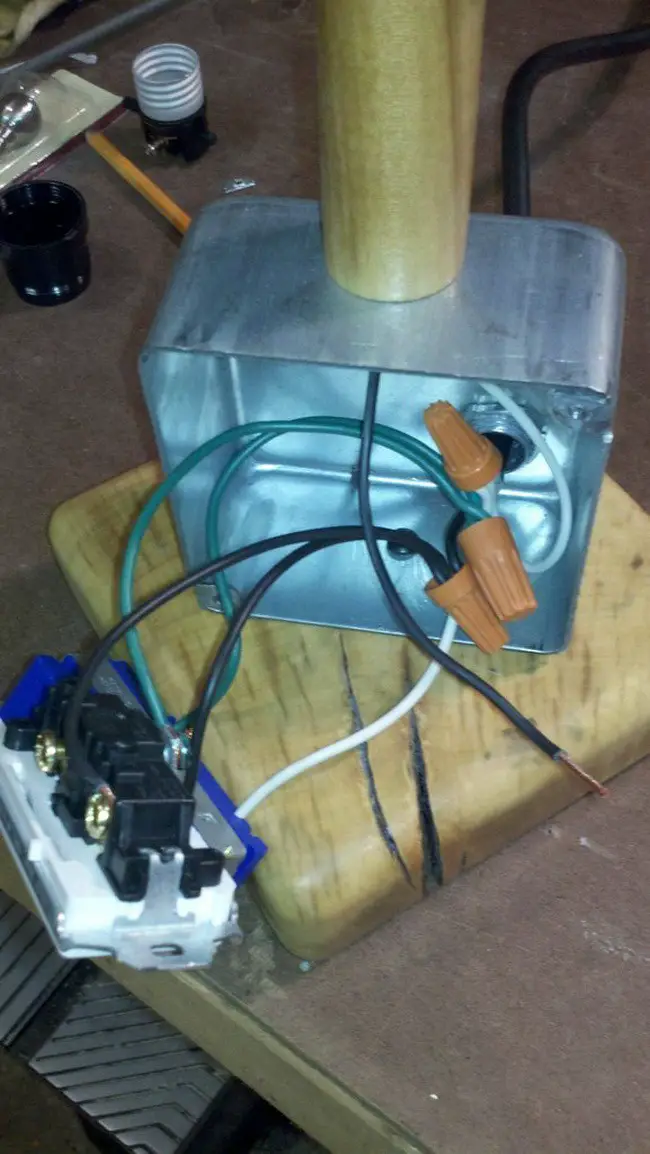
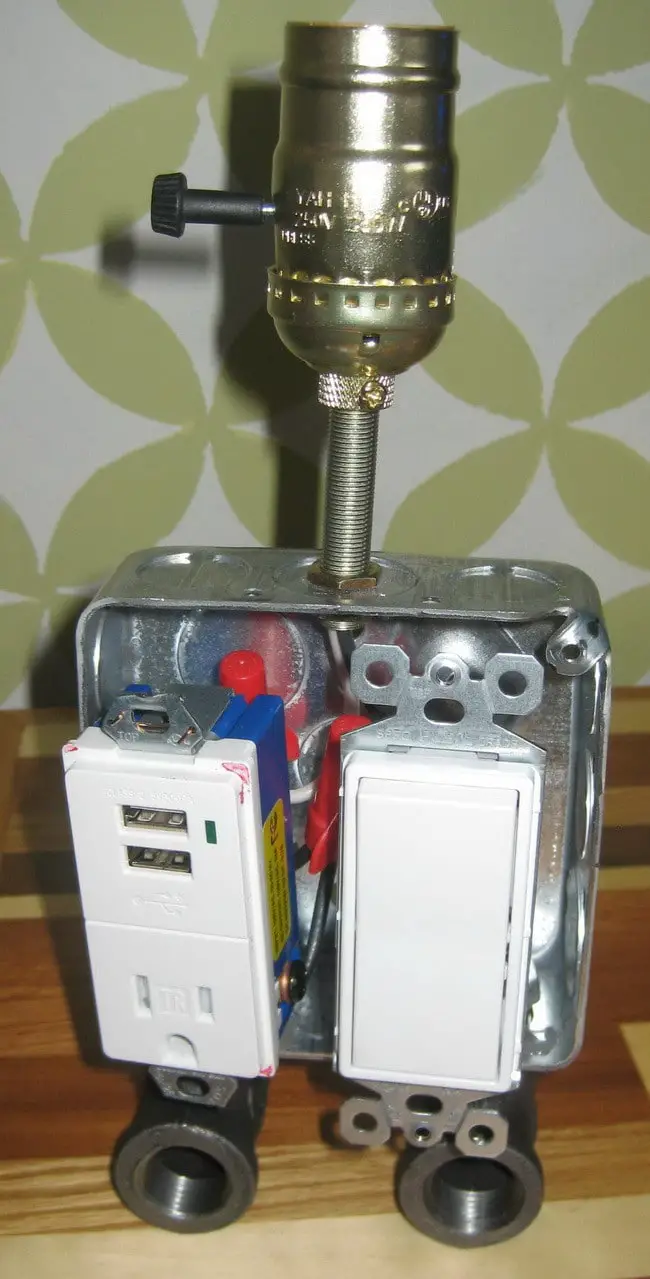
For those of you not an electrical genius, here is a not so professional way of hooking up the wiring – Connect green ground from cord to the green ground of the switch, outlet, AND THE METAL CASE, and the light socket if it has a shell ground. (As long as the metal body of the box is grounded, you are ok.)
Connect the white neutral wire of the cord to the terminal labeled neutral on the outlet (usually a silver screw) and to the white or outside threaded part of the light socket.
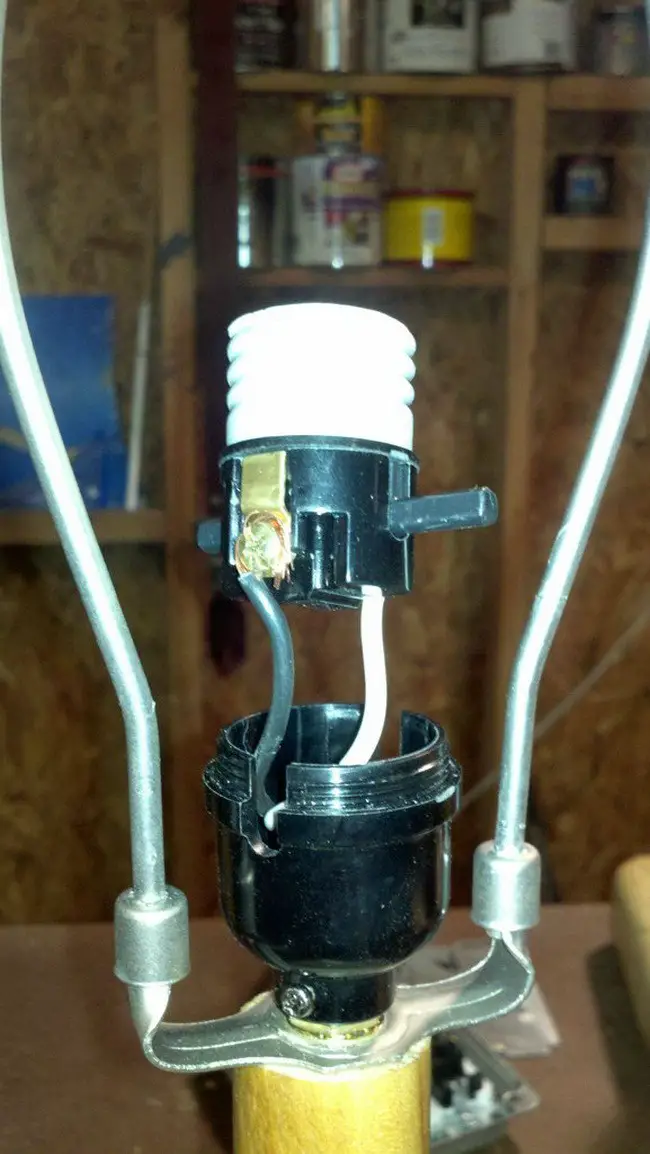
Connect hot black of the cord to the hot of the outlet (usually gold screw) and to one side of the switch. Connect the other side of the switch to the center hot terminal of the light socket.
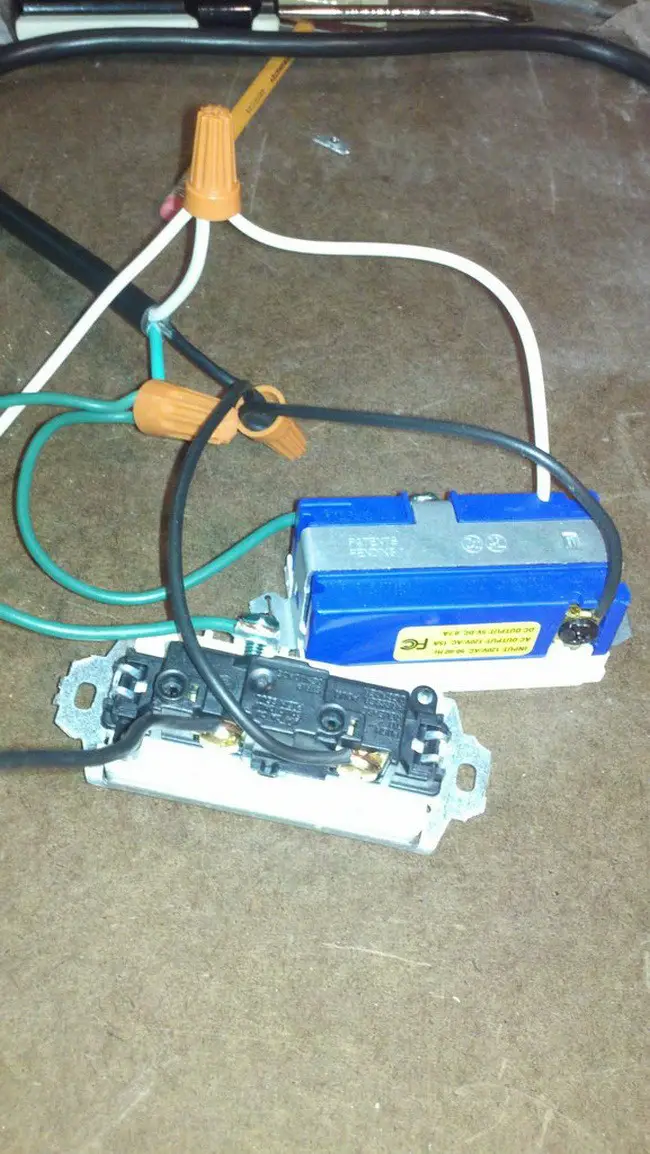
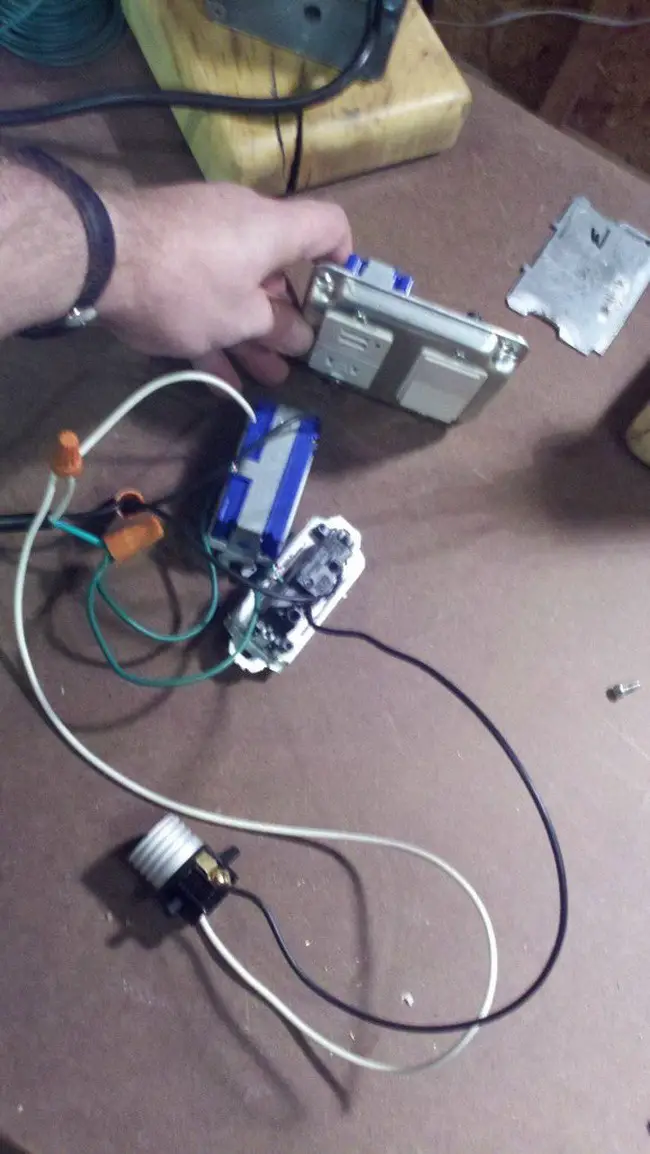
You will need 4 more pieces of wire to get power to the outlets. Have a look at the wiring schematic above. We actually cut about 5 inches of wire off of the end of the cord we bought and used that for the extra wiring. 4 pieces of wire are needed to complete the wiring – A small white wire (neutral) A small black wire (hot) and two green wires (ground). The black wire will go from the USB outlet directly to the switch. The white wire will get spliced from the USB outlet to the white wire. (2 small green wires used here) One green wire will go from the green ground screw on the USB outlet to the green screw on the switch and the second will be grounded into the metal housing box. (NOTE: The black wire is the “hot” wire, power travels from the wall and up and into the switch (look at schematic above) the switch is used only to turn on and off the light. The USB outlet is ALWAYS powered regardless which way the switch is turned on or off.) Remember, it is a good practice to wrap the outlets with electrical tape to cover the screws when using metal junction boxes (you do have the option to use a plastic junction box instead). When you are pushing all that stuff back in and something touches the metal, it will cause a spark and or shock so wrap well in electrical tape.
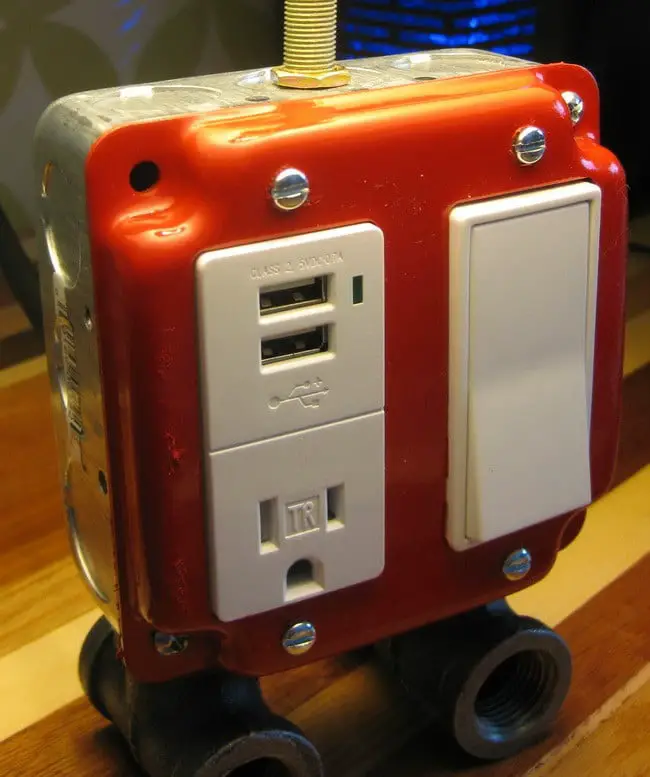
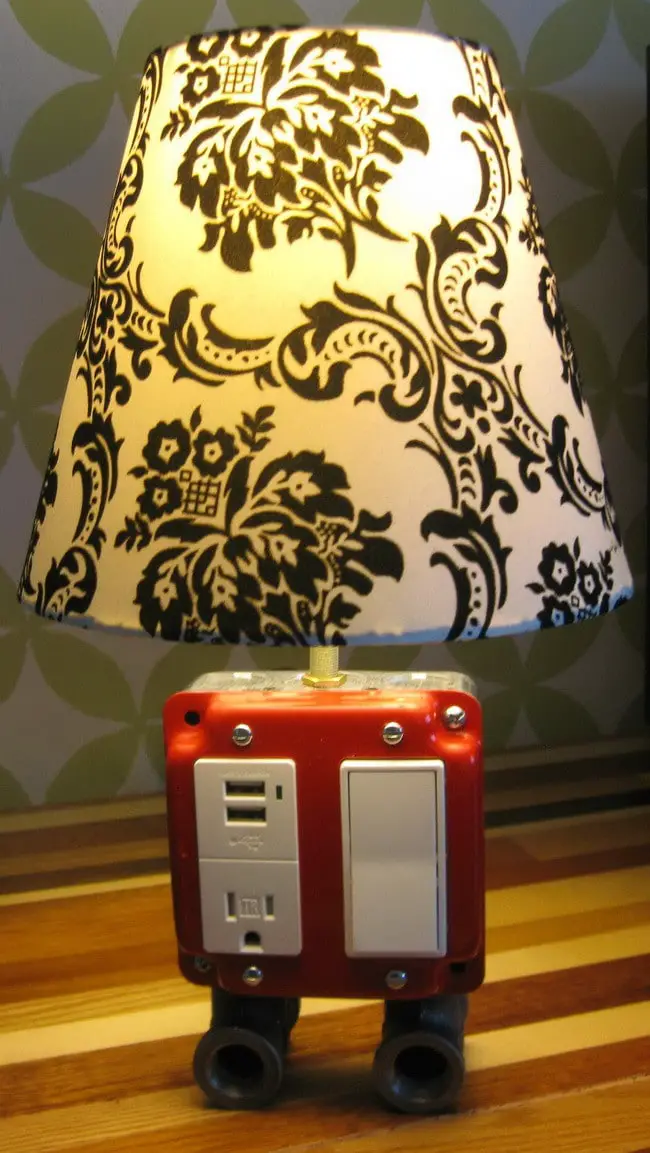
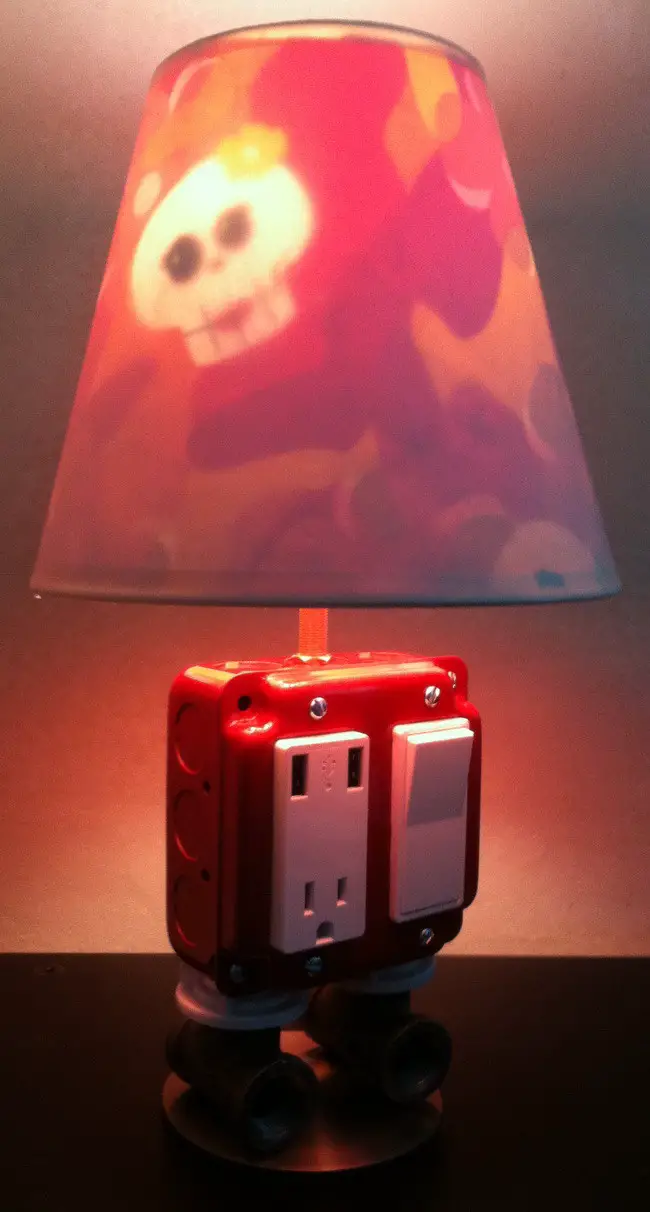
The above USB Charger/Lamp Combo was sent in by one of our readers.
They followed our plans and went a few steps further by creating a custom lampshade.
When off, the lamp shade is white. Turned on, the cool colors appear!
Also notice the bottom circular plate that the lamp stands on.
This adds for a better appearance and keeps the lamp sturdy.
(A special thanks to Mark Justin for sending this photo to us)
*** FOR THOSE HAVING ISSUES WITH WIRING – PLEASE SEE BELOW *** 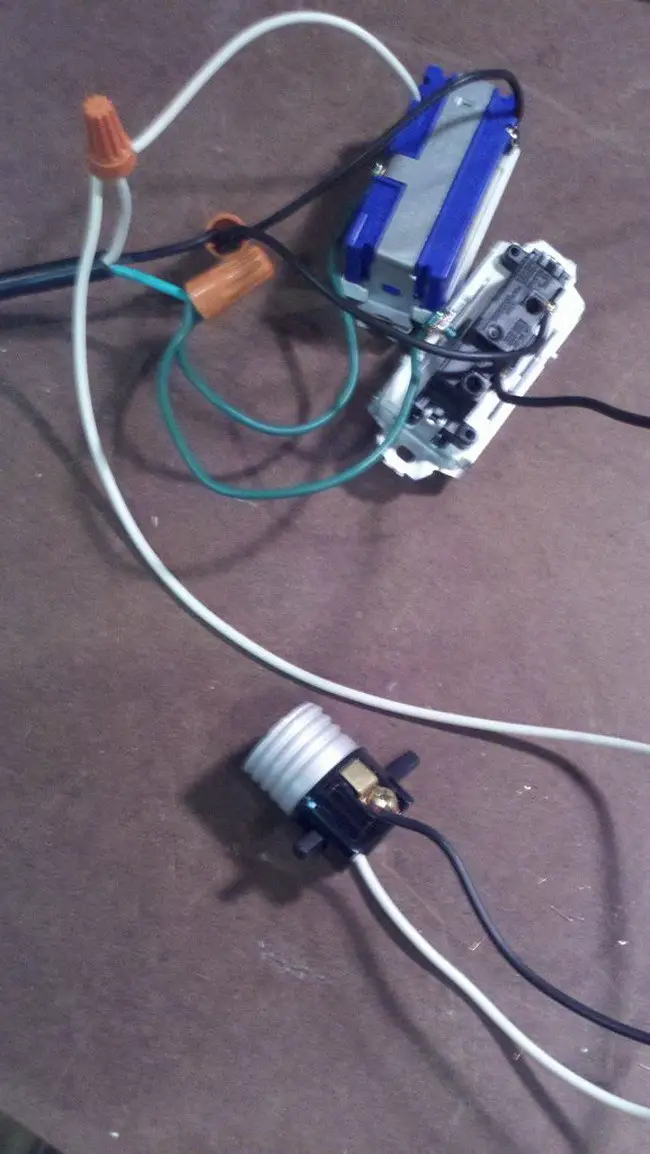
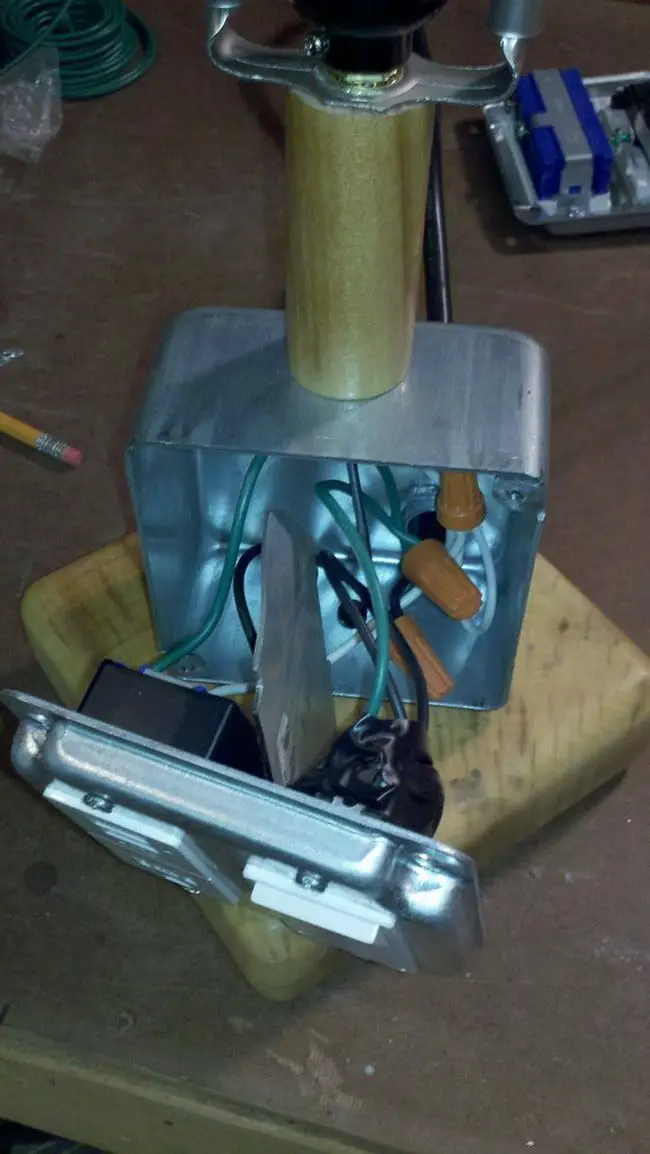
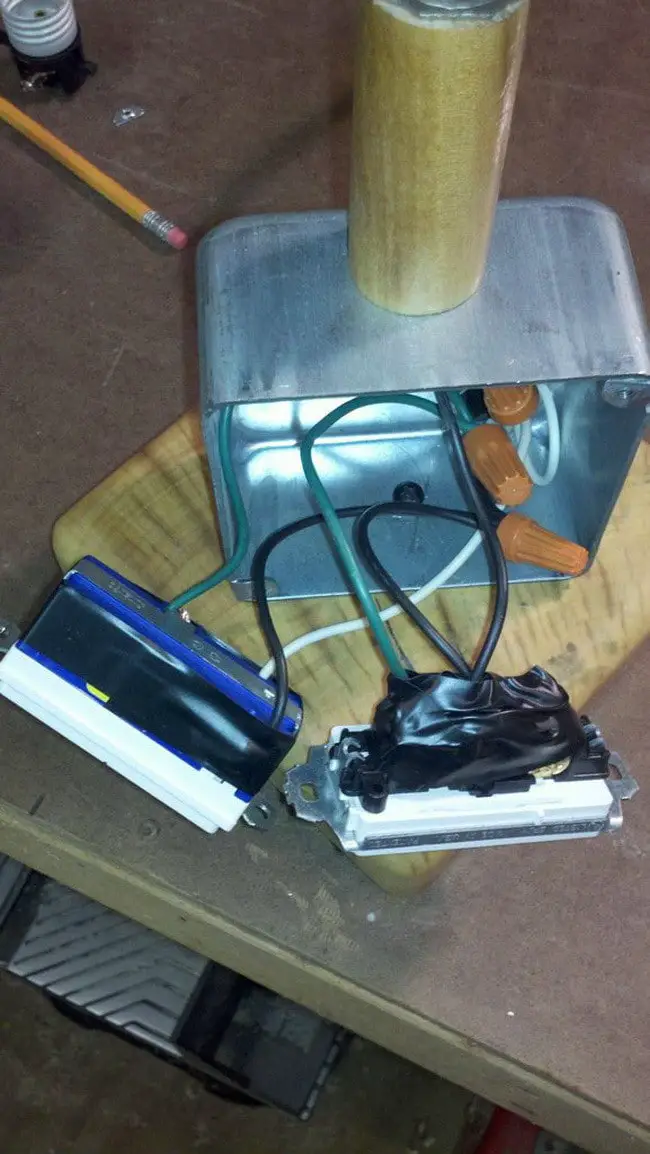




Since the outlet is rated for 15 amps, should I make sure the power cord is also rated for at least 15 amps? I’m having trouble finding anything rated higher than 10 amps.
You are using the switch to stop the electricity from getting to the lamp. The neutral wire does not carry electricity and should never be connected to the hot wire.
I am heading to Lowes this morning to get the parts to build this. I have been struggling with a gift idea for my niece, and I think this may be the ticket! Great tutorial with plenty of detail to make the build quick and painless.
Tony,
Amazon has all the lamp shade types and sizes.
-RR
Where can I get the lamp shade, what size?
Michel,
Here is the junction box cover you can find at any Lowe’s home improvement store.
-RR
Hi. I am having a tough time trying to find the double decora plate you show in the project. The one in the printable parts list photo is readily available, but I want to use the one in your project photos. They are not the same. Any chance you have a manufacturer name or part number for the one you used? Thanks! Great write up!
No, I bought a single 3-wire cord. After stripping the wires; two of them are white (hot/neutral) and one green. I didn’t know how to tell the difference between the hot and neutral but learned that the ‘smooth’ coated wire is hot and the ‘ribbed’ coated wire is neutral. Thanks for the reply!
Jenn,
So you bought 2 wires? One for main wiring and one for internal wiring? The 2 white wires are located where on your lamp? The switch or?
-RR
I began constructing this lamp today, and I just have one question. I bought a 3 wire cord to use as the main power cord and a small section for the wiring. After stripping the wires, I can see which one is the ground, but the other two wires are both white. How do I tell which one is neutral and which one is hot? Thanks :)
OMG that was a project. I loved the idea. My teenage girls love their new lamp. Some improvement would be to list a more specific parts list (size and quantity). I spent hours looking for parts at home depot and guessing what size parts to get. For example what size clamp connector to get. Choosing electrical wire was challenging. I have changed out switches in my house before and I have never used electrical cord on a switch. The wire from the electrical cord was just not hooking into the switch and did not look safe. So i used solid piece of copper wire for the outlet and the switch. FYI, check to make sure the switch fits in the junction box and that your lid is able to properly secure the switch and outlet into that box. I didn’t check and the project took longer than it should of.
This is great. I’m no electrician, but this looks like something I can do. I wouldn’t have that lampshade, though. I just clashes with the red. I’d get a solid primary color to go with, or just have a darker lampshade. I love this idea though, it’s so creative.
Matt,
Recheck your wiring. Should not be tripping breaker. Be sure you do not have wires touching bare metal sides of box. Most likely this is the case. If you used electrical tape to cover wire nuts, cut with a razor and be sure the proper wires are going where they should be. Do you have a ground wire? You need one.
-RR
I used a regular outlet and it keeps tripping the breaker. Does it have to be rated a special amp amount?
Mitchell,
My box did not have a built in lug/threaded hole on it to attached a ground wire, so I secured the stripped end of my ground wire between two of the plumbing fittings which hold the feet to the box. The wire is held snugly between them, effectively grounding all metal parts of the electrical box. Let me know if you need any more clarification!
Thanks,
Travis
Mitchell,
Some boxes have a threaded hole in it to add a ground wire.
-RR
How did you ground into the metal box without running a screw through your housing?
Kyle,
You may have used a box that is not wide enough to hold all wires and switches. What is the exact size of the box? Either that or possibly you used larger (wider, deeper) switches that we have in the example.
-RR
Im having troubles with my switches and plugs not fitting inside of the extended exposed cover and not fitting down inside the junction box? what do i do? or did i happen to grab the wrong size box and cover?
Shea,
It is only necessary to switch the “hot” wire, as this is where the electricity “flows” in from. Neutral is constantly hooked up to the lamp, and the hot is switched.
Why does the switch not need a neutral wire?
I used the same as in the above list but the wiring was weird I had to google a different set up
What gauge and amp did you use?
Half inch nipples is what I used and fit
I bought extra of the ones in plumbing due to those were locking washers and tighten down I out a addition washer in between just to make it flush
Thanks Rob! I do not know that I noticed that the article called for washers for the cord, as I am planning to simply run my cord through one of the tees at the base. I assume that you are just referring to standard washers to go over the threads of the pipe (probably 3/4″ or so)? Do you know which section of the hardware store I would look for these in? I assume the section with bolts and washers, and not the plumbing section, right?
Thanks,
Travis
Get extra of those washers for the cord and use it on the plumbing that’s what I did and it set good
I am having the same issue with the “wobbly legs,” due to the reducers not screwing far enough into the plumbing tees. When I get home today, I intend to use a hacksaw (or Sawzall) to cut down the threads on the reducers so that they are shorter and able to screw in fully. I’ve shortened bolts using this technique, so I assume it will work on these fittings. If I am successful, I will be sure to send in pictures of the process and finished product.
Thank you for this excellent tutorial!
–Travis
Nesto,
No, if you use a dimmer instead of a normal on/off switch, you won’t need anything extra. You will need to simply follow what the instructions say on the dimmer switch for specific wiring.
-RR
I just bought all the material for this project, but I was just wondering if I could replace the light switch with a dimming light switch. Would the wiring be any different?
I just built my lamp. The schematics and photos were a great help. Love it!
Sarah,
Yes ALWAYS use a grounded cord (3 prong) for obvious reasons.
-RR
This is a great idea ! Thanks for sharing it…
I bought a DIY lamp kit but the power cord is not grounded. Can I still use it or should I just get a grounded cord ?
COOL!!
TY for sharing!
I do not know if it is required for code, but I noticed tha you did the same thing I would do…
covering the wires with electrical tape. I started doing this years ago for safety reasons & I still do it today.
This is sweet! :)
Have to make me 1….or 3
Melanie,
All parts needed can be found at your local home improvement store in the “electrical” section, “lighting” section, and “plumbing” section. There are pictures on this page that show everything you need. Print the pictures or screenshot with your phone and take it with you to the store.
-RR
Do you have a more detailed parts list with sizes and quantities?
Is there any tutorials you have about making the white lamp shade that changes colors when on?
For those of us less handy, sounds like a fundraiser to me!!!
Hi Andrew,
We drilled a hole in the top of the gang box and put the threaded tube through the hole and secured it with a nut at the top and a nut at the bottom. Here is a picture to show you what we mean. https://removeandreplace.com/wp-content/uploads/2013/03/USB-Outlet-Lamp-Combo_3.jpg
-RR
Fantastic tutorial! I’m having trouble figuring out how you seated the lamp socket into the gang box though. The pictures don’t show you using the galvanized bushing or the other pieces shown in the original parts list and it doesn’t look like you knocked out the metal spacer. Hoping you can provide some guidance. Thank you!
Hi Mark,
We did have the same issue…. Simple Fix – We removed the legs and sanded them down an 1/8 inch. This creates a flat surface on the legs making the lamp sturdy and level.
Also, could you email us a few pictures of your lamp? We would like to see how you did. info (at) removeandreplace.com
Just built this little steam punk lamp/iPad charger/outlet and it is just plain C-O-O-L! My question is the legs. I used the 1/2 T and bushings as indicated, but the legs are really wobbly since the bushings don’t snug up into the T’s to make a tight fit. What’s the secret? What did I miss?
Thanks for the inspiration and creativity!
Mark.
Hi Colleen,
Yes we did paint ours. However some home improvement stores may have them already painted. If you choose to paint yours, make sure to use a good quality spray paint. The Rust-Oleum brand seems to be the best for spray painting over metal.
Thanks for the plans/idea…going to make one for my desk in my classroom/computer lab :-)
Did you find the junction box cover as is or did you paint it? Thanks!
Colleen
Hi Alex, Yes you need 4 more pieces of wire to hook up the outlets. Have a look at the wiring schematic above. (Or here https://removeandreplace.com/2013/03/03/build-a-lamp-combo-usb-charger-easy-fun-diy/wiring/ ) We actually cut about 5 inches of wire off of the end of the cord we bought and used that for the extra wiring. 4 pieces of wire – A small white wire (neutral) A small black wire (hot) and two green wires (ground). The black wire will go from the USB outlet directly to the switch. The white wire will get spliced from the USB outlet to the white wire. (2 small green wires used for the ground) The green wire will go from the green ground screw on the USB outlet to the green screw on the switch and then grounded into the metal housing box.
So I’m a little unclear about the wiring. If my brain is working correctly, you need some more wire. To span between the two plugs and to connect to the metal box and stuff? How do you put one wire from the cord, to two or three seperate spots?
So, how do I connect the wires to more than one spot? Do I need a little piece of wire to splice a few of the spots together?
Hi Bill, Yes feel free to email your lamp pictures to – info (at) removeandreplace.com
Once you or anyone else sends in a photo of your USB/Lamp Project, we will add it to the site for others to compare.
I actually purchased everything you have in the list to make this lamp myself… Do you have a way for me to show you the finished product when I’m done? I think it would be cool to compare your lamp with mine. And btw I found a better USB outlet that says 2.8 amps. This means you can actually charge 2 iPads at once! I bought it at home depot and was only $25 dollars.